Jackintosh Multidrive Emulation
Source code CHANGELOG Report BUG Build your image v1.0.0
Discover Jackintosh in depth at jackintosh.sidecartridge.com. Build your ROM image in the browser, follow the illustrated first steps with System 6.0.8, see every program tested, and take the tour of how an Atari becomes a Mac Plus, address by address. This page covers the microfirmware on the Multi-device.

Switch on your Atari. A Macintosh Plus comes up. In 1985 Jack Tramiel launched the Atari ST: a 68000, a mouse, a windowed desktop and a sharp monochrome screen, at a fraction of the Macintosh’s price. The press called it the “Jackintosh”. Forty years later the joke comes true.
The genuine Mac Plus ROM runs on the Atari’s own 68000: the happy Mac, System 6, the Finder and the software of 1986 to 1990, from disk images on a microSD card. No TOS, no emulator: from power-on, the Atari is the Mac.
Two parts work together:
- The Jackintosh ROMs (md-jackintosh-roms), built in your browser at jackintosh.sidecartridge.com from your own Mac Plus ROM. They take the place of TOS in the Atari’s ROM sockets, boot it as a Mac Plus, draw the disk menu and drive the cartridge port themselves.
- This microfirmware, on the Multi-device in the cartridge port. It reads and writes the Mac’s disk images on the microSD card, gives the Mac the time of day from an NTP server, keeps its parameter RAM, and stores the choices made in the menu.
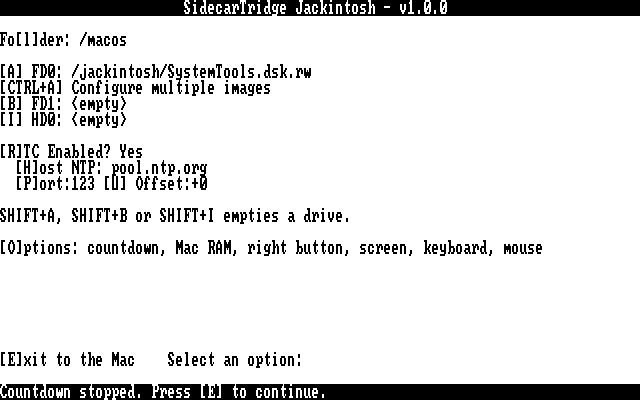 | 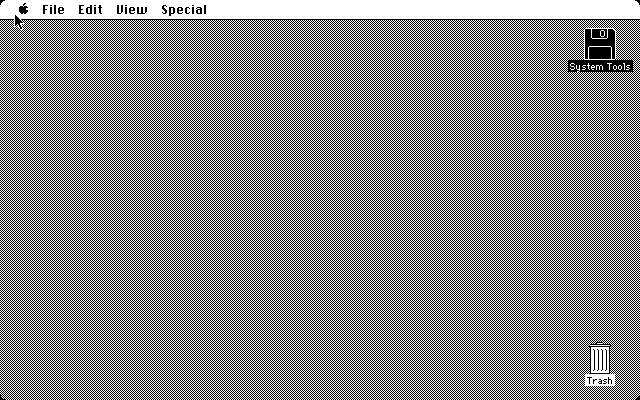 | 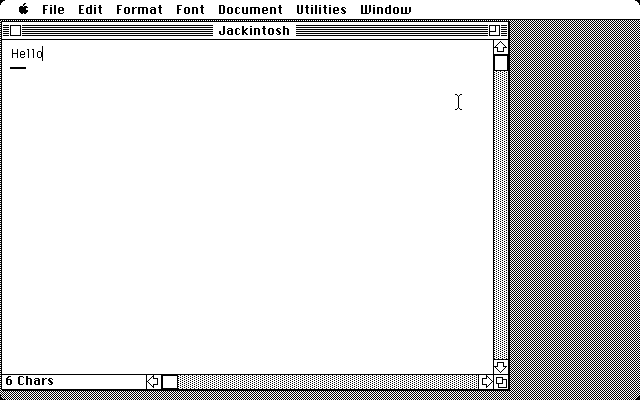 |
| The Jackintosh menu at power-on | The Finder | Microsoft Word 4 |
Bring your own Mac Plus ROM. Apple’s code is not included in the app, the ROMs’ source code or the website. The image builder needs your own Mac Plus v3 ROM (128 KB), and the image it makes holds Apple’s ROM: keep it for yourself.
Table of contents
🛡️ What you need
- An Atari ST, STF, STFM, Mega ST, STE or Mega STE with a monochrome monitor: an SM124, or any mono display.
- A SidecarTridge TOS Emulator in the TOS ROM sockets, to serve the Jackintosh image as the Atari’s ROM. You can also burn the image into EPROMs or EEPROMs and fit them in the TOS sockets instead of the TOS chips.
- A SidecarTridge Multi-device in the cartridge port, running this microfirmware, and its microSD card.
- Your own Mac Plus v3 ROM, the 128 KB file.
What you get: Apple’s own Mac Plus ROM, patched in place, at full Atari speed; 640x400 on the mono monitor, or the Plus’s 512x342 framed in black; up to 4 MB of Mac RAM; floppies and a hard disk from the microSD card; the clock from the network; sound on the STE and Mega STE, and the Mega STE at 16 MHz with its cache; US, French, German, Spanish and UK Atari keyboards.
🚀 Installation
The microfirmware
- Launch the Booster App on your SidecarTridge Multi-device.
- Open the Booster web interface.
- In the Apps tab, select “Jackintosh Multidrive Emulation” from the list of available apps.
- Click “Download” to install the app to your SidecarTridge’s microSD card.
- Once installed, select the app and click “Launch” to activate it.
After launching, the app runs every time your Atari is powered on.
The Jackintosh ROM image
- Open jackintosh.sidecartridge.com and go to Build your image.
- Drop your Mac Plus v3 ROM on the page.
- Choose your Atari: ST family (ST, STF, STFM, Mega ST, a 192 KB image) or STE family (STE, Mega STE, a 256 KB image).
- Click Build: the page checks your ROM, adds the Jackintosh glue and patches it, all in your browser. Then download the image.
- Add the image to the SidecarTridge TOS Emulator and make it the default image. See Upload a TOS image and Select the default TOS image in the TOS Emulator User Guide.
To go back to TOS, make a TOS image the default again: the Atari switches between the Mac and TOS without opening the case.
The app only works with the Jackintosh ROMs. On an Atari that boots TOS it shows a page inviting you back to Booster or on to the GEM desktop (see Without the Jackintosh ROMs).
🕹️ Usage
Every time the Atari boots with the Jackintosh ROMs, they show the Jackintosh menu for 20 seconds (or what the menu’s [C]ountdown option says). If no key is pressed, the Mac boots from the disks chosen in it. Any key stops the countdown; E then boots.
💾 The disks on the card
On first use, the microfirmware creates the folder /jackintosh on the microSD card. Put your Mac disk images there, in any subfolders you like, and choose them in the menu. Nothing is mounted until it is chosen: a drive with no image chosen stays empty.
| Unit | Mac drive | Images |
|---|---|---|
| FD0 | Internal floppy | Ten slots: slot 1 at every boot, the others stepped with SELECT |
| FD1 | External floppy | One image |
| HD0 | Hard disk | One image |
- Raw images (
.dsk,.img, …): the file is the disk, sector by sector. - DiskCopy 4.2 images, and MacBinary II files holding a DiskCopy 4.2 image (
.image.bin): always read-only. - A floppy is read-only unless its name ends in
.rw(in any case), as in the Drives Emulator:Word.dskis read-only,Word.dsk.rwis written. The hard disk is read-write, unless the file is read-only on the card. - The format is told from the content, not from the extension.
The Mac’s parameter RAM (the control panel settings, the time zone) is kept in /jackintosh/PRAM.BIN.
A hard disk image is a plain file on the card: copy it somewhere safe before big changes.
The Jackintosh menu
The menu is drawn by the Jackintosh ROMs; the microfirmware lists the card for it and keeps what you choose in the Multi-device’s flash, so the choices survive power cycles.
| Command | Description |
|---|---|
| Fo[l]der | Choose the folder the images are browsed from. By default /jackintosh. The browser starts from the root of the card. |
| [A] FD0 | Choose the image of FD0’s current slot. |
| [CTRL+A] | Configure up to 10 images for FD0. Slot 1 is the main [A] FD0 image; press 2..9 or 0 to choose slots 2..10, and SHIFT + 2..9 or 0 to empty a slot. |
| [B] FD1 | Choose the image of FD1. |
| [I] HD0 | Choose the hard disk image. |
| SHIFT+A, SHIFT+B, SHIFT+I | Empty FD0’s current slot, FD1 or HD0. |
| [E]xit to the Mac | Boot the Mac with the chosen disks. |
The menu shows each drive’s state: read-only, not mounted (the image cannot be opened), or a disk mounted that is not the one chosen.
Real-time clock
| Command | Description |
|---|---|
| [R]TC Enabled | Enable or disable the time of day from NTP. |
| [H]ost NTP | The NTP server to ask (default pool.ntp.org). |
| [P]ort | The NTP server’s port (default 123). |
| [U] Offset | The Mac’s time zone, kept in its parameter RAM. |
The Mac gets the time over the Wi-Fi network configured in the Booster App. The microfirmware serves UTC and the Mac applies its own time zone; until a server has answered, the Mac keeps its own clock. The RTC settings apply at the Multi-device’s next start: a power cycle of the computer or a reset of the Multi-device (the Atari’s reset button is not enough). With the RTC disabled, the Wi-Fi is not started at all.
Options
[O]ptions opens a page of the Jackintosh ROMs’ own options. Each key steps its option to the next value, and the options apply from this boot on. SPACE or ESC goes back to the main menu.
| Option | Values |
|---|---|
| [C]ountdown at boot | 30, 20 (the default), 10 or 5 seconds |
| [M]ac RAM | All of it (the default), 1024, 2048 or 2560 KB |
| [R]ight mouse button | Off (the default), Command-click or double-click |
| [S]creen | 640x400 (the default), or the Plus’s 512x342, centred |
| [K]eyboard (experimental) | US (the default), French, German, Spanish or UK |
| Mouse [T]racking | 1 (slowest) to 10 (fastest), 5 by default; SHIFT+T steps it down |
| Mega STE [P]rocessor | Only on a Mega STE: 8 MHz (the default), 16 MHz with the cache off, or 16 MHz with the cache on |
The file browser
| Key | Action |
|---|---|
UP / DOWN | Move up or down in the list |
LEFT / RIGHT | Previous or next page |
RETURN | Open a folder, or .. to go back to the parent folder |
SPACE | Choose the selected image, or the folder |
ESC | Leave the browser |
Names starting with . are not listed. A folder lists at most 256 entries, and paths longer than 95 characters cannot be chosen.
🔘 Changing floppies with SELECT
Once the Jackintosh ROMs have started, in the menu or in the Mac, a short press on the Multi-device’s SELECT button changes the disk in FD0:
- With FD0 empty (eject the floppy on the Mac first), the next slot that holds an image goes in, and the Pico W LED flashes the slot’s number. Empty slots are skipped, and after the last slot it wraps back to the first.
- With a disk in FD0, nothing happens: swapping a disk under a mounted Mac volume would corrupt it.
This is how multi-floppy installers work: queue the disks in FD0’s slots with [CTRL+A], and press SELECT each time the Installer asks for the next one.
Holding SELECT for 10 seconds is a factory reset: the global settings are erased and the Multi-device restarts into Booster.
💡 The LED
| LED | Meaning |
|---|---|
| Off, with short flashes | Working: it flashes on every access to the microSD card for the Mac |
| N short flashes | SELECT put FD0’s slot N in the drive |
| Blinking every 700 ms | No usable microSD card: none inserted, no FAT or exFAT file system, or the folder cannot be created. The Jackintosh ROMs show the reason. Insert a card and press SELECT |
🔁 Reset and power cycle
Pressing the Atari’s reset button shows the Jackintosh menu again and boots the Mac with the same disks. A floppy the Mac ejected (Restart and Shut Down eject them) is put back in its drive. FD0 goes back to slot 1.
After a power cycle the menu shows the last choices, with FD0 back at slot 1, and the RTC settings changed since the last start apply.
🚫 Without the Jackintosh ROMs
Launched on an Atari that boots TOS, the microfirmware has nothing to serve, so the cartridge shows a page that says so:
| Key | Action |
|---|---|
X | Return to the Booster menu |
G | Continue to the GEM desktop |
| any other key | Stop the countdown; then only X or G leave |
After 30 seconds without a key, it returns to Booster. The Jackintosh ROMs never run the cartridge’s code, so with them this page never appears.
🍎 First steps: System 6.0.8
The Mac needs a System. The First steps guide on the Jackintosh website walks through it with screenshots. In short:
- Download MacOS 6.0.8 US 800K and unpack it (7-Zip, The Unarchiver, Keka or
7z). You get four floppies. Copy them to/jackintoshon the card. - Switch the Atari on. In the menu press
A, pickdisk1.image.bin(System Tools), pressSPACE, thenE. The happy Mac, then the Finder.Controlis the Mac’s Command key. - For a hard disk, download the empty 20 MB volume Jackintosh-HD-20MB.dsk.zip, unzip it to
/jackintoshand choose it withI. Boot from System Tools and drag its System Folder onto Jackintosh HD. - Choose Restart, press
SHIFT+Ain the menu to empty FD0, thenE: the Mac starts from the hard disk.
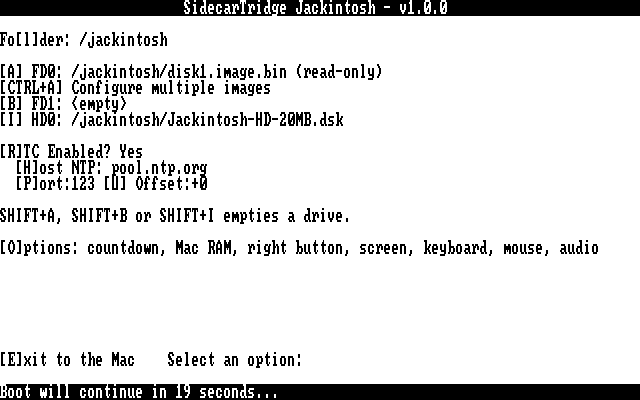 | 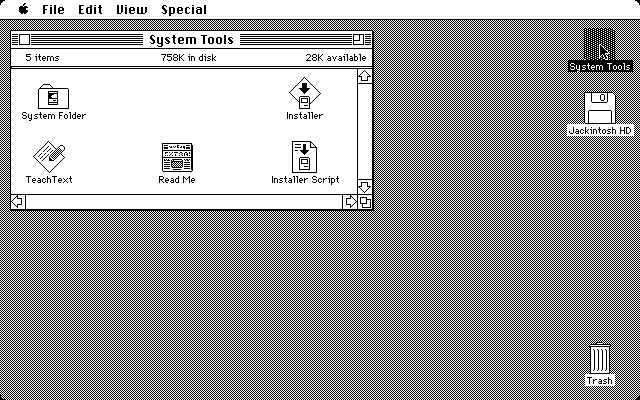 |
| System Tools in FD0, the hard disk in HD0 | Dragging the System Folder to the hard disk |
For the full System 6.0.8 (Keyboard, Mouse and Sound panels, MultiFinder and more), run Apple’s Installer with the floppies queued in FD0’s slots and stepped with SELECT. In the Installer, Easy Install finds no matching configuration: click Customize and choose System software for any Macintosh. The website’s guide shows every step.
🗂️ What runs
A Jackintosh is a Macintosh Plus with System 6.0.8 (or 6.0.7), a 68000, up to 4 MB and a monochrome screen. A program that needs a 68020 or Color QuickDraw fails as it fails on a real Mac Plus, and so does software that drives the Mac’s floppy chip directly (copy protections, disk copiers).
Tested and working, among others: Microsoft Word 4.0a, 5.0 and 5.1a, Excel 4.0, PowerPoint 2.01, Aldus PageMaker 3.5 and 4.2, ClarisWorks 1.0 to 2.1, MacWrite Pro 1.5, WordPerfect 3.0a, Acrobat Reader 1.0, THINK C, THINK Pascal, MPW, MacPaint, SimCity, Shuffle Puck, Lode Runner, Crystal Quest and Tetris.
The full, up to date list, with notes for each program, is on the Software page of the Jackintosh website.
⚙️ Advanced: microSD card speed
The microSD card speed is the SPI bus clock between the RP2040 and the card, from 1 MHz to 24 MHz; the default is 12.5 MHz. It is a global Multi-device setting, set in the Booster App: in its web interface, the Config tab, SD card bus speed (KHz) (for example 24000 for 24 MHz). Save it and relaunch the app. If you see instability, try 12500 or 6000.
🔧 How it works
The Jackintosh image is Apple’s Mac Plus ROM with about 35 KB of 68000 code in front of it, the “glue”. It starts the Atari, shows the menu, and then stands in for every Mac chip the Atari lacks: the timers, the clock, the keyboard, the floppy drive, the sound. The Multi-device answers the glue’s disk, clock and PRAM requests over the cartridge port.
The How it works tour on the Jackintosh website goes through it address by address, from power-on to the Finder.
🛠️ Setting Up the Development Environment
This project is based on the SidecarTridge Multi-device Microfirmware App Template. Build instructions are in the repository’s README, and the contract with the Jackintosh ROMs in its programming.md. For the Multi-device’s programming documentation, see the Programming Guide.
📄 License
This project is licensed under the GNU General Public License v3.0. See the LICENSE file for full terms.
Macintosh and Mac are trademarks of Apple Inc.; the Mac Plus ROM is Apple’s and is never part of this project.
🤝 Contributing
Made with ❤️ by SidecarTridge