Troubleshooting
This page is for board revision 3 (RP2350) with firmware v4.0.0. What changed in firmware v4.0.0 is marked with its label. For board revisions 1 and 2, see the firmware v2.x guide.
Table of contents
- The LEDs
- The
ROMEMULdrive - The Atari
- The SWITCHER
- “This version of SWITCHER tool is not compatible with the firmware of the device.”
- “The firmware and the SWITCHER app must share the same protocol version.”
- “This program requires 80 columns screen.”
- “No ROMs found. Do you have a Sidecartrige device configured?”
- “Error reading the flash page at address …”
- “Not enough memory to list the ROM images.”
- Cannot upload TOS images with names longer than 8 characters
- The rescue switcher
- TOS images and the
ROMEMULdrive - Errors ejecting the
ROMEMULdrive
The LEDs
The User Guide explains every LED. These three mean something is wrong.
The green and orange LEDs blink together, and the Atari does not start
v4.0.0
The firmware installed is for another board: a file with rp2350b in its name. The board stops before it can harm anything. Put it in BOOTSEL mode and install the rp2350a update file (Firmware installation); your TOS images are still there.
The green LED blinks on its own
The board has no TOS image it can serve: none has been chosen, or the default one is larger than the 512 KB the board can serve, and there is no usable rescue image either. Connect the board to your computer: it opens the ROMEMUL drive even in this state. Check that DEFAULT.TXT and RESCUE.TXT name files that are on the drive, then eject it.
The orange LED blinks on its own
The board could not read or write its drive. Unplug it and connect it again. If it keeps blinking, the drive may be damaged: copy what you can to your computer and install a full firmware file, which formats it again.
The ROMEMUL drive
The ROMEMUL drive does not appear on my computer
The board opens its drive only when a computer talks to it on the USB cable during the board’s first 2 seconds. Check, in this order:
- The cable carries data. Many USB-C cables only charge, and with those the board starts as if it were in the Atari. We cannot stress enough the importance of a good quality USB data cable.
- The board is plugged into a computer, not a charger or a powered hub without a computer behind it. Some USB hubs work, others do not: try a port on the computer itself.
- The Atari is switched off. If the Atari powered the board before the cable was plugged in, the board was already serving TOS and does not look for a computer any more. Switch the Atari off, or press
RESETon the board with the cable plugged in: it starts again and finds your computer.
If it still does not appear, check that the board answers in BOOTSEL mode:
- Hold down the
BOOTbutton on the board. - While holding it, press and release
RESET. - Release
BOOT.
Alternatively, with the board unplugged, hold BOOT, plug the USB cable in, then release BOOT.
If the RP2350 drive appears, the board and the cable work: install the firmware again (Firmware installation). If not, try another cable and another computer.
The ROMEMUL drive is not mounted again after ejecting it
That is expected. After an eject the board rebuilds its list of TOS images, then waits with its green and orange LEDs off until it is unplugged. To open the drive again, unplug the board and plug it in, or press RESET on the board.
v4.0.0
A REBOOT file on the drive now makes the board start serving TOS to the Atari after the eject, with the cable still plugged in; before firmware v4.0.0 it opened the drive again. See Magic file names.
Files I copied do not appear, or are not stored correctly
Computers keep part of what they write to a USB drive in memory, and write it out later. Always eject the ROMEMUL drive when you finish: the eject writes everything out, and it is also when the board rebuilds its list of TOS images.
INFO.TXT still shows the old version after an update
The board writes INFO.TXT only when the drive has none, so an update leaves the old one. Delete INFO.TXT, eject the drive, and connect the board again: it writes a new one with the version installed.
The board does not respond to the RESET or BOOT button
Small buttons can stop responding because of dust, grease or flux. Put a little isopropyl alcohol (IPA) on the button, press it several times while it is wet, and let it dry.
The Atari
The Atari does not start with the board installed
- Unplug the USB cable. If a computer is on the cable when the board powers up, the board opens its drive and the Atari does not start. Unplug the cable, or eject the drive with a
REBOOTfile on it (Magic file names). - Look at the LEDs: see The LEDs above.
- Start the TOS image the board came with. Write its name in
DEFAULT.TXT(for exampleEmuTOS 1.4.0 192KB - English UK - 50Hz.IMG) and eject the drive. If EmuTOS starts, the problem is in the other image. - Check the image size: 192 KB for the ST and Mega ST, 256 KB for the STE and Mega STE. A 256 KB image does not start on an ST motherboard without the 256 KB decoder.
- Start the rescue switcher with the RESCUE button and run its self-test (
T): it checks every connection between the Atari and the board. See ROM Rescue Switcher.
The Atari starts, but crashes or shows a garbled screen with a TOS image that works elsewhere
Run the rescue switcher’s self-test and its 30-second soak test: errors there point to a loose contact or a timing problem. If they pass, try other READ_BUS_TICKS values (Advanced Settings). On an accelerated Atari, try ACCELERATED_BUS = 1.
The SWITCHER
“This version of SWITCHER tool is not compatible with the firmware of the device.”
v4.0.0
This is SWITCHER 3.1.0 on a board with firmware v4.0.0 (SWITCHER 3.0 says “This version of SWITCHER.TOS is not compatible with the firmware of the device.”). Replace it with SWITCHER 4.0.0: on the ROMEMUL drive, and on the floppies or hard disk you run it from.
“The firmware and the SWITCHER app must share the same protocol version.”
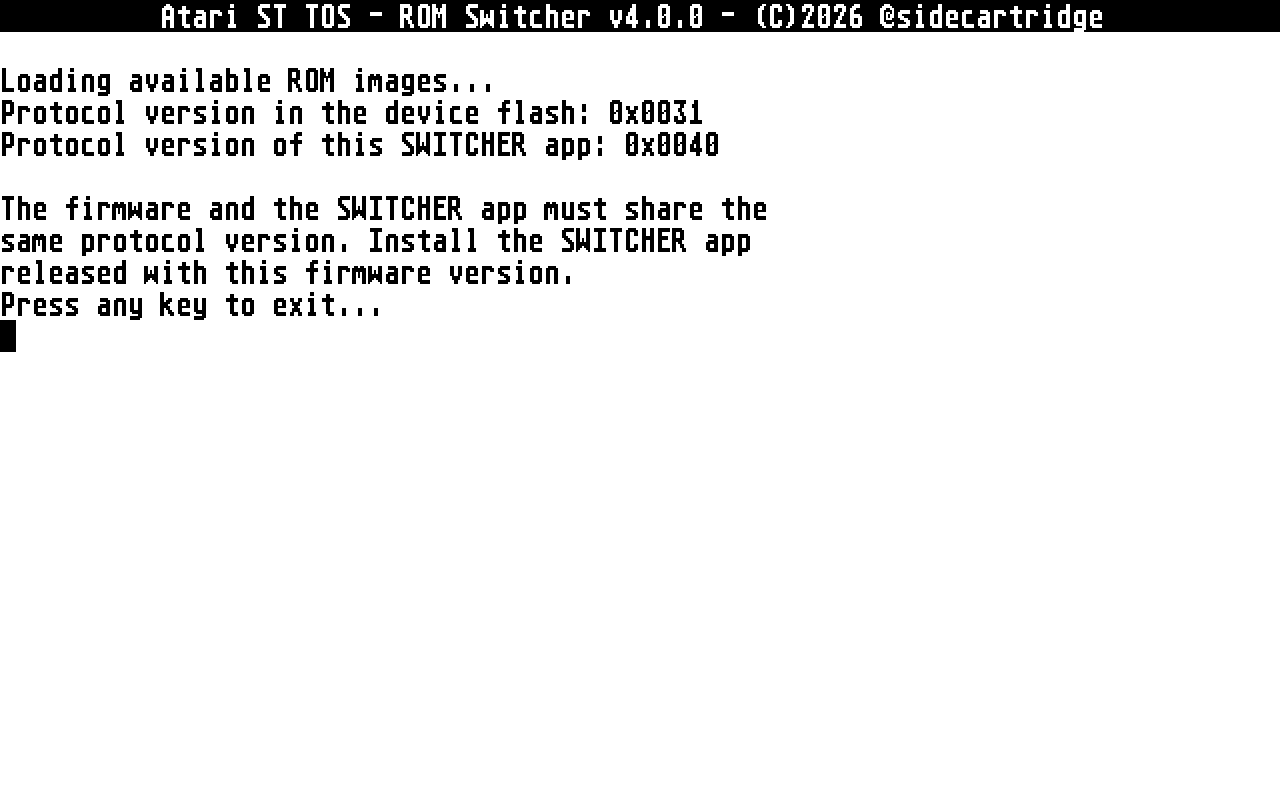
SWITCHER 4.0.0 shows this, with the two version numbers, when the board runs an older firmware. Update the board to firmware v4.0.0 (Upgrading to v4.0.0), or use the SWITCHER that came with the firmware it has.
“This program requires 80 columns screen.”
The SWITCHER needs medium resolution on a colour monitor, or high resolution on a monochrome one. Change the resolution from the desktop and run it again.
“No ROMs found. Do you have a Sidecartrige device configured?”
The board has no TOS images, so there is nothing to list. Copy at least one image to the ROMEMUL drive from your computer first.
“Error reading the flash page at address …”
The SWITCHER cannot talk to the board. Check that the board is well seated in the sockets and runs firmware v4.0.0, and run the rescue switcher’s self-test.
“Not enough memory to list the ROM images.”
The Atari is short of free memory. Start it without the programs in the AUTO folder and without desk accessories, and run the SWITCHER again.
Cannot upload TOS images with names longer than 8 characters
The Atari’s own file names are 8 characters and a 3-letter extension, so an uploaded image keeps a short name. Rename it in the SWITCHER afterwards (R), or copy it to the ROMEMUL drive from your computer with the name you want.
The rescue switcher
“The SidecarTridge does not answer commands”
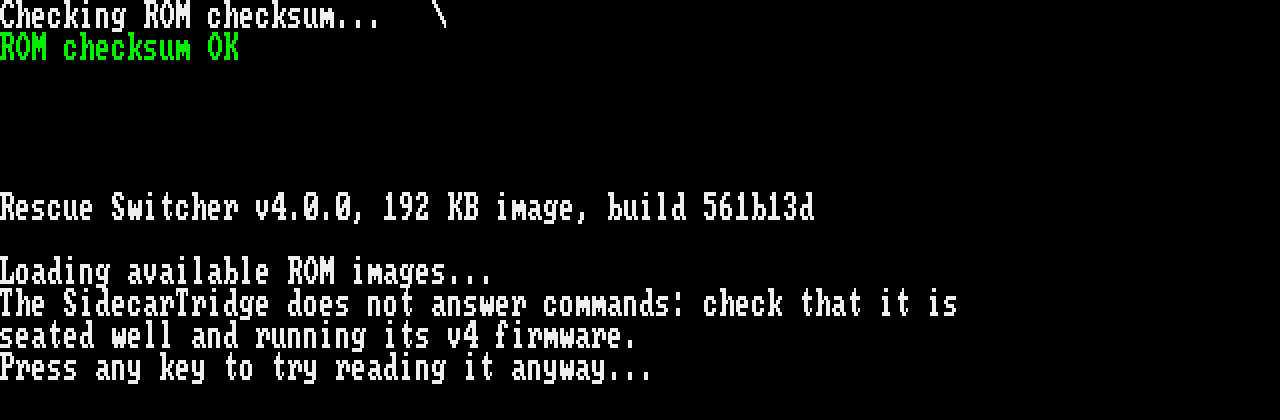
The rescue switcher started, but the board does not take its commands. Check that the board is well seated and runs firmware v4.0.0. A key tries anyway; if that fails too, it stops with “Error reading the flash page … Exiting.”: switch the Atari off.
The rescue switcher says it is not compatible
- “This version of SWITCHER tool is not compatible with the firmware of the device.” is the rescue switcher 3.1.0 on firmware v4.0.0. Copy the rescue switcher 4.0.0 to the drive and name it in
RESCUE.TXT(Upgrading to v4.0.0). - “This rescue switcher is not compatible with the device’s firmware.” is the rescue switcher 4.0.0 on an older firmware: update the firmware.
After either message, switch the Atari off: the key leads nowhere.
“ROM checksum FAIL”
The rescue switcher’s image on the drive is damaged, or is not the published file. Copy it again from the downloads page and eject the drive.
Nothing happens after “Press any key to exit…”
Switch the Atari off: the rescue switcher has nothing to go back to. Fix the cause the message gave, and switch it on again.
The image I chose in the rescue switcher is no longer the default
v4.0.0
An image chosen in the rescue switcher is the default until the ROMEMUL drive is next ejected. The board then takes the default from DEFAULT.TXT again. To keep it, select it in the SWITCHER too, or write its name in DEFAULT.TXT.
TOS images and the ROMEMUL drive
Images copied to the drive do not appear in the SWITCHER
Eject the drive after copying: the eject is when the board adds them to its list.
Images copied in an earlier session appear after an upload from the SWITCHER
An upload from the SWITCHER rebuilds the list too, so it picks up images copied to the drive that were never ejected.
Editing DEFAULT.TXT or RESCUE.TXT has no effect
The board reads them when the drive is ejected. Save the file, then eject the drive.
After editing DEFAULT.TXT or RESCUE.TXT, the board starts the first image of the list
The name in the file does not match any image exactly. Check the spelling and the extension: the name must be exactly the file’s, up to 63 characters.
Errors ejecting the ROMEMUL drive
My computer returns an error when ejecting the drive
A program is probably still using the drive. Close every program that may have it open, and try again. Also check:
- Third-party tools and drivers: on Windows especially, some utilities and antivirus programs fill removable drives with hidden files. Disable them for the
ROMEMULdrive. - The USB-C cable: try another one that carries data.
- USB hubs: some work with the board and others do not. Try a port on the computer itself, or another computer.
Can’t change the RESCUE and DEFAULT/ACTIVE images from the host computer
The default image is the one the Atari starts. Change it with the SWITCHER, or in DEFAULT.TXT on the drive.
The rescue image is your way back when nothing else starts, so it can only be changed in RESCUE.TXT on the drive; the SWITCHER cannot change it. With firmware v4.0.0, keep the rescue switcher 4.0.0 there: it can start any of your images.
Firmware v3.x only. Older guides described a way to change the rescue image from the SWITCHER:
- Edit
RESCUE.TXT. - Unplug the board without ejecting.
- In the SWITCHER, rename the new image to its own name.
Firmware v4.0.0 does not need it: edit RESCUE.TXT and eject the drive.