User Guide
v2.2.0
Table of contents
Booster Manager Mode
What is the Booster Manager Mode?
The Booster Manager Mode is a new feature introduced in the SidecarTridge Multi-device firmware version 2.0 . It allows users to manage microfirmware apps on the device through a web interface, making it easier to install, launch, and manage apps.
Thanks to the Booster Manager Mode, users can now easily manage microfirmware apps on the SidecarTridge Multi-device board. This mode is designed to simplify the process of installing and launching apps, providing a user-friendly web interface accessible from any device connected to the same WiFi network. As a side effect, it also helps developers to build their own microfirmware apps and test them on the device without needing to integrate with the main firmware.
In Manager mode, the Booster app will automatically connect to your configured WiFi network and will automatically connect to the public repository of microfirmware apps, displaying them in the web interface. The web interface is accessible from any computer or mobile device connected to the same WiFi network as the Booster app.
Starting with Booster v2.1.0, if Wi-Fi negotiations fail the Manager falls back to an offline-safe mode: the Atari ST terminal remains active so you can still boot the microfirmwares that are already downloaded. Press ESC on the terminal to enter the apps workflow, or hold any SHIFT key to keep booting from GEMDOS without touching the web UI.
If your DHCP network supports a DNS with .local domains, you can access the web interface using http://sidecart.local. Otherwise, use the IP address assigned by your DHCP server and visible on your computer screen.
The Atari ST Manager screen and the shared web status banner also show live Wi-Fi signal strength and the Pico W MAC address, and Booster replies to ICMP ping requests while connected so network troubleshooting is easier.
Note: The device needs a SDHC or SDXC microSD card formatted with exFAT or FAT32 file system to work properly. The app will warn the user if the microSD card is not present or not formatted correctly.
Apps view
The Apps view shows:
- The list of installable apps from the public repository.
- The list of installed apps on the device.
- The list of apps that are not installed but are available on the microSD card.
This view is the default view when you access the web interface. At the top of the Apps page, the Catalog channel selector lets you switch quickly between the Stable and Beta catalogs. Below it, the Platform and Features filters let you narrow the catalog dynamically without scrolling through every entry. While the catalog is being fetched, the page shows a loading indicator.

Each app shows the following information:
- Name: The name of the app.
- Version: The version of the app.
- Description: A short description of the app.
- Features: A list of features supported by the app as a taxonomy.
- Computer: The computers supported by the app as a taxonomy.
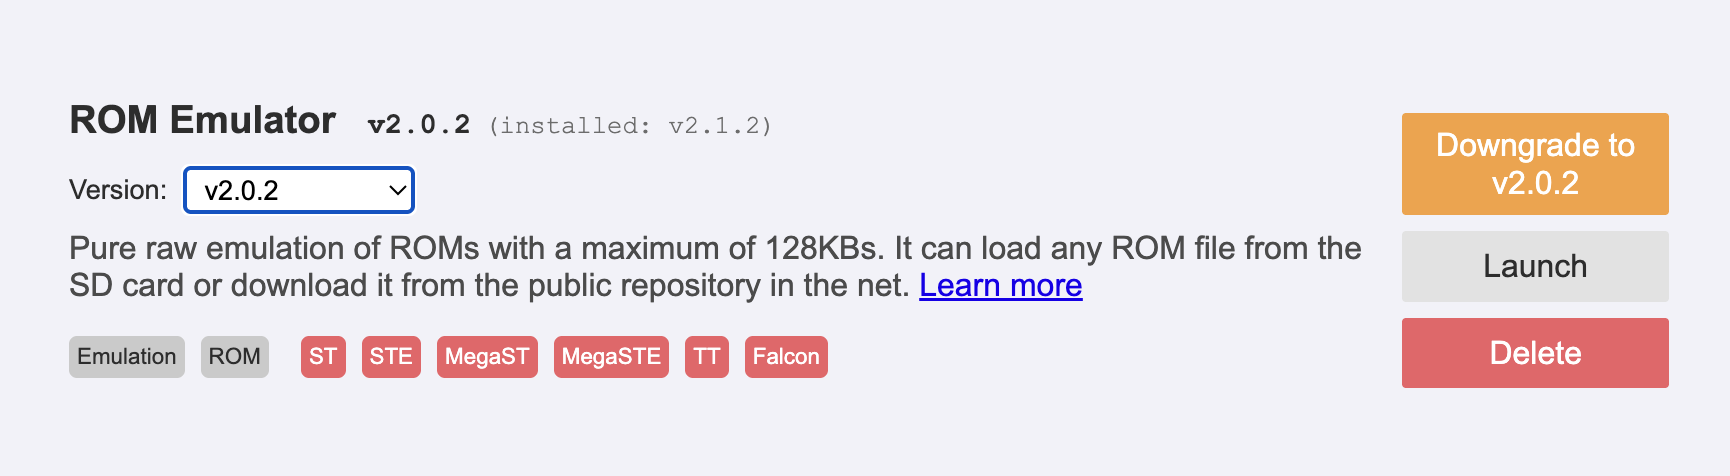
When the catalog exposes more than one version of a microfirmware, the app card also shows a Version dropdown. The newest version is selected by default. If older versions are still published in the catalog, you can choose one of them to install or roll back to it. When the selected version is not the one currently installed, the card also indicates which version is already present on the device.
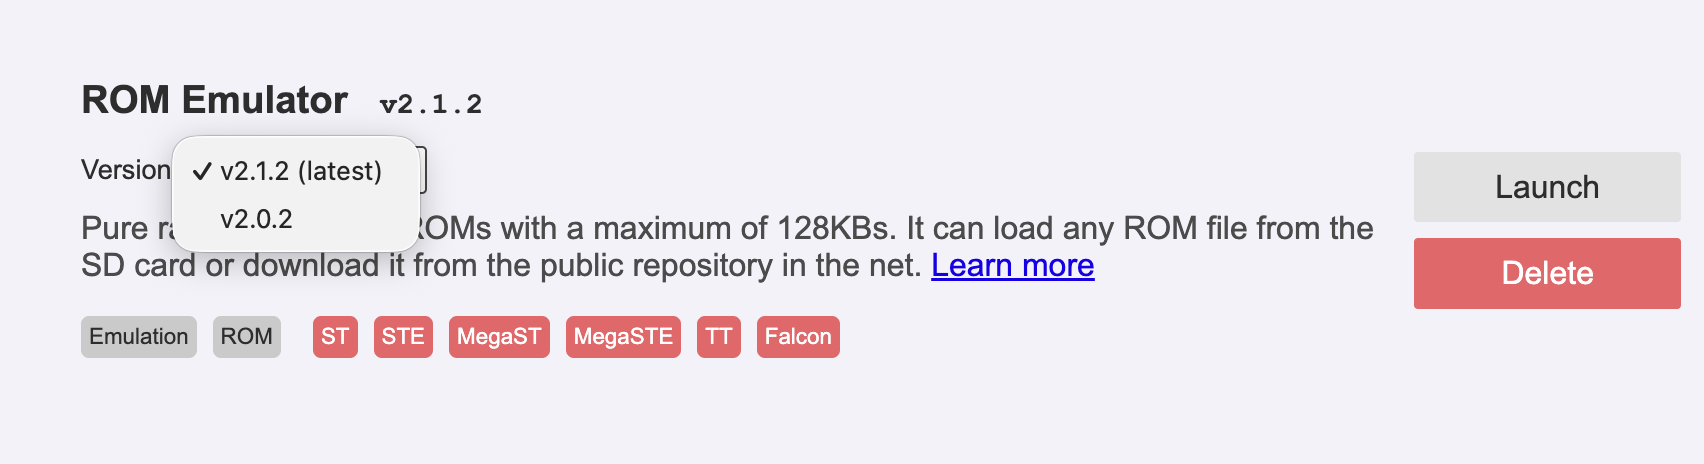
At the right hand side of each app, you can see the following buttons:
- Install / Update / Downgrade: A single context-aware action button downloads the selected version from the public repository to the microSD card. The label changes depending on whether the selected version is new, newer than the one installed, or older than the one installed. Downgrading to an older version requires an explicit confirmation step.
- Delete: Delete the app from the device microSD card. You can download the app again if you want to.
- Launch: Launch the installed app. This will install the selected app in the flash memory of the device and after reboot it will be launched automatically. If you want to launch an app that is already installed, you can use the Launch button at any time.
When launching an app, the computer screen will show a message indicating that the app is being launched. The Booster app will make its best effort to also reboot the computer, but this may not always be possible. So assume that the computer is not rebooted and you need to do it manually.
When the ST keyboard is handy you can also press ESC to open the terminal-driven apps workflow or hold SHIFT to continue booting from GEMDOS. That manual launcher works even if Wi-Fi is unavailable, so any microfirmware already downloaded remains usable in offline scenarios.
The Booster microfirmware app is now installed in the flash memory of the device, and every time you power on the device, it will automatically launch the app.
To return to the Booster app, the user needs to use the command menu on the microfirmware app to do it, or press the SELECT button for more than 10 seconds and then power off and power on the device and the computer.
Network view
The Network view shows the list of available WiFi networks and permits some basic network configuration options:
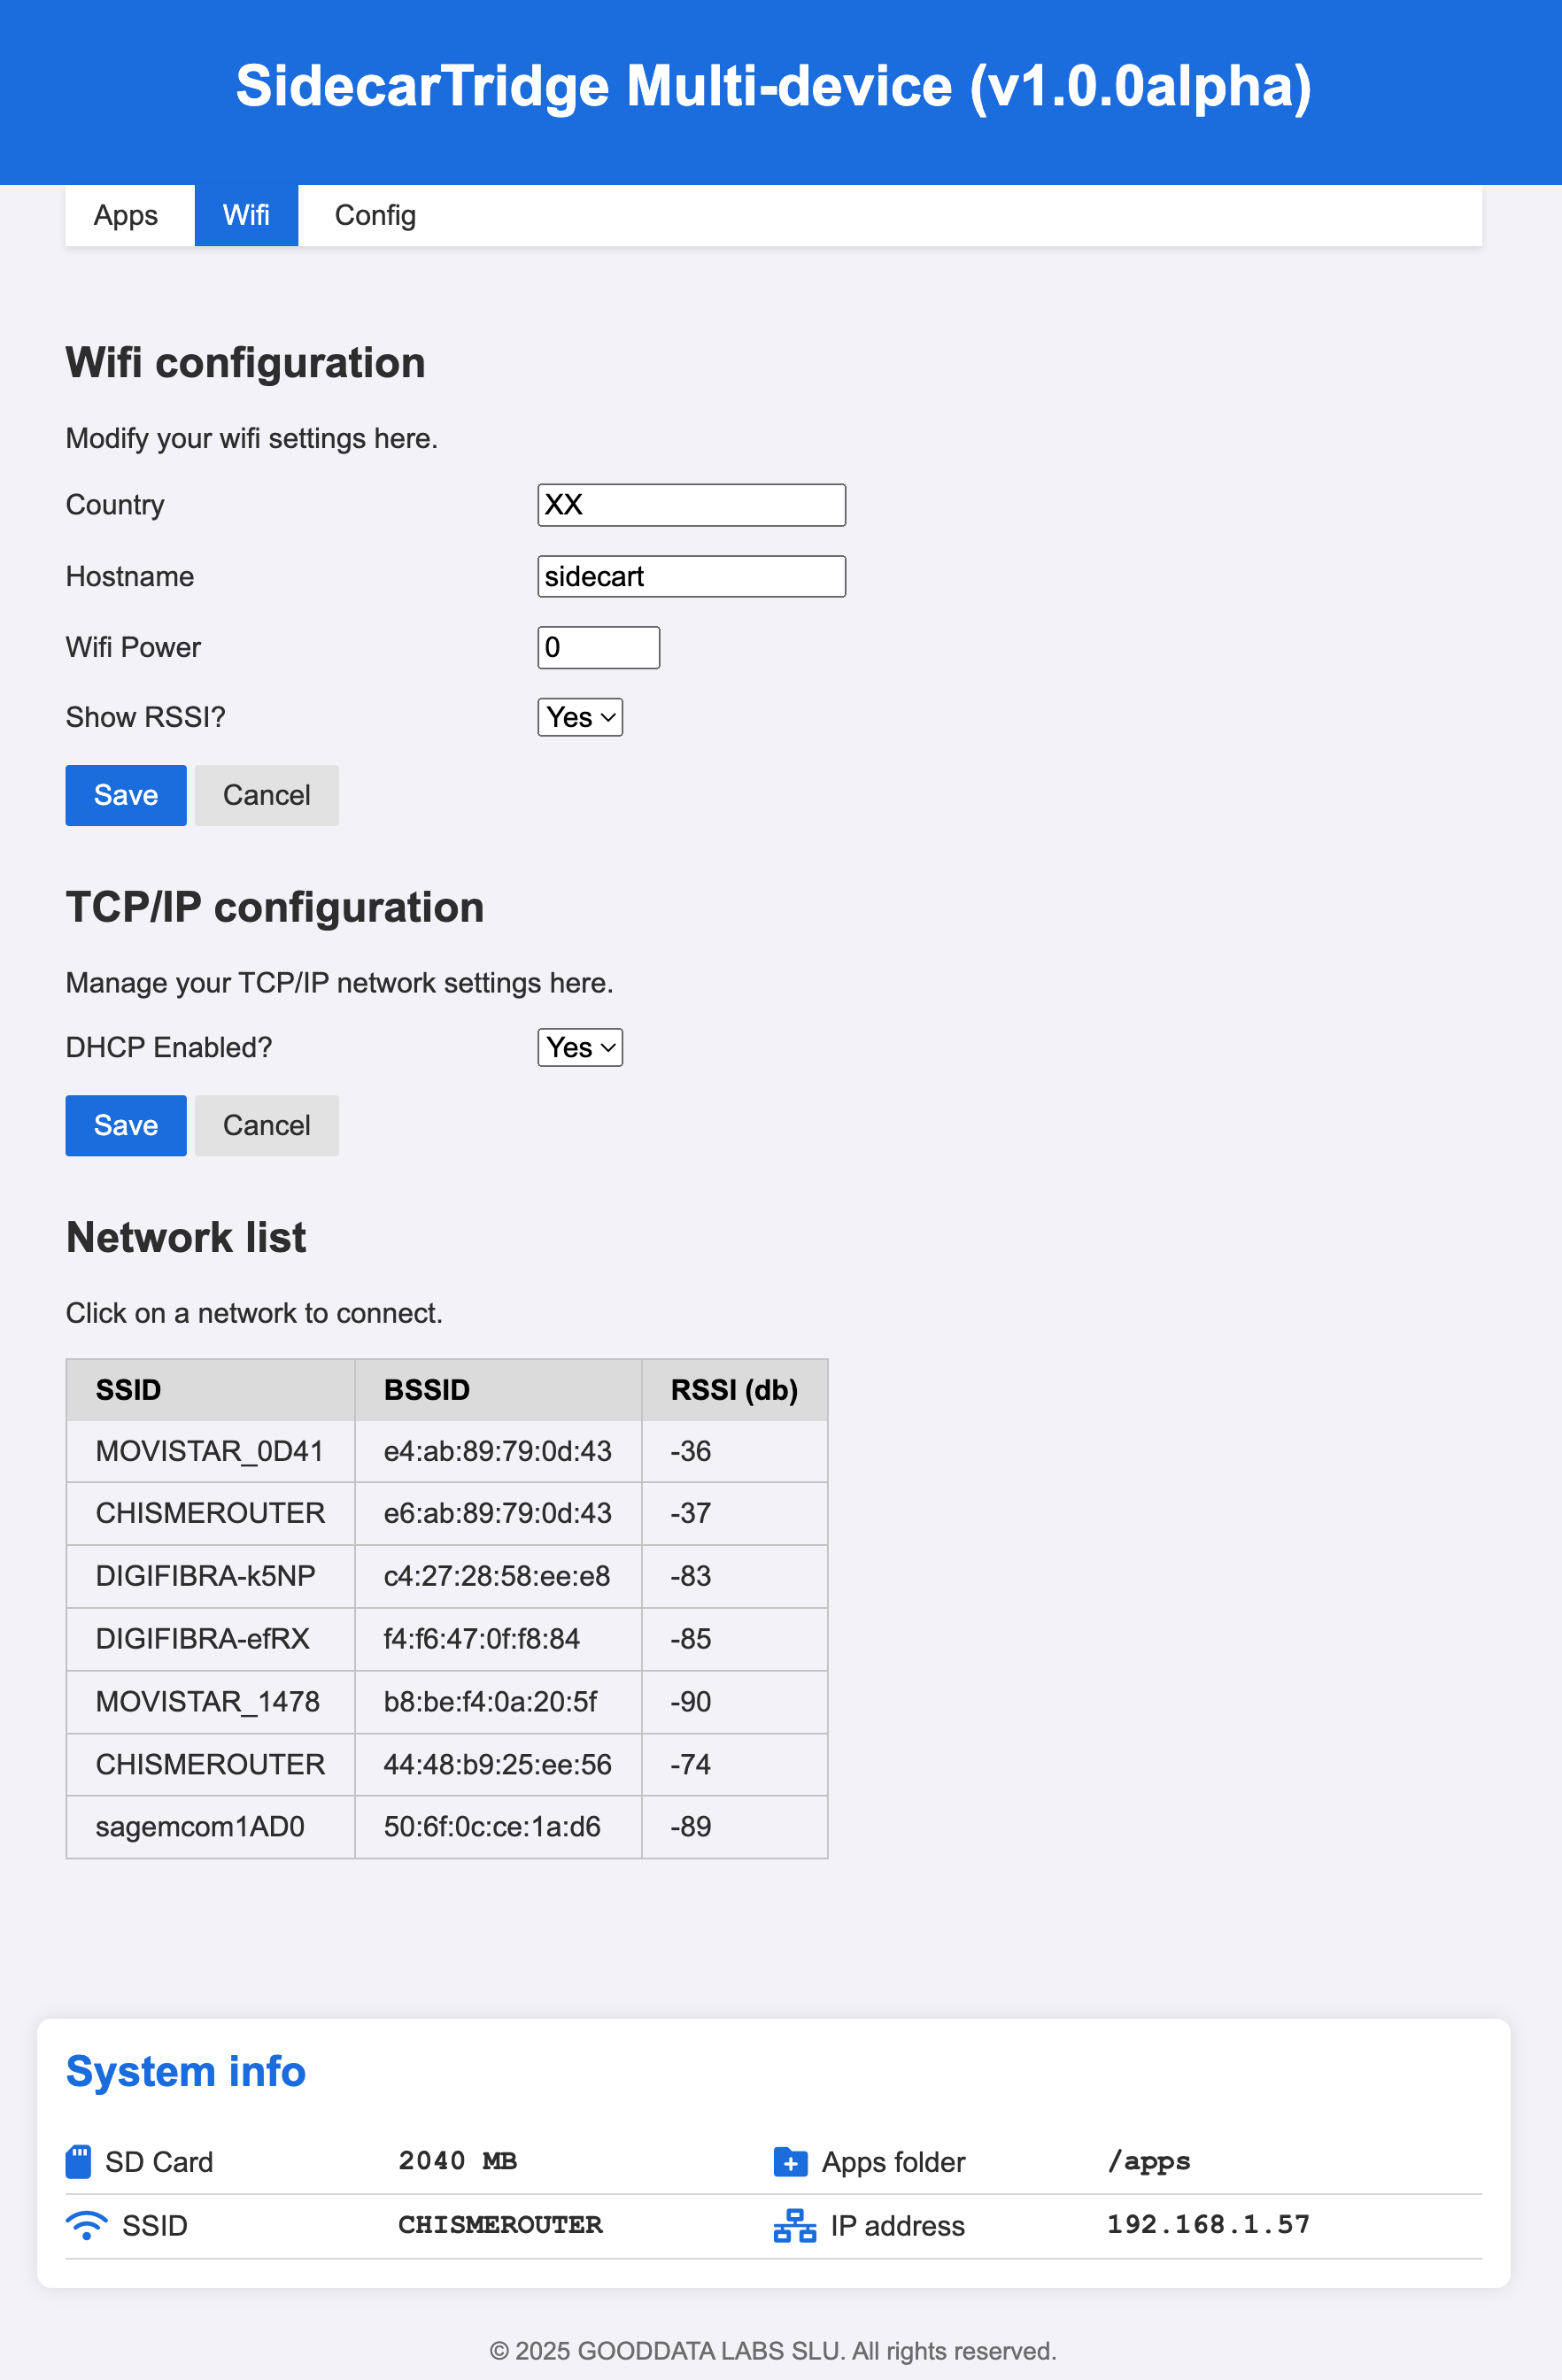
- Country: The country code of the WiFi network. This is used to configure the WiFi module to use the correct channels and frequencies.
- Hostname: The hostname of the device. This is used to identify the device on the network. By default is
sidecart. - Wifi Power: The power of the WiFi module. From 0 to 4.
- Show RSSI: Show the RSSI value in dBm for visible WiFi networks. This helps estimate signal strength and connection stability.
- DHCP Enabled: Enable or disable DHCP on the device. When disabled, the TCP/IP settings view lets you enter a static IPv4 address, netmask, gateway, and DNS servers.
When Show RSSI is enabled, the device can show the RSSI value of nearby WiFi networks. As a general reference, use the first matching threshold in the table below.
| RSSI Value (dBm) | Signal Strength | Probability of Good Connectivity |
|---|---|---|
>= -30 dBm | Excellent | Very high |
>= -40 dBm | Very good | High |
>= -50 dBm | Good | Good |
>= -60 dBm | OK | Usually good |
>= -67 dBm | Minimum for stable WiFi | Acceptable |
>= -70 dBm | Weak | Borderline |
>= -80 dBm | Very weak | Low |
< -80 dBm | Almost unusable | Very low |
Below -80 dBm, the signal strength is considered weak and can lead to connectivity issues. The board may fail to connect to the selected WiFi network, lose the connection intermittently, or take longer to obtain an IP address from DHCP. Monitoring RSSI values helps you identify networks with stronger signals and connect to more reliable WiFi networks.
Don’t forget to click the Save button to save the changes!
It’s also possible to change the WiFi network. To do this, click on the new WiFi network from the list. A new window will open with the WiFi network details. Enter the password and click the Connect button.
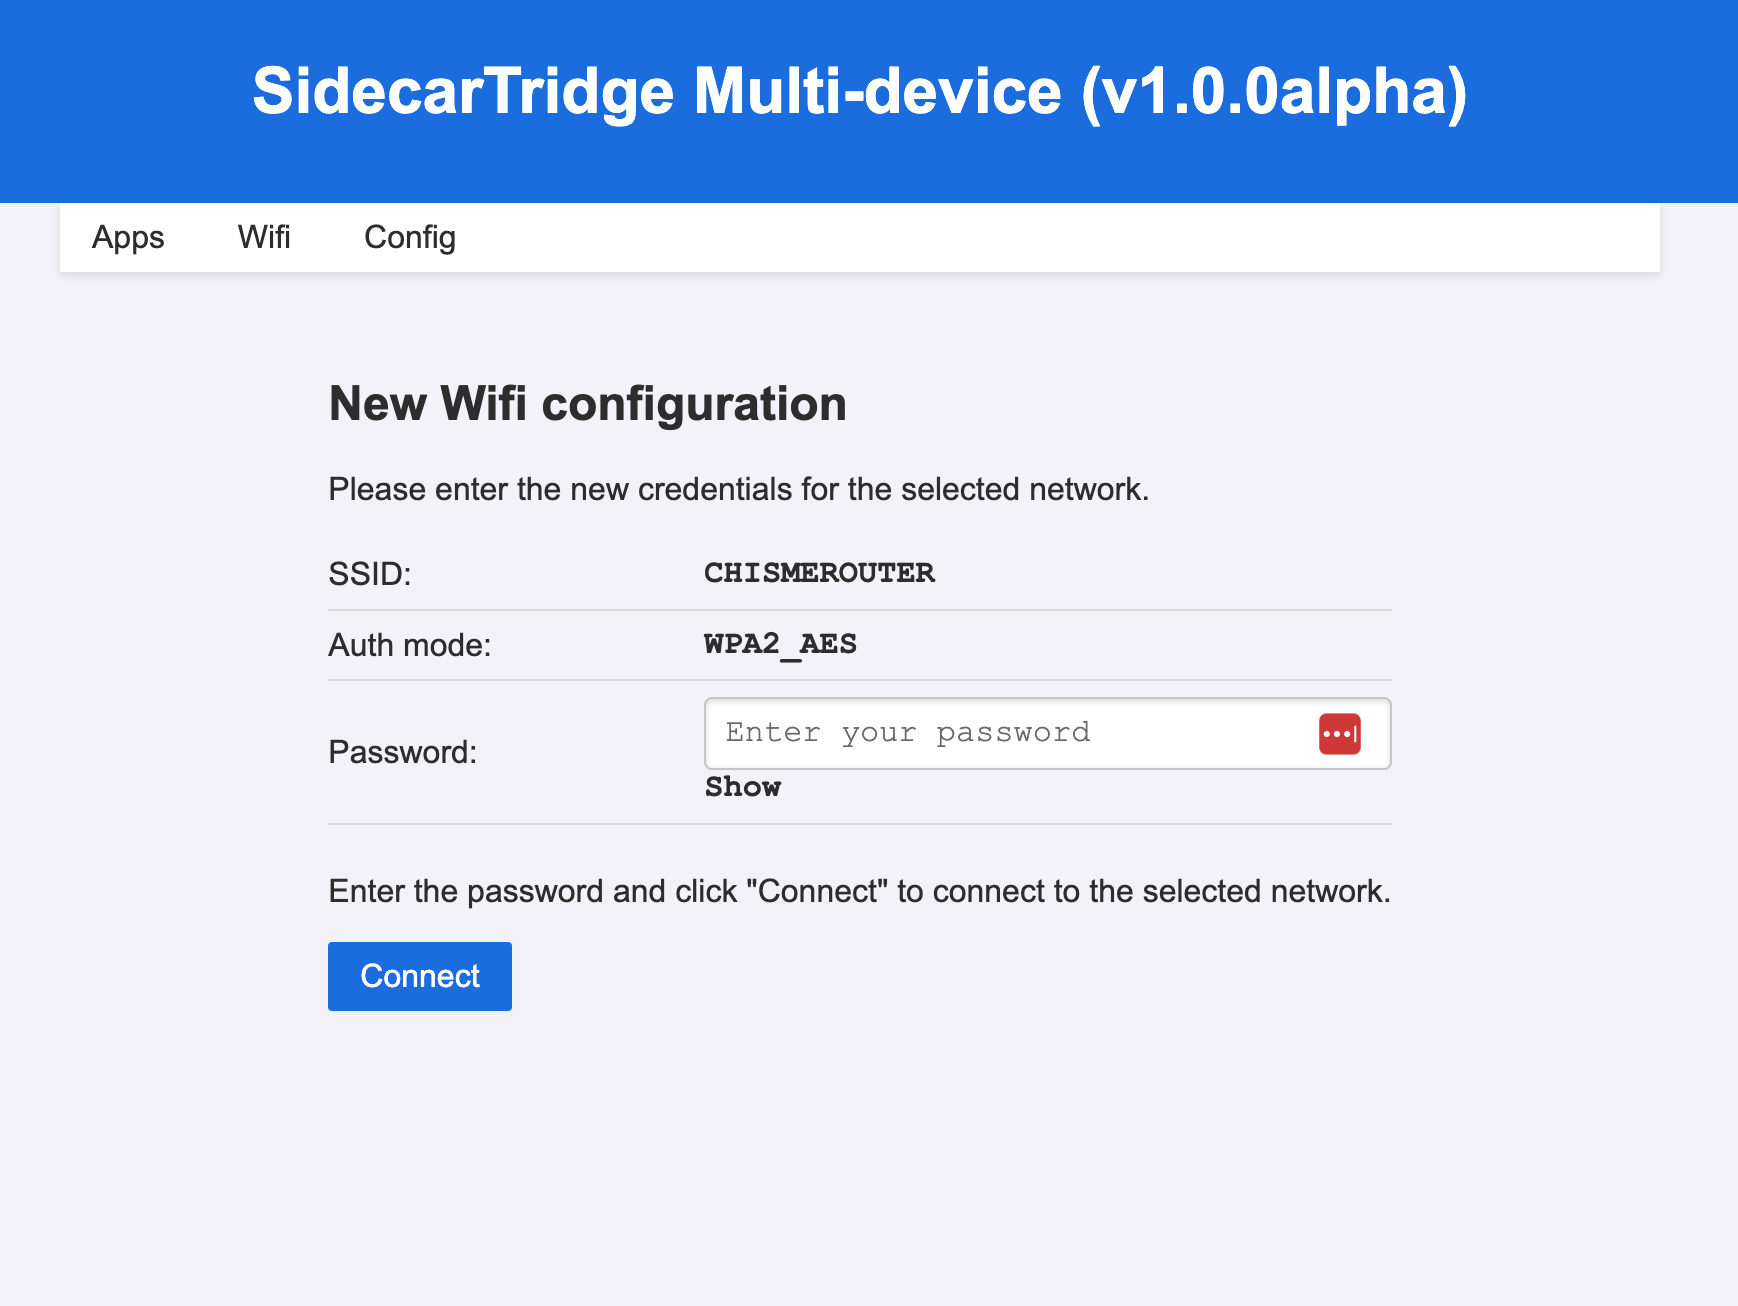
The Booster app will save the WiFi credentials to flash memory and reboot. It will then connect to your WiFi network and show a message on the computer screen.
Note: If the Booster app is not able to connect to the WiFi network, Starting with Booster v2.1.0 the Manager will stay in offline mode so you can still launch already-downloaded apps from the keyboard. Only press the SELECT button for ten seconds (to return to Factory mode) if you actually need to reconfigure Wi-Fi from scratch.
Device view
The Device view shows the device information and some basic configuration options:
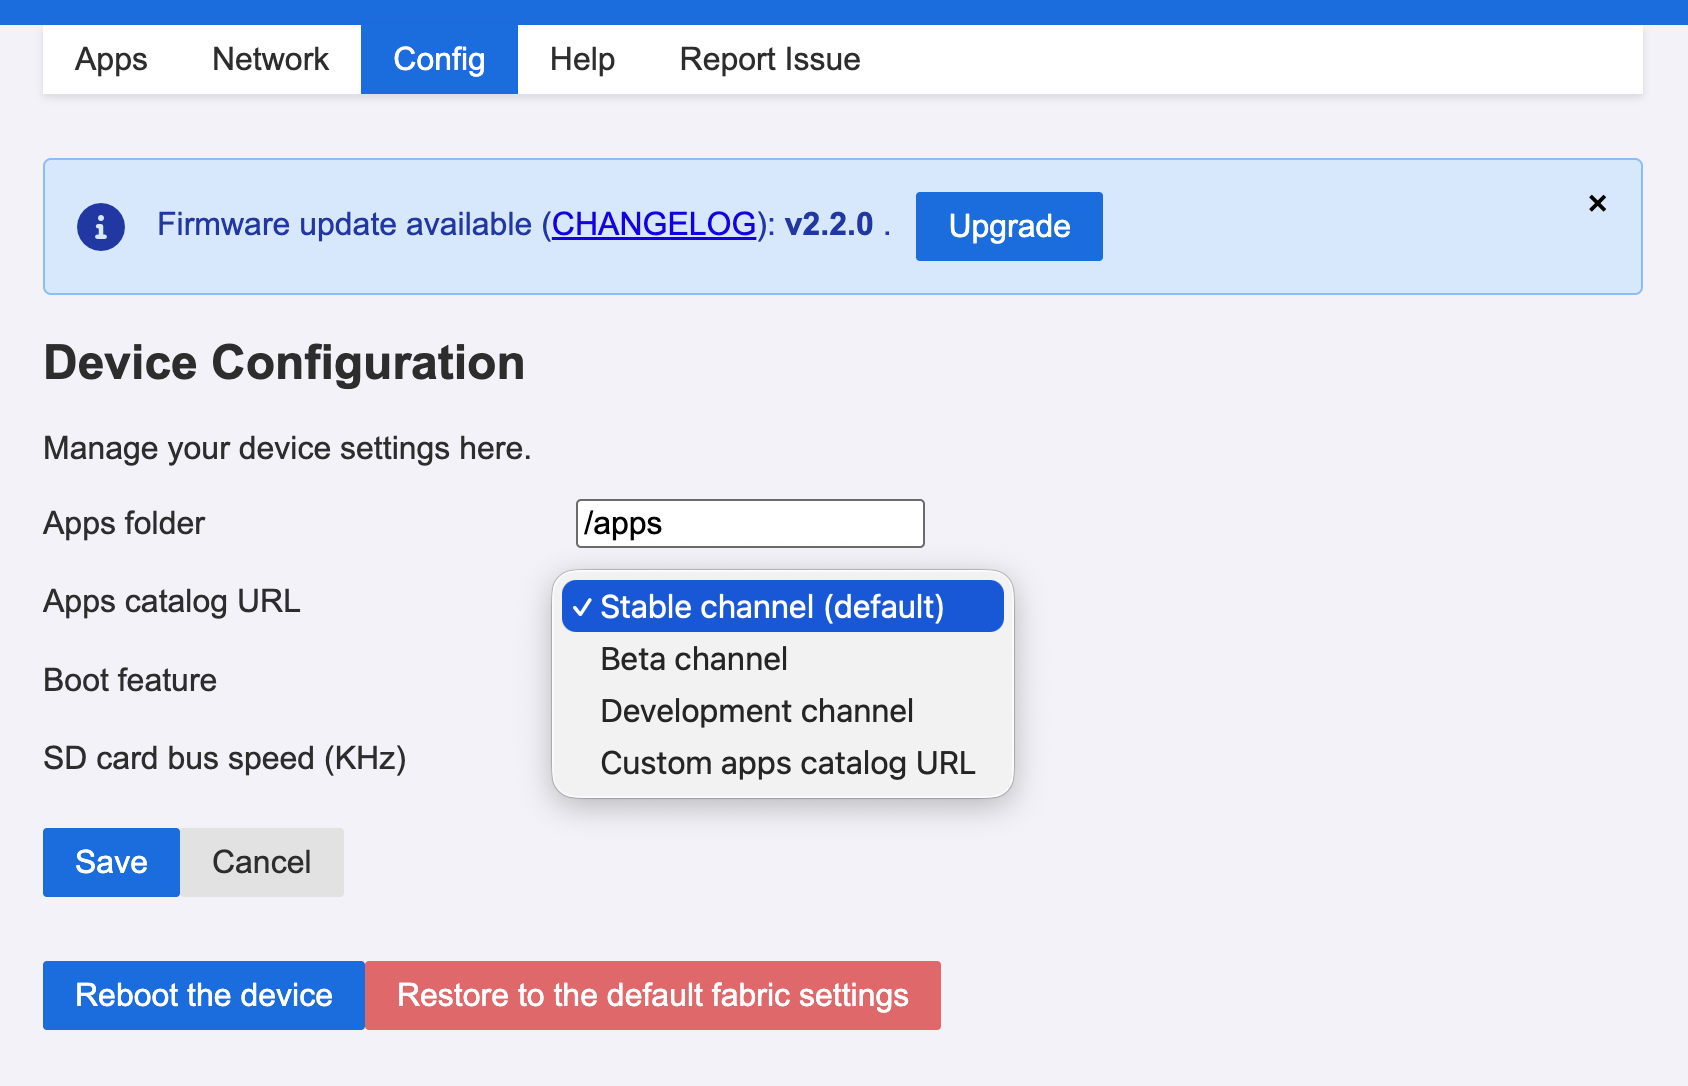
- Apps folder: The folder where the apps are stored. By default is
/apps. This folder is created on the microSD card when the Booster app is launched for the first time if it does not exist. - Apps catalog URL: This field is now a channel selector. You can choose Stable, Beta, or Development, or switch to Custom apps catalog URL to type your own catalog URL. The default is the Stable channel. If you use a custom catalog, its
apps.jsonfile must be reachable over HTTP. - Boot feature: The UUID of the microfirmware app to load at boot time, or the Booster factory path. If the app cannot find the configured UUID in flash memory, it will load the Booster app in Manager mode.
- SD card baud rate (KB): The baud rate of the SD card. By default is
12000. It can be safely increased to24000. Above this value, the SD card may not work properly or the value will be ignored.
Don’t forget to click the Save button to save the changes!
It also provides two buttons to reboot the device:
- Reboot the device: Reboot the device and load the microfirmware app in flash memory. This is the normal way to reboot the device.
- Restore to the default fabric settings: Reboot the device and load the Booster app in Factory mode. This is useful to reset the WiFi configuration or return the device to its default setup.
Firmware update
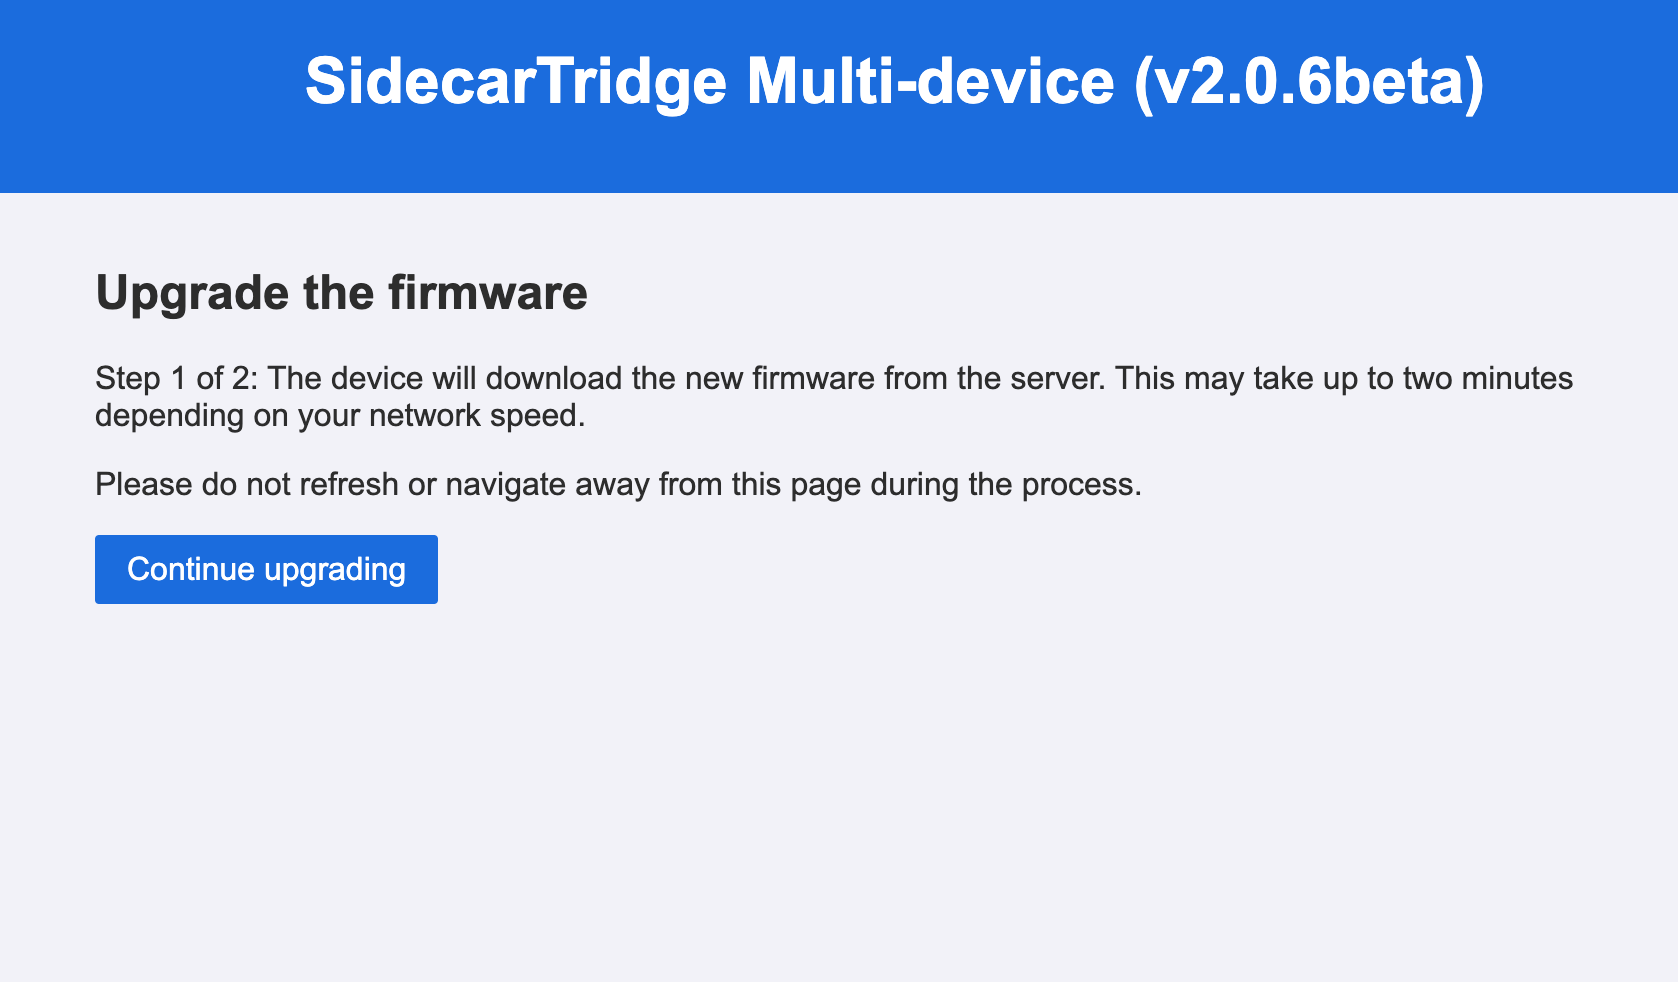
Starting in version v2.0.6 Beta you don’t need to download the newer firmware version manually. Instead, the Booster app reports available updates and guides you through the installation process.
When a new firmware version is available, the Booster app shows a message on top of the web interface, including the target version and a direct link to the firmware changelog so you can review the release notes before starting the upgrade.
The update process is straightforward and can be done directly from the web interface. First, the user needs to confirm the update by clicking the Continue upgrading button. The Booster app will then download the new firmware version. It can take about two minutes to complete the update process. The screen on the Atari 16/32 computer will display information about the update progress.
Once the new firmware has been downloaded to the microSD card, the Booster app will ask the user to confirm the installation. The user needs to click the Confirm firmware upgrade button to proceed. It will take a few seconds to reflash the firmware in the Raspberry Pi Pico W.
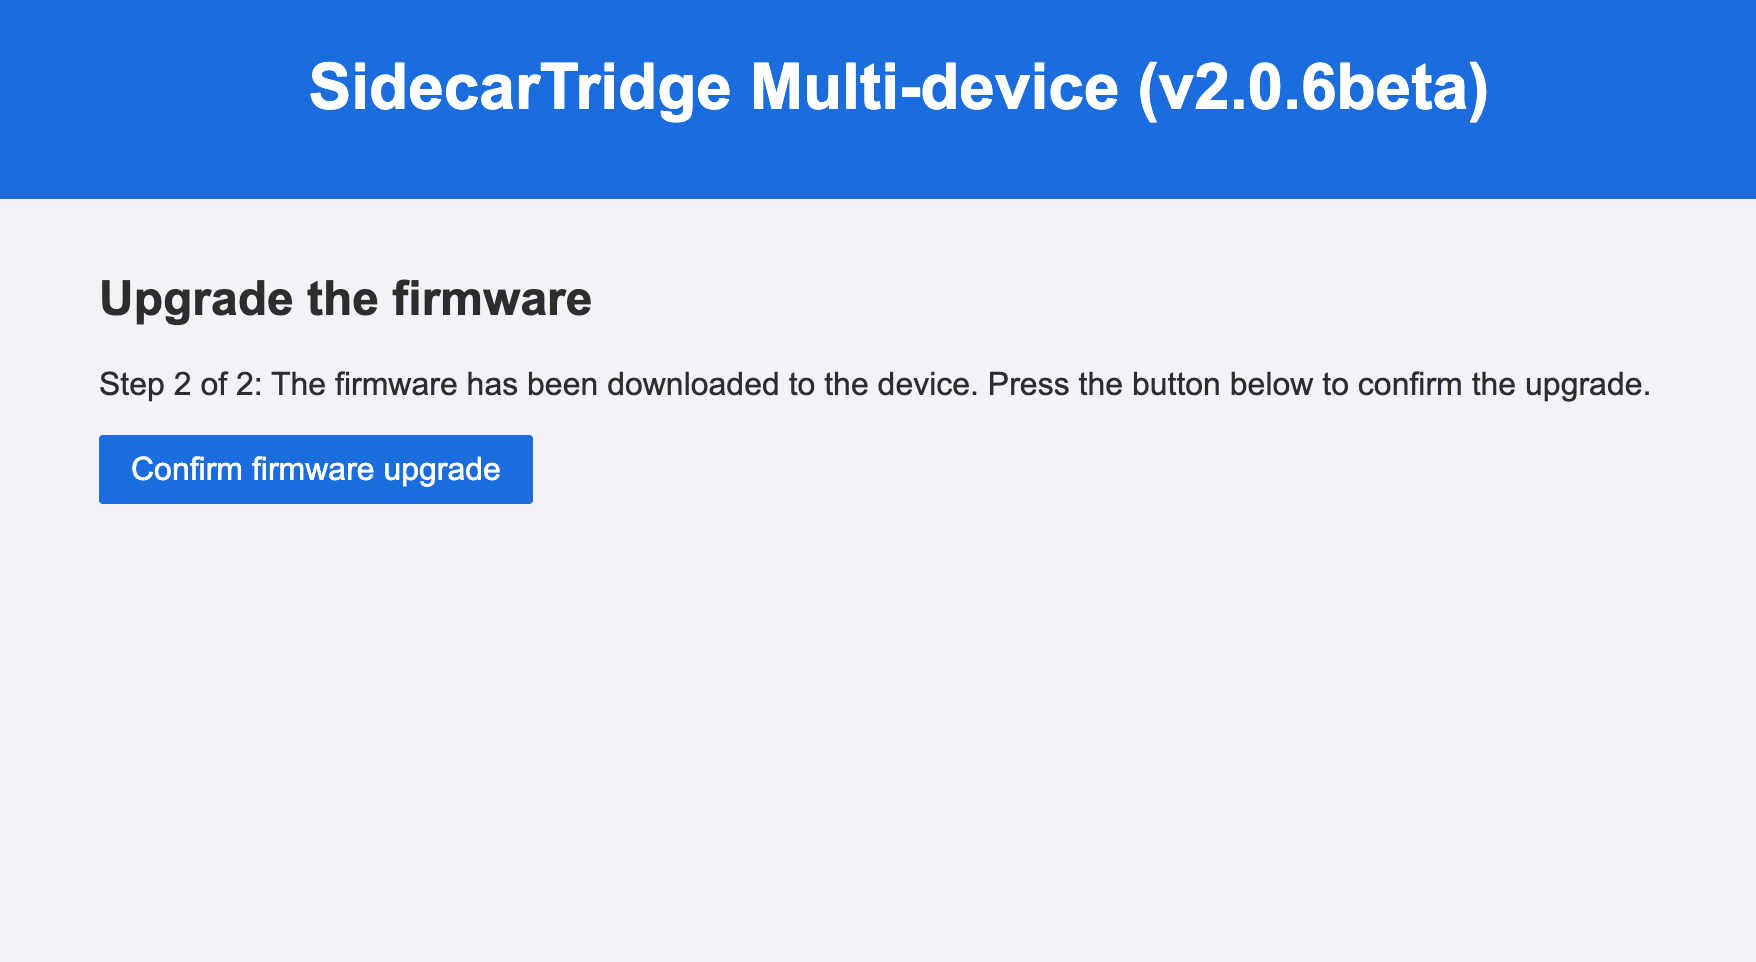
After the reflashing process is complete, the screen on the Atari 16/32 computer will turn black and the Booster app will reboot activating the new firmware.
If the update process fails or gets interrupted, the device can get bricked. In this case, you will need to perform a fresh installation of the firmware.