Printer Emulator
Source code CHANGELOG Report BUG v1.0.0
Print like it’s 1989, collect PDFs. This microfirmware gives the Atari ST, STE, Mega ST and Mega STE a printer without a printer: your programs print as if an Epson FX-80 or an HP LaserJet II were plugged into the printer port, and every page lands on the microSD card as a PDF, ready to read on your computer over USB.
On a Mega STE, it keeps the speed and cache setting you chose: it prints at 8 MHz, at 16 MHz and with the cache on.
Table of contents
🚀 Installation
- Launch the Booster App on your SidecarTridge Multi-device.
- Open the Booster web interface.
- In the Apps view, find Printer Emulator (search for it, or look on the Emulation shelf) and click Install.
- Once it is installed, click Launch.
After launching, the app runs every time you power on your Atari.
🖨️ Usage
When you power on your Atari, the app shows its setup screen, with a 20-second countdown on its bottom line. When the countdown runs out, or when you press E, the printer is installed and the Atari goes on to the desktop. Press any other key to stop the countdown and change the settings.
From then on, the Atari prints as if a printer were plugged in: Alt-Help, the desktop’s Print, and every program that prints through TOS. Each print job becomes one PDF on the microSD card.
Once the printer is installed, resetting the Atari brings it back to the desktop with the printer installed again, without the setup screen. To see the setup screen again, press SELECT on your Multi-device and then press the reset button on your Atari, or power the Atari off and on.
On first use, the microfirmware creates the /PRINTER folder on the microSD card for the PDFs. You can choose another folder from the setup screen.
⚙️ Setup screen
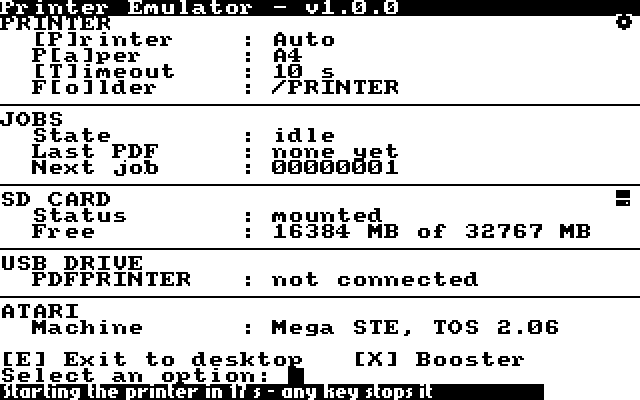
Information on the setup screen
The setup screen shows the settings at the top and four live sections below them, updated while the screen is up:
- Jobs: what the printer is doing (
idle,receivinga job,makingits PDF), the last PDF made and how many pages it has, and the number the next job will get. - SD card: whether the card is mounted, and its free space.
- USB drive: whether a computer has the PDFPRINTER drive, and how many PDFs it shows.
- Atari: the machine and its TOS version. If it says
no hello (reset the ST), the Multi-device restarted without the Atari: reset the Atari before pressingE.
The bottom line shows the countdown, or Countdown stopped: [E] starts the printer. once a key has stopped it.
Printer settings
Every change is stored at once and used from the next job on.
[P]rinterchooses the printer, one press at a time:- Auto (the default): each job goes to the printer it was written for. A job that starts with the LaserJet’s commands (PCL) prints on the HP LaserJet II; everything else, plain text and Alt-Help included, prints on the Epson FX-80.
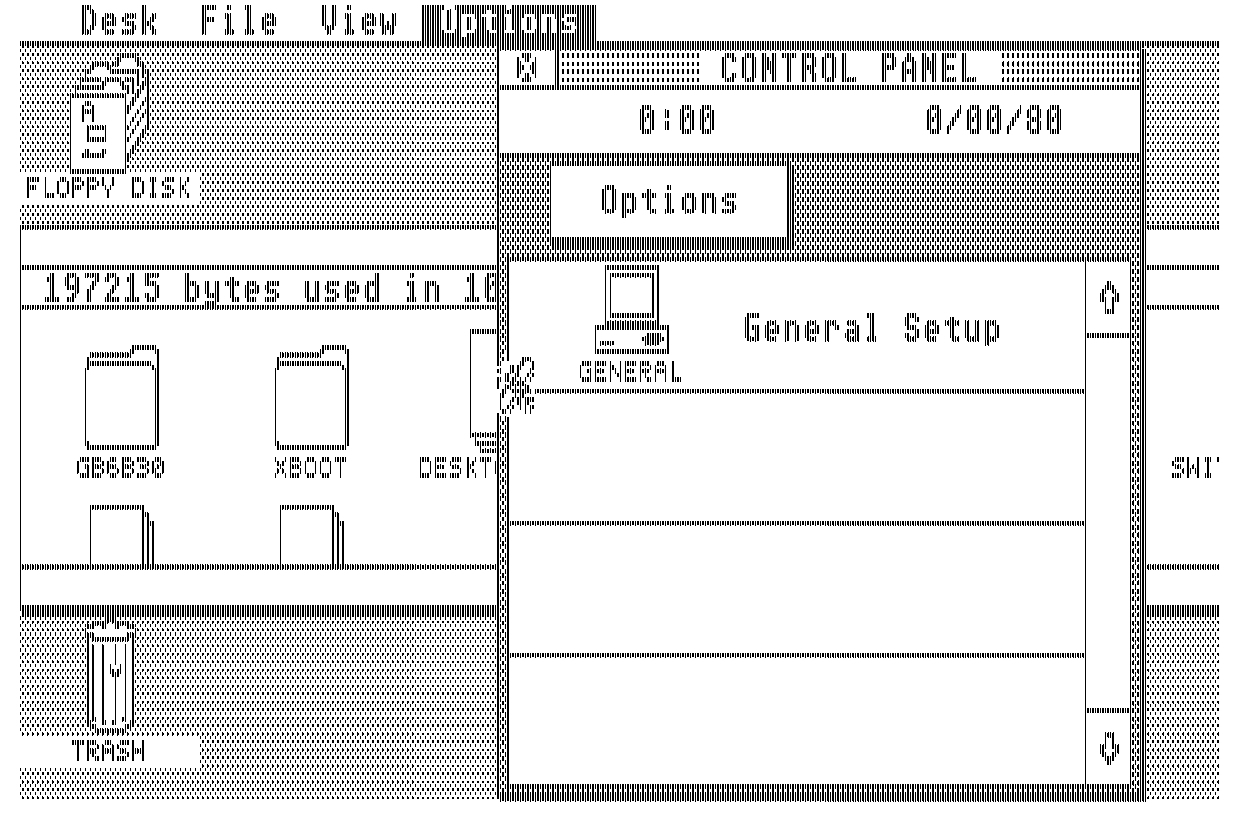
- Epson FX-80: every job prints on the FX-80, a 9-pin dot-matrix printer, at its highest resolution (240 x 216 dots per inch). Characters 128 to 255 print as the Atari’s own characters, as on Atari’s own printers.
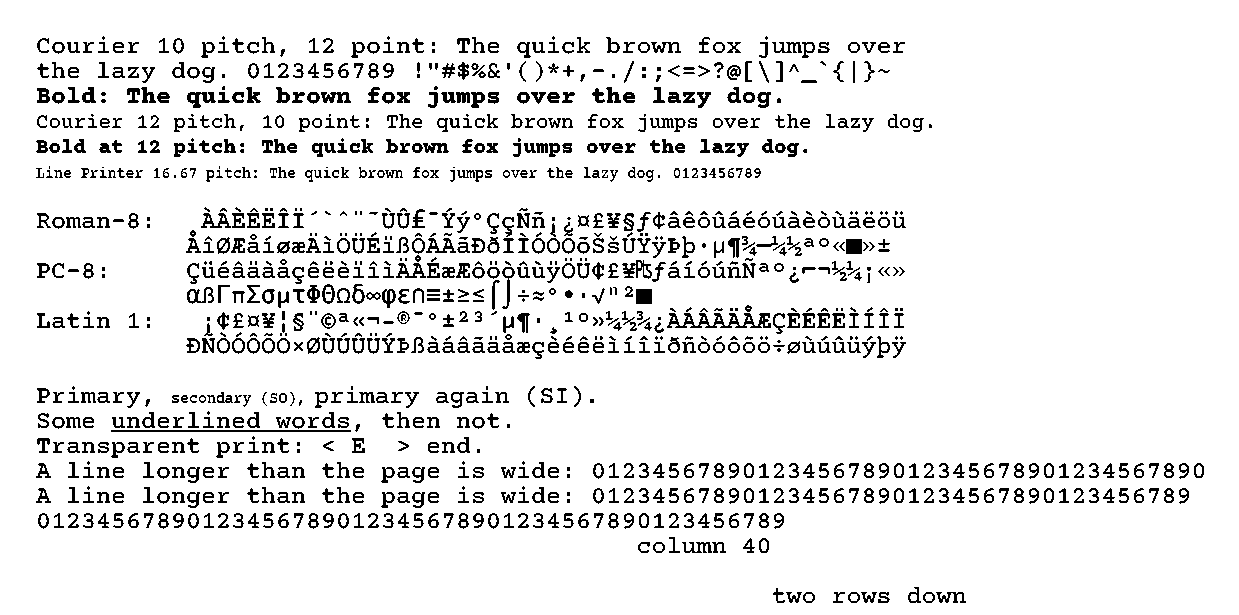
- HP LaserJet II: every job prints on the LaserJet, a 300 dots per inch laser printer that speaks PCL 4: its raster graphics, its built-in fonts (Courier 10 and 12 pitch, medium and bold, and Line Printer) and their character sets (Roman-8, PC-8, ISO Latin 1, ASCII).
P[a]pertoggles the paper between A4 and Letter. The FX-80 prints 70 lines a page on A4 and 66 on Letter, at 6 lines an inch.[T]imeoutsets how long the Atari must stop printing before a job ends: 5, 10 (the default), 20, 30, 60 or 120 seconds, one press at a time. Everything printed until then goes into the same PDF, so a program that pauses between pages needs a longer timeout.F[o]lderopens the folder picker: the folder the PDFs go to.
Choosing the folder
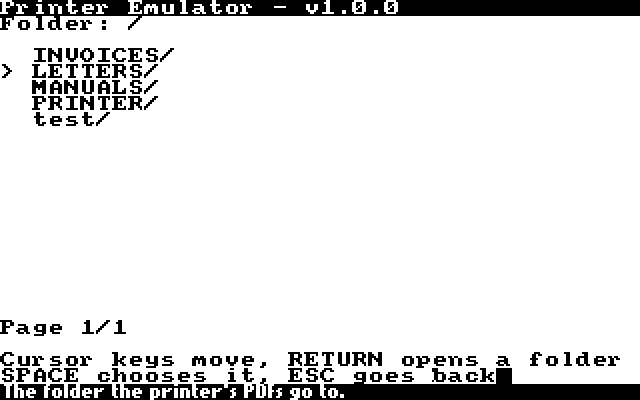
The picker lists the card’s folders, one level at a time. The cursor keys move, RETURN opens a folder (.. goes up), SPACE chooses the folder shown, and ESC goes back to the setup screen without a change. Only folders that already exist on the card can be chosen, not the card’s root. The folder cannot change while a job is printing.
Other setup screen commands
[E] Exit to desktop: installs the printer and boots the Atari to the desktop.[X] Booster: goes back to the Booster app.
📄 Print jobs and PDFs
A job is everything the Atari prints until it has been quiet for the timeout, or until it is reset. Each job gets the next number and becomes nnnnnnnn.pdf in the folder: 00000001.pdf, 00000002.pdf and so on. The numbers never repeat, even after a power cut: a number that is already on the card is skipped.
While a job is printed and turned into a PDF you may see its working files in the folder (.TMP, .PRN, .PDT). They become the PDF within seconds of the job’s end, and the PDFs are made in the order of the jobs, also after the Multi-device starts again. A job that cannot be turned into a PDF keeps its .PRN file, the bytes the Atari sent.
Each page of a PDF is one picture of the printed page, as the printer would have printed it:
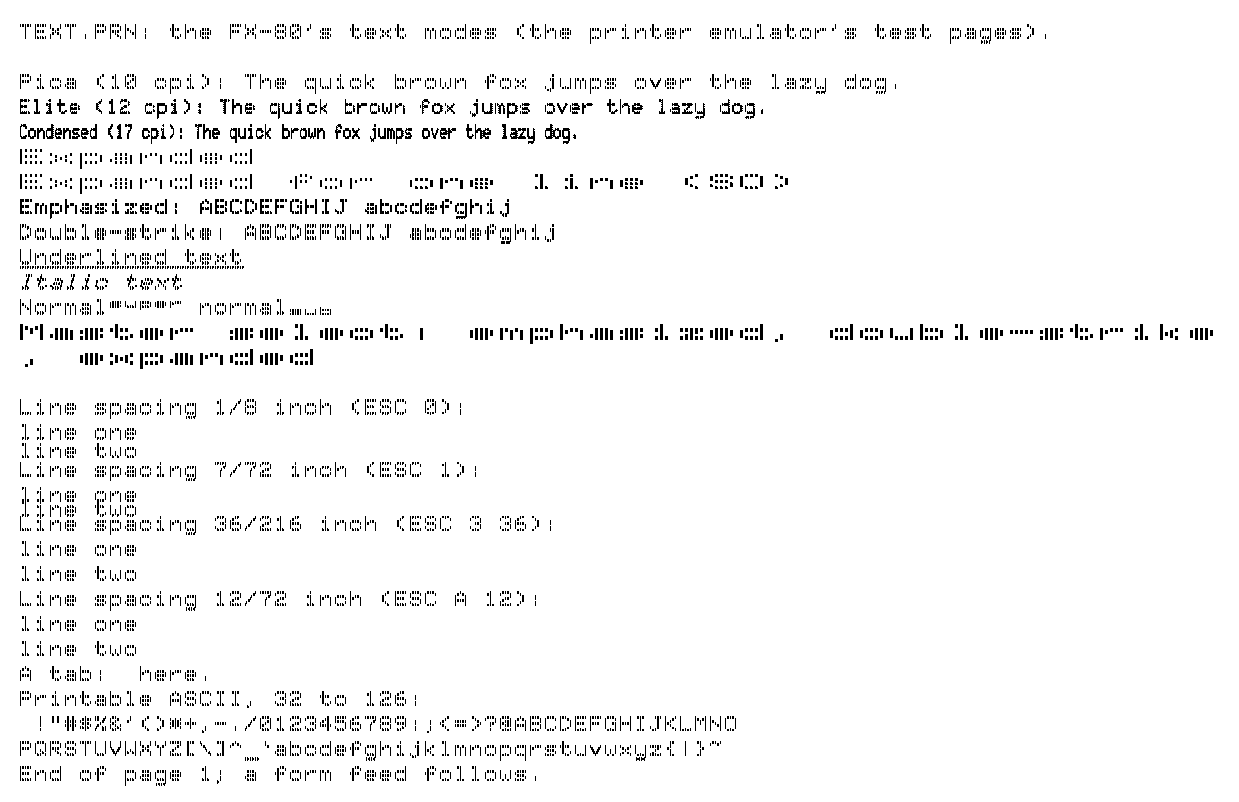
The Multi-device has no clock, so the files are dated 1 January 1970.
If the card is missing or full, the Atari keeps printing as if nothing happened, but the job is lost: the setup screen says so in Jobs (lost: card full or lost: card failed), and a job the card could not take is deleted.
💾 Getting the PDFs: the PDFPRINTER drive
Connect the Multi-device’s micro-USB port (on its Raspberry Pi Pico W) to your computer while the app runs: a drive named PDFPRINTER appears with the folder’s PDFs, and nothing else. It is read-only: you can open and copy the PDFs, but not change or delete them.
A PDF printed while the drive is connected appears on its own: the drive disappears for about five seconds and comes back with the new PDF (on a Mac, about eight seconds after the PDF is made).
To delete PDFs, or to read the working files, take the microSD card out and read it in your computer.
🛠️ Setting up your programs
The Atari does not know which printer is plugged in: each program sends its own printer’s commands. Choose the driver for the printer you want, and leave [P]rinter on Auto, or set it to that printer.
Alt-Help and the desktop
- Alt-Help (the screen dump) only speaks the Atari and Epson dot-matrix printers’ commands: leave
[P]rinteron Auto or the FX-80. On a forced HP LaserJet II it prints pages of garbage, as a real LaserJet would. - The desktop’s Install Printer (or XControl’s printer settings) changes how Alt-Help prints, for example Draft or Final. Keep the port on Printer.
- The desktop’s Print of a text file prints it as it is, on the FX-80.
GDOS programs (Easy Draw, GEM Output, Timeworks Publisher)
GDOS reads the printer driver and its fonts from ASSIGN.SYS, as device 21. The fonts must be the ones made for that printer’s resolution: without them GDOS prints the drawings but leaves the text out.
For the Epson FX-80, Atari’s FX-80 driver with its FX-80 fonts (Atari’s “GDOS Fonts and Drivers for Epson FX-80” disk):
21 FX80.SYS
EPSHSS07.FNT
ATSS10EP.FNT
ATSS12EP.FNT
ATSS18EP.FNT
ATSS24EP.FNT
ATTR10EP.FNT
ATTR12EP.FNT
ATTR18EP.FNT
ATTR24EP.FNT
ATTP10EP.FNT
For the HP LaserJet II, a GDOS LaserJet driver with fonts for 300 dots per inch, for example the ones that come with Timeworks Publisher:
21 HP_LJET.SYS
HPSS07AS.FNT
HPSS10AS.FNT
HPSS12AS.FNT
HPSS14AS.FNT
HPSS24AS.FNT
HPTR07AS.FNT
HPTR10AS.FNT
HPTR12AS.FNT
HPTR14AS.FNT
HPTR24AS.FNT
List only the fonts that are in your GEMSYS folder.
Programs with their own printer drivers
| Program | Epson FX-80 | HP LaserJet II |
|---|---|---|
| 1st Word Plus | PRINTERS\EPSON_FX.CFG as the printer | PRINTERS\STANDARD.CFG, with [P]rinter on HP LaserJet II (on Auto, plain text goes to the FX-80): plain text in Courier, without bold, underline, pictures or accented letters |
| ST Writer Elite | prints as it is | – |
| Degas Elite | PRINTERS\EPSON.PRT (File > Print type) | – |
| GFA BASIC | LPRINT and HARDCOPY | – |
A program with an Epson FX-80, Epson 9-pin or Atari dot-matrix (SMM804) driver prints on the FX-80; one with an HP LaserJet, LaserJet Plus or LaserJet II driver prints on the LaserJet.
✅ Tested programs
| Program | Printer |
|---|---|
| Alt-Help, in low, medium and high resolution | FX-80 |
| The desktop’s Print of a text file | FX-80 |
| Install Printer and XControl’s printer settings, with Alt-Help | FX-80 |
| 1st Word Plus 2.02 | FX-80 |
| ST Writer Elite 4.0 | FX-80 |
| Degas Elite 1.0 | FX-80 |
GFA BASIC 3.5: LPRINT and HARDCOPY | FX-80 |
| Easy Draw 2.35 and its Outprint, through GDOS | FX-80 and LaserJet |
⚠️ Known issues
- Programs that drive the printer port’s hardware themselves, instead of printing through TOS, are not caught: nothing reaches the card. Calamus 1.x is one, and so is Signum 3 with its default output channel, “Centronics schnell”. Signum 3’s “Centronics, BIOS” channel does reach the card, but Signum 3 only has 24-pin drivers, which the FX-80 does not understand.
- The LaserJet prints every page in portrait, on the paper of
P[a]per, and does not draw PCL’s filled rectangles. - The PDFPRINTER drive has been tested with macOS only.
- The files are dated 1 January 1970.
🔄 System reset behavior
Resetting the Atari ends the job being printed, and the printer is installed again before the desktop starts. The setup screen only shows after a power cycle, or after a press on SELECT.
Holding SELECT for 10 seconds is a factory reset of the Multi-device: every setting, of this app and of the others, goes back to its default, and the Multi-device starts Booster.
🔌 Power cycling
When you power the Atari off, a job that has not ended yet is kept: it becomes a PDF the next time the Multi-device starts. The next job numbers carry on from where they were.
📄 License
This project is licensed under the GNU General Public License v3.0. See the LICENSE file for full terms.
The HP LaserJet II’s fonts are drawn from Courier Prime (SIL Open Font License) and DejaVu Sans Mono.
🤝 Contributing
Made with ❤️ by SidecarTridge