This is a deprecated version of the Getting Started guide for the SidecarTridge TOS emulator with firmware version 1.0. Upgrade to the latest firmware version and refer to the latest Getting Started guide for the most up-to-date information.
Getting Started
This section provides guidance on the initial steps to start working with the SidecarTridge TOS emulator. It includes prerequisites, hardware installation instructions, software setup, and configuration. By following the procedures outlined in this and the upcoming sections, users can ensure a smooth start to their journey with the SidecarTridge TOS emulator.
Table of contents
Prerequisites
Before you begin the installation and setup of the SidecarTridge TOS emulator, ensure you have the following items and tools:
Required Components
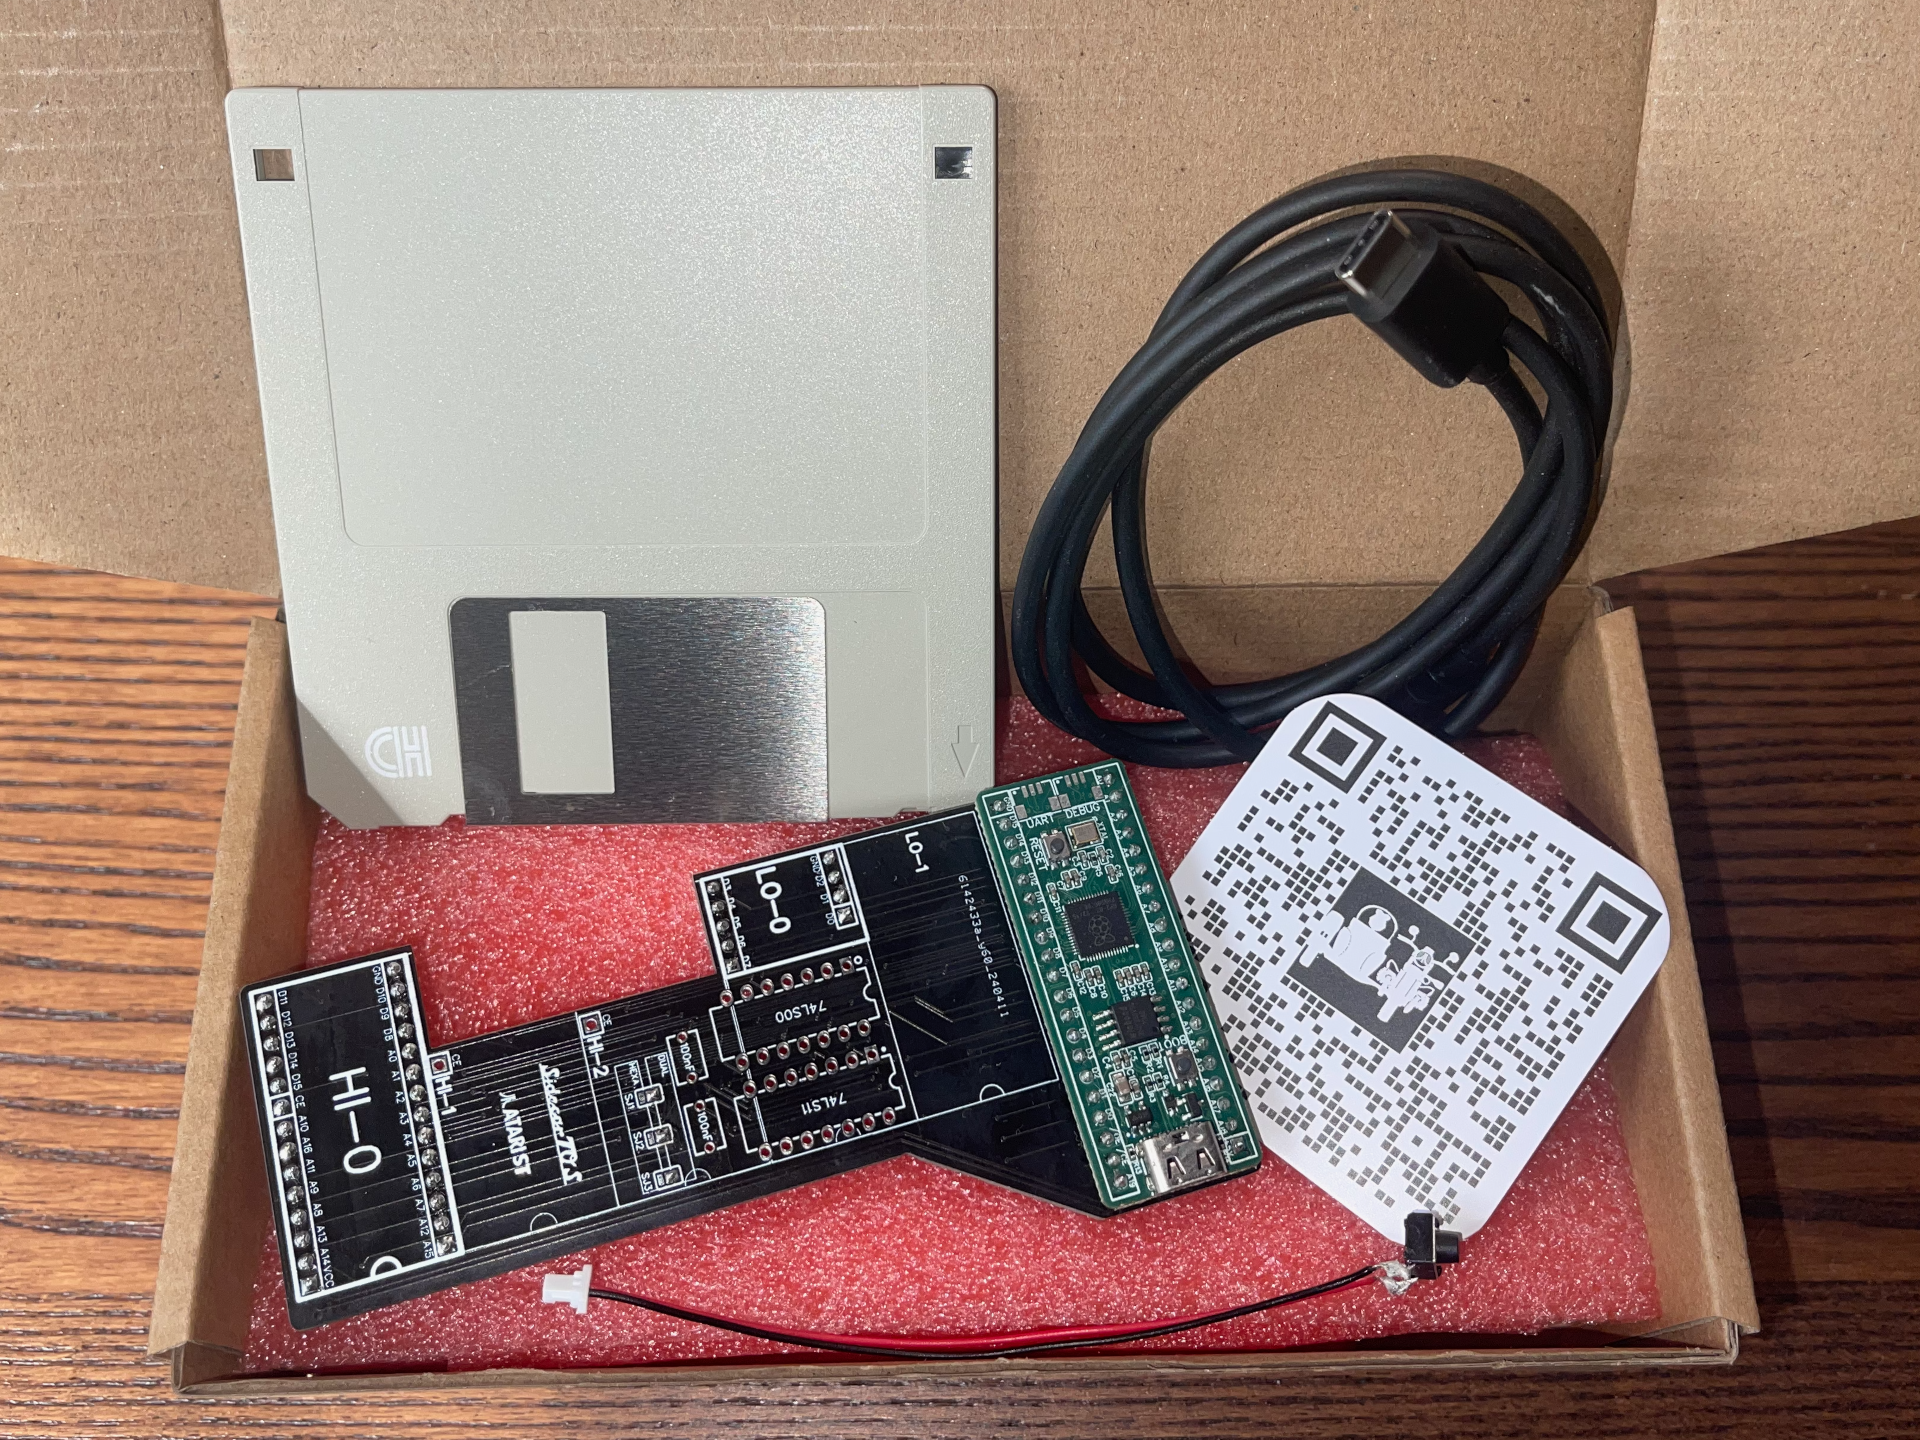
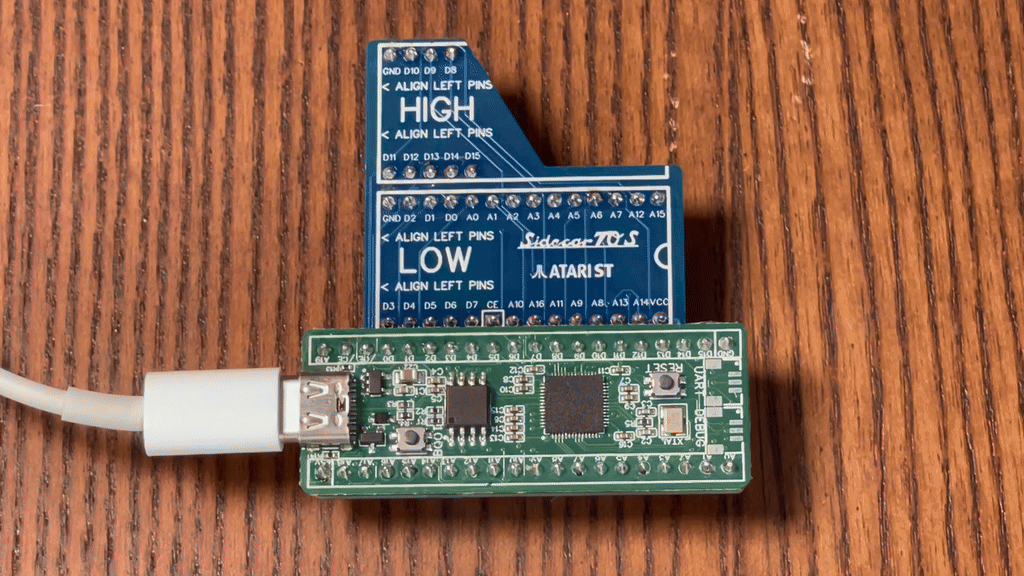
SidecarTridge TOS Emulator Kit
This should include:
- The SidecarTridge ROM Emulator Board
- The SidecarTridge Atari ST Carrier Board. The ROM Emulator Board is soldered onto this carrier board.
- (Optional) 3 1/2 floppy disk with the SWITCHER.TOS application. It is the program for managing TOS versions on the Atari ST. It can also be downloaded from the SidecarTridge website.
- (Optional) USB-C cable: for connecting the SidecarTridge TOS emulator to a computer for firmware updates and TOS image transfers.
- (Optional) RESCUE cable: for connecting an external push button to the SidecarTridge TOS emulator to enter rescue mode.
Atari ST Computer
The emulator is compatible with various models, please read the previous section to ensure compatibility with your Atari ST model.
Tools and Equipment
- Phillips Head Screwdriver: For opening the Atari ST case.
- Anti-Static Wrist Strap: To prevent static discharge that could damage electronic components.
- Small Container: To hold screws and small parts during the disassembly of the Atari ST.
- IC Extractor Tool: For safely removing the ROM chips from the Atari ST motherboard. I strongly recommend using a proper IC extractor tool to avoid damaging the ROM chips or the motherboard. If you don’t have one, you can use a flat-head screwdriver, but be very careful not to damage the chips or the motherboard.
- Insulating Tape: To avoid short circuits between the SidecarTridge TOS emulator and the Atari ST motherboard.
- Computer with USB Port: A Windows, macOS, or Linux computer for transferring ROM files and updating firmware.
Software and Files
- TOS Image Files: Ensure you have the necessary TOS image files ready for transfer. These can be downloaded from reputable sources like Avtandil website, EmuTOS website, or other trusted sources.
- SWITCHER.TOS Program: A program for selecting and managing TOS versions on the Atari ST. This program is required to switch between TOS versions and can be downloaded from the SidecarTridge website.
The SidecarTridge TOS emulator comes with a default EmuTOS image pre-installed and ready to boot. Since the original TOS image files are copyrighted, it’s up to you to find the TOS images for your Atari ST model. At this moment every single TOS version found and tested on the internet is working with the SidecarTridge TOS emulator. Please read the Compatibility section for a full list of tested TOS versions.
By having these prerequisites in place, you will be well-prepared to proceed with the installation and setup of your SidecarTridge TOS emulator.
Unboxing and Inspecting the Components
SidecarTridge TOS Emulator Kit
When you receive your SidecarTridge TOS emulator kit, carefully unbox and inspect the components to ensure everything is included and in good condition. All kits should contain the following items:
- SidecarTridge ROM Emulator Board soldered onto the Carrier Board: This is the main component that will replace the ROM chips on your Atari ST motherboard.
- RESCUE cable and push button: This cable allows you to connect an external push button to the SidecarTridge TOS emulator for entering rescue mode.
- SidecarTridge QR Code card: This card contains a QR code that links to the SidecarTridge website for firmware updates and documentation.
Additional Components
If you have purchased additional components like the USB-C cable or the SWITCHER.TOS floppy disk, ensure they are also included in the package.
Preparing the ROM Images
Connecting the Device to a Computer
The SidecarTridge TOS emulator has two modes: mass storage mode for transferring TOS image files and ROM emulation mode for booting the Atari ST with the selected TOS image. This section focuses on mass storage mode.
To enter mass storage mode, plug the SidecarTridge TOS emulator into the USB-C cable and connect it to your computer. It can be connected to both the Atari ST and your computer simultaneously but will enter mass storage mode when powered on from the USB-C cable.
If the SidecarTrdg volume does not appear on your computer, ensure the USB cable is properly connected and press the RESET button on the SidecarTridge TOS ROM Board for a few seconds to enter mass storage mode.
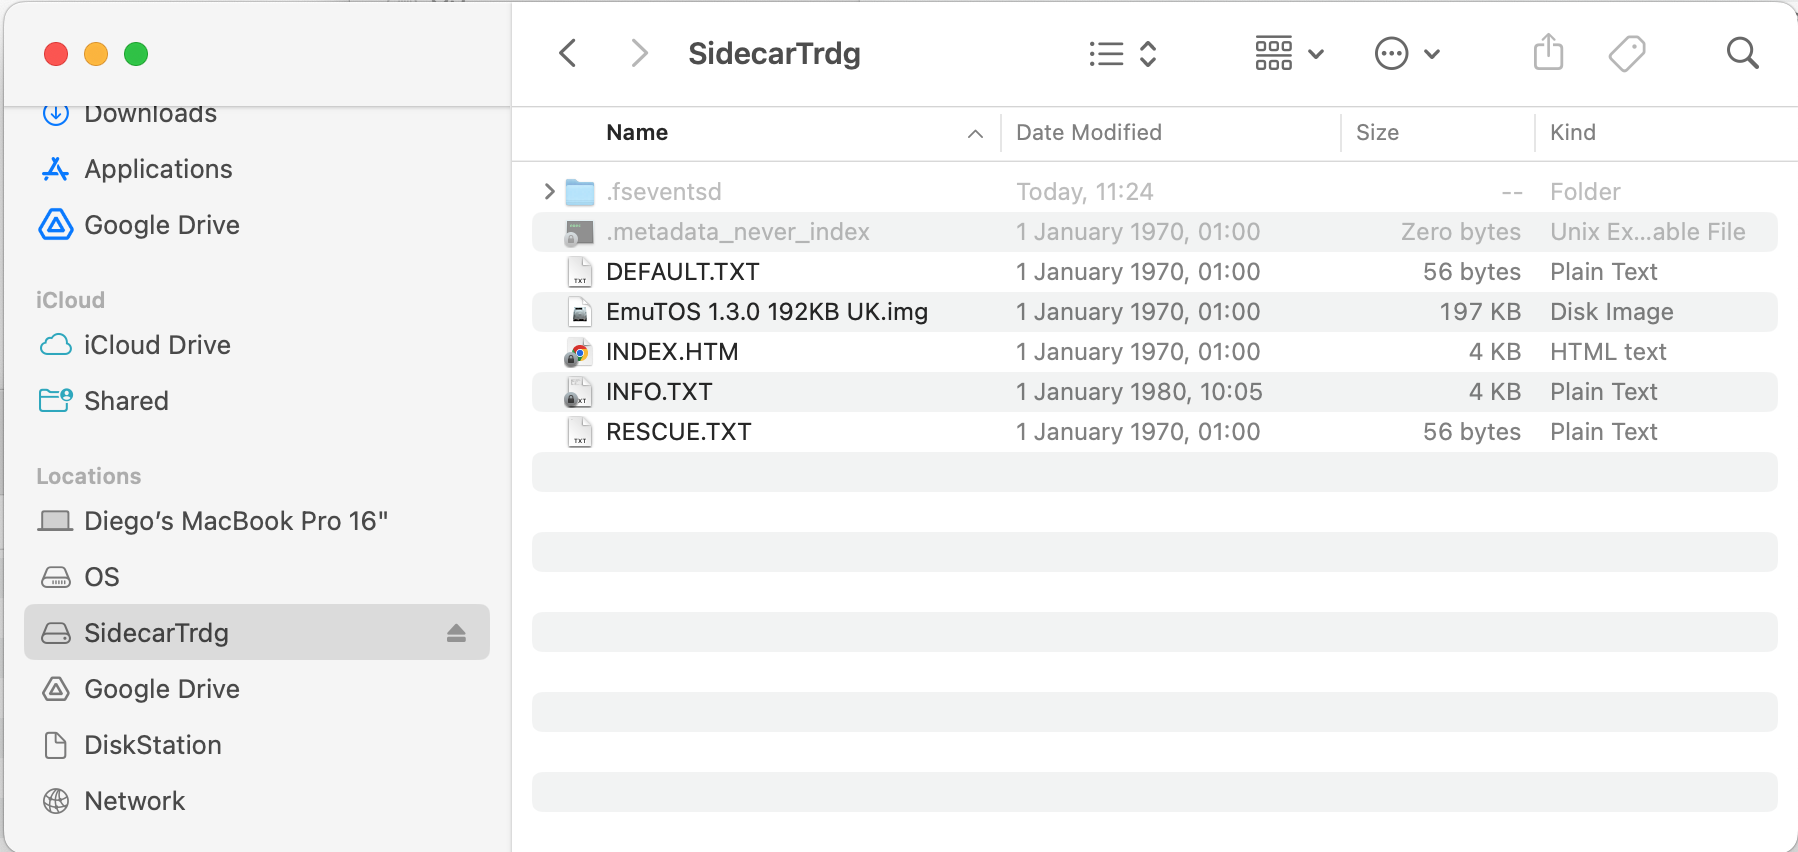
Open the SidecarTrdg volume on your computer to access firmware files and TOS image files. The following files should be present:
INDEX.HTM: Opens the SidecarTridge TOS documentation website.INFO.TXT: Contains information about the firmware version and installed TOS images.DEFAULT.TXT: Contains the name of the default active TOS image file.RESCUE.TXT: Contains the name of the rescue TOS image file.
There are also system files and directories starting with a dot (.) used by the SidecarTridge TOS emulator and an EmuTOS image file for your computer. For STF, STFM, and Mega ST models, the file is 192KBytes; for STE and Mega STE models, the file is 256KBytes.
There may be an offset of 4KBytes between the actual size of the image and the displayed file size due to the 4KBytes cluster size used by the SidecarTridge TOS emulator’s FAT16 file system.
The Mini-FAT16 File System
The SidecarTridge TOS emulator uses a simplified subset of the FAT16 file system with a 4KBytes cluster size. This means TOS images are stored in 4KBytes blocks, and file sizes are rounded up to the nearest 4KBytes boundary.
To copy TOS image files to the SidecarTridge TOS emulator, drag and drop them into the SidecarTrdg volume. The emulator will automatically store the TOS images in the mini-FAT16 file system. However, there are some limitations:
- File Types: The emulator can store any file type, but only TOS image files should be stored.
- No Directories: The emulator does not support directories; all TOS image files must be in the root directory.
- No Date/Time Information: The mini-FAT16 file system does not store date and time information for files; files will display in the order copied.
- Long File Names: Supports file names up to 56 characters. Longer names will be truncated.
- Maximum Files: Supports up to 64 files. Exceeding this will result in an error.
- No Fragmented Files: Files must be stored in contiguous blocks to avoid fragmentation. It is recommended to copy files in a single batch.
- Storage Size: The emulator has 16MBytes of storage space.
By following these guidelines, you can ensure that TOS image files are stored correctly and accessible by the emulator. Also, depending on the operating system of your computer you may need to follow some additional steps to ensure the files are correctly copied to the SidecarTridge TOS emulator.
Copying TOS Image Files
Before copying TOS image files to the SidecarTridge TOS emulator, it is strongly recommended to first copy all files to a folder on your computer. This way, you can easily restore them if needed and reduce the risk of fragmentation during the copy process.
Create a Folder for the TOS Images
Create a folder on your desktop named Atari STE TOS Images to store and organize your TOS image files. For example, using a MacBook Pro with macOS:
Download TOS Images: Collect a list of TOS images from the internet and store them in the folder. Refer to the Compatibility section for tested versions.
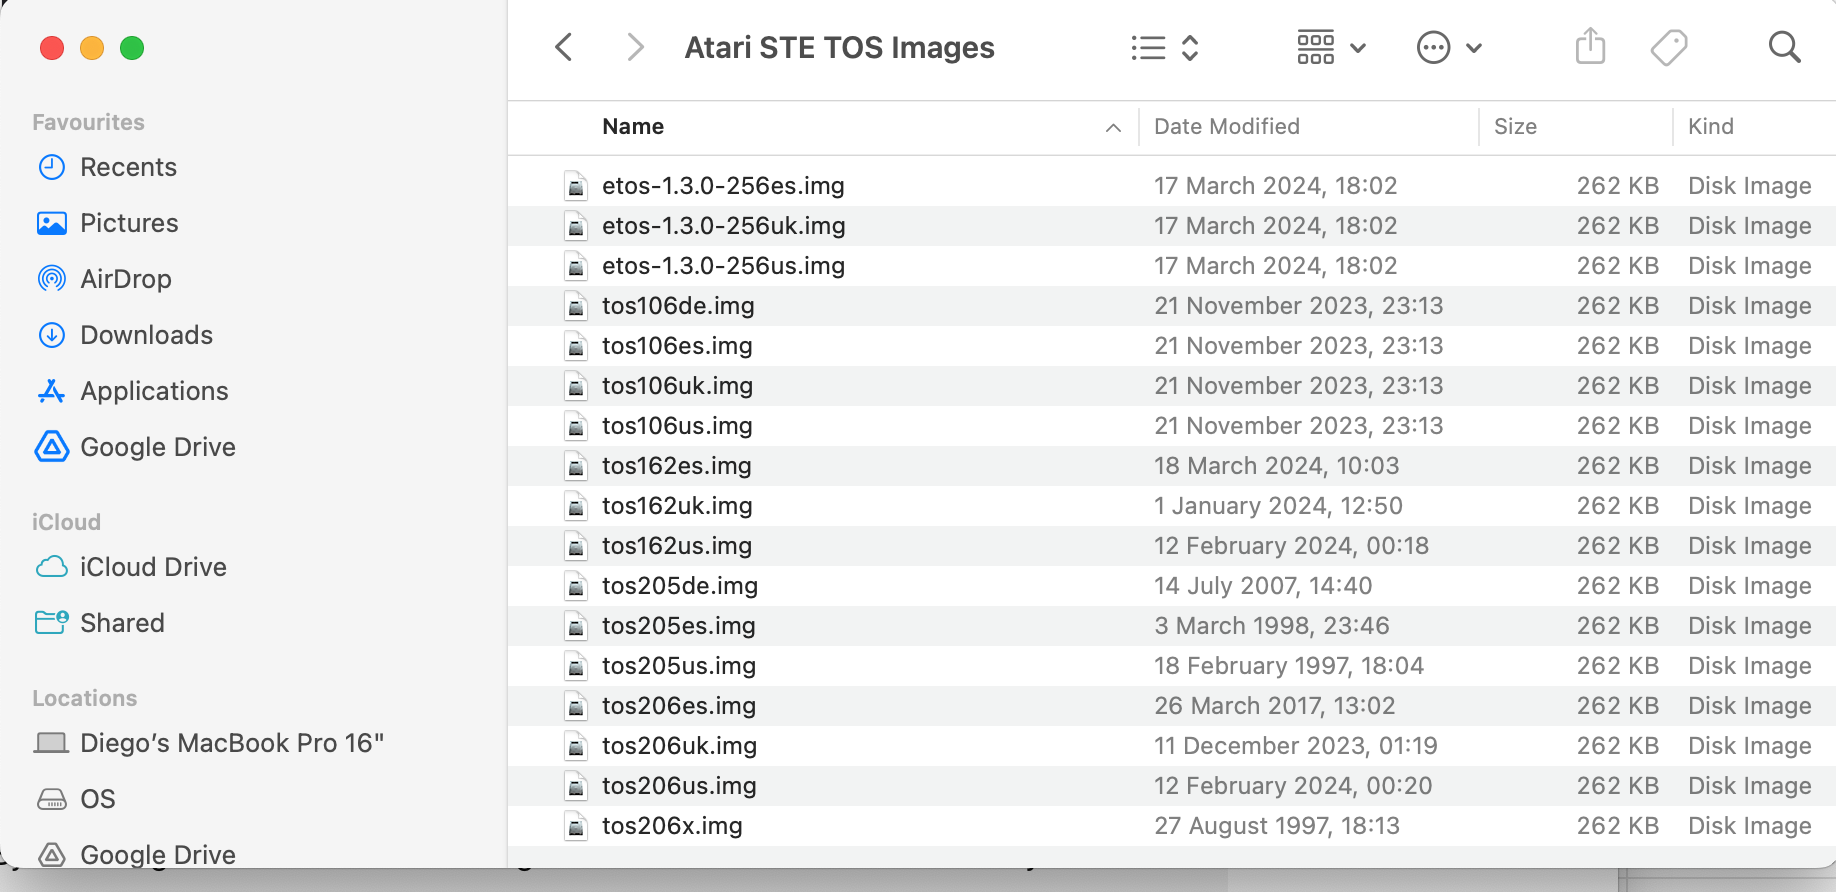
Rename Files for Clarity: Rename files to a readable format, such as
TOS Version - Language - Screen Hertz.img. For example,tos106uk.imgbecomesTOS 1.06 - English-UK - 50Hz. This helps when selecting the TOS version with theSWITCHER.TOSprogram.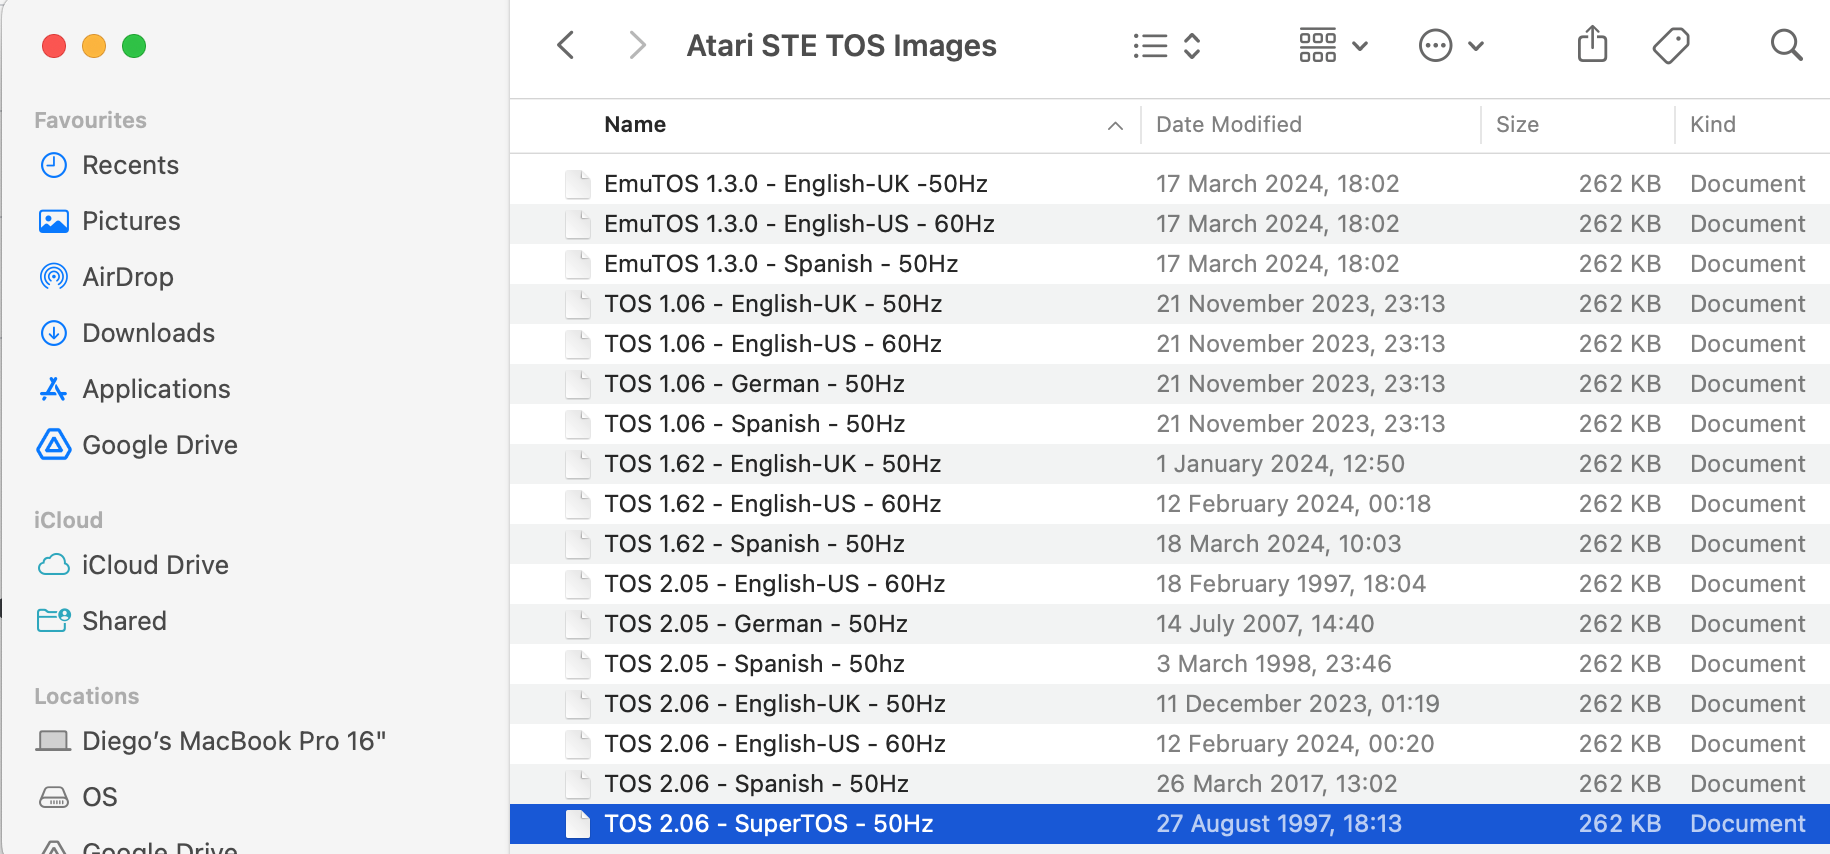
With the TOS image files organized and renamed, you can proceed to copy them to the SidecarTridge TOS emulator.
Copying the TOS Images on macOS
You can simply drag and drop the TOS image files from the Atari STE TOS Images folder to the SidecarTrdg volume. The files will be copied to the emulator’s storage space and will be accessible for booting the Atari ST with the selected TOS image.
If you copy multiple files at once, ensure they are copied in a single batch to avoid fragmentation. Once the files are copied, you can proceed to the next section.
When dragging and dropping files from a Mac to the SidecarTridge TOS emulator, macOS creates temporary hidden files that are not supported by the SidecarTridge TOS emulator. To avoid this, it is recommended to open a Terminal window to copy the files to the SidecarTridge TOS emulator.
cp -R /path/to/Atari\ STE\ TOS\ Images/* /Volumes/SidecarTrdg/
Copying the TOS Images on Windows
In Windows, you can also drag and drop the TOS image files from the Atari STE TOS Images folder to the SidecarTrdg volume. Please follow the same guidelines as in macOS to avoid fragmentation and ensure the files are copied correctly.
Copying the TOS Images on Linux
In Linux, you can use the cp command to copy the TOS image files from the Atari STE TOS Images folder to the SidecarTrdg volume. Please follow the same guidelines as in macOS and Windows to avoid fragmentation and ensure the files are copied correctly.
cp -R /path/to/Atari\ STE\ TOS\ Images/* /media/username/SidecarTrdg/
Note: Depending on the Linux distribution, the mount point of the SidecarTridge TOS emulator may vary. Replace /media/username/SidecarTrdg/ with the correct mount point of the emulator.
Obtaining Information about the TOS Images and Flash Status
After copying the TOS images to the SidecarTridge TOS emulator, you can check the information about the TOS images and the flash status. Open the INFO.TXT file in the SidecarTrdg volume to view the information. The file should contain details similar to the following:
SidecarTridge ROM chip emulator v1.0.0 - (C)2024 GOODDATA LABS SL

Total ROMs:	25
Default ROM index:	0	address: 0x10040000	block size: 64
Rescue ROM index:	0	address: 0x10040000	block size: 64

ROM images:
EmuTOS 1.3.0 English UK 50Hz: 	start address: 0x10040000, blocks: 64 metadata: 0x30040
EmuTOS 1.3.0 - English-UK -50Hz: 	start address: 0x10082000, blocks: 64 metadata: 0x40
EmuTOS 1.3.0 - English-US - 60Hz: 	start address: 0x100c2000, blocks: 64 metadata: 0x40
EmuTOS 1.3.0 - Spanish - 50Hz: 	start address: 0x10102000, blocks: 64 metadata: 0x40
TOS 1.06 - English-UK - 50Hz: 	start address: 0x10142000, blocks: 64 metadata: 0x40
._TOS 1.06 - English-UK - 50Hz: 	start address: 0x10182000, blocks: 1 metadata: 0x1
TOS 1.06 - English-US - 60Hz: 	start address: 0x10183000, blocks: 64 metadata: 0x40
TOS 1.06 - German - 50Hz: 	start address: 0x101c3000, blocks: 64 metadata: 0x40
TOS 1.06 - Spanish - 50Hz: 	start address: 0x10203000, blocks: 64 metadata: 0x40
TOS 1.62 - English-UK - 50Hz: 	start address: 0x10243000, blocks: 64 metadata: 0x40
TOS 1.62 - English-US - 60Hz: 	start address: 0x10283000, blocks: 64 metadata: 0x40
TOS 1.62 - Spanish - 50Hz: 	start address: 0x102c3000, blocks: 64 metadata: 0x40
._TOS 2.05 - English-US - 60Hz: 	start address: 0x10303000, blocks: 1 metadata: 0x1
TOS 2.05 - English-US - 60Hz: 	start address: 0x10304000, blocks: 64 metadata: 0x40
._TOS 2.05 - German - 50Hz: 	start address: 0x10344000, blocks: 1 metadata: 0x1
TOS 2.05 - German - 50Hz: 	start address: 0x10345000, blocks: 64 metadata: 0x40
._TOS 2.05 - Spanish - 50hz: 	start address: 0x10385000, blocks: 1 metadata: 0x1
TOS 2.05 - Spanish - 50hz: 	start address: 0x10386000, blocks: 64 metadata: 0x40
TOS 2.06 - English-UK - 50Hz: 	start address: 0x103c6000, blocks: 64 metadata: 0x40
TOS 2.06 - English-US - 60Hz: 	start address: 0x10406000, blocks: 64 metadata: 0x40
._TOS 2.06 - English-US - 60Hz: 	start address: 0x10446000, blocks: 1 metadata: 0x1
._TOS 2.06 - Spanish - 50Hz: 	start address: 0x10447000, blocks: 1 metadata: 0x1
TOS 2.06 - Spanish - 50Hz: 	start address: 0x10448000, blocks: 64 metadata: 0x40
._TOS 2.06 - SuperTOS - 50Hz: 	start address: 0x10488000, blocks: 1 metadata: 0x1
TOS 2.06 - SuperTOS - 50Hz: 	start address: 0x10489000, blocks: 64 metadata: 0x40

FLASH fragmentation:
GAP: 0, start address: 10080000, blocks: 2
GAP: 1, start address: 10303000, blocks: 1
GAP: 2, start address: 10304000, blocks: 65
GAP: 3, start address: 10345000, blocks: 65
GAP: 4, start address: 10386000, blocks: 64
GAP: 5, start address: 10447000, blocks: 1
GAP: 6, start address: 10448000, blocks: 65
GAP: 7, start address: 10489000, blocks: 2933

Summary:
Total:			16208896 bytes
Free:			12013568 bytes
Fragmented:		1077248 bytes
Fragmented space:	6.65%
Max free space:		74.12%

Open the INDEX.HTM file to access instructions online
Edit the DEFAULT.TXT and RESCUE

.TXT files to modify the default and rescue TOS images
The INFO.TXT file provides information about the files stored in the following format:
- Total ROMs: The total number of TOS images stored on the SidecarTridge TOS emulator.
- Default ROM index: The index of the default active TOS image, the start address, block size, and metadata.
- Rescue ROM index: The index of the rescue TOS image, the start address, block size, and metadata.
- ROM images: A list of TOS images stored on the emulator with their start address, block size, and metadata.
- FLASH fragmentation: Information about the gaps in the flash memory.
- Summary: The total, free, fragmented, and fragmented space in the flash memory.
It is not surprising that even after copying the files in a single batch, the SidecarTridge TOS emulator will show some fragmentation. After copying a batch of files, you can force the flash memory to defragment by creating a file named DEFRAG on the SidecarTrdg volume.
For example, on macOS:
touch /Volumes/SidecarTrdg/DEFRAG
On Windows (D drive where the SidecarTrdg volume is mounted):
TYPE NUL > D:\DEFRAG
On Linux:
touch /media/username/SidecarTrdg/DEFRAG
After creating the DEFRAG file, the SidecarTridge TOS emulator will defragment the flash memory and remove the fragmentation. Wait for the volume to disappear and reappear on your computer to ensure the defragmentation process is complete.
Warning: The defragmentation process may take some time depending on the number of files stored on the SidecarTridge TOS emulator. It is recommended to wait for the volume to reappear on your computer before proceeding with other operations.
After the defragmentation process is complete, if you open the INFO.TXT file again, you should see that the fragmented space is reduced to 0.00%.
SidecarTridge ROM chip emulator v1.0.0 - (C)2024 GOODDATA LABS SL

Total ROMs:	18
Default ROM index:	0	address: 0x10040000	block size: 64
Rescue ROM index:	0	address: 0x10040000	block size: 64

ROM images:
EmuTOS 1.3.0 English UK 50Hz: 	start address: 0x10040000, blocks: 64 metadata: 0x30040
EmuTOS 1.3.0 - English-UK -50Hz: 	start address: 0x10080000, blocks: 64 metadata: 0x40
EmuTOS 1.3.0 - English-US - 60Hz: 	start address: 0x100c0000, blocks: 64 metadata: 0x40
EmuTOS 1.3.0 - Spanish - 50Hz: 	start address: 0x10100000, blocks: 64 metadata: 0x40
TOS 1.06 - English-UK - 50Hz: 	start address: 0x10140000, blocks: 64 metadata: 0x40
TOS 1.06 - English-US - 60Hz: 	start address: 0x10180000, blocks: 64 metadata: 0x40
TOS 1.06 - German - 50Hz: 	start address: 0x101c0000, blocks: 64 metadata: 0x40
TOS 1.06 - Spanish - 50Hz: 	start address: 0x10200000, blocks: 64 metadata: 0x40
TOS 1.62 - English-UK - 50Hz: 	start address: 0x10240000, blocks: 64 metadata: 0x40
TOS 1.62 - English-US - 60Hz: 	start address: 0x10280000, blocks: 64 metadata: 0x40
TOS 1.62 - Spanish - 50Hz: 	start address: 0x102c0000, blocks: 64 metadata: 0x40
TOS 2.05 - English-US - 60Hz: 	start address: 0x10300000, blocks: 64 metadata: 0x40
TOS 2.05 - German - 50Hz: 	start address: 0x10340000, blocks: 64 metadata: 0x40
TOS 2.05 - Spanish - 50hz: 	start address: 0x10380000, blocks: 64 metadata: 0x40
TOS 2.06 - English-UK - 50Hz: 	start address: 0x103c0000, blocks: 64 metadata: 0x40
TOS 2.06 - English-US - 60Hz: 	start address: 0x10400000, blocks: 64 metadata: 0x40
TOS 2.06 - Spanish - 50Hz: 	start address: 0x10440000, blocks: 64 metadata: 0x40
TOS 2.06 - SuperTOS - 50Hz: 	start address: 0x10480000, blocks: 64 metadata: 0x40

FLASH fragmentation:
GAP: 0, start address: 104c0000, blocks: 2878

Summary:
Total:			16208896 bytes
Free:			11788288 bytes
Fragmented:		0 bytes
Fragmented space:	0.00%
Max free space:		72.73%

Open the INDEX.HTM file to access instructions online
Edit the DEFAULT.TXT and RESCUE.TXT files to modify the default and rescue TOS images
Now that the flash memory is defragmented, we can proceed to the next section to learn how to modify the default and rescue TOS images.
Modifying the Default and Rescue TOS Images
The SidecarTridge TOS emulator allows you to set a default active TOS image and a rescue TOS image. The default TOS image is the one that will boot when the Atari ST is powered on, while the rescue TOS image is used in case of a boot failure as a fallback option by enabling the rescue mode. You can set the RESCUE signal on the SidecarTridge TOS emulator using the RESCUE connector and a push button.
The default image can be changed by editing the DEFAULT.TXT file in the SidecarTrdg volume or by using the SWITCHER.TOS program on the Atari ST.
The rescue image can ONLY be changed by editing the RESCUE.TXT file in the SidecarTrdg volume.
We strongly recommend using the SWITCHER.TOS program to change the default TOS image. Change the rescue TOS image only when necessary, as it is a critical setting that should be used in case of boot failure.
To change the default and rescue TOS images using the SWITCHER.TOS program, please refer to the Switching Between TOS Versions section in the User Guide.
Changing the default and rescue TOS images by editing the DEFAULT.TXT and RESCUE.TXT files is straightforward. Open the DEFAULT.TXT file in the SidecarTrdg volume and replace the name of the default TOS image with the desired TOS image file name. For example, to set TOS 2.06 - SuperTOS - 50Hz as the default TOS image, the DEFAULT.TXT file should contain exactly the name of the file (including the extension if it exists):
TOS 2.06 - SuperTOS - 50Hz
macOS and Windows operating systems may create hidden files when copying files to the SidecarTridge TOS emulator. These hidden files are not supported by the emulator and may cause issues. Use the Terminal in macOS or the Command Prompt in Windows to edit the files directly.
Some text editors do not modify the files when saving them. They create a new file and rename the old one. This will cause issues with the SidecarTridge TOS emulator, as it will not recognize the new file. Use a text editor that modifies the file directly. In Mac OSX and Linux, you can use the vi, vim or nano text editor in the Terminal. In Windows, you can use the notepad text editor in the Command Prompt.
After editing the DEFAULT.TXT and RESCUE.TXT files, save the changes and eject the SidecarTrdg volume from your computer. The next time you mount the SidecarTrdg volume and open the INFO.TXT file, you should see the changes reflected in the default and rescue TOS images.
SidecarTridge ROM chip emulator v1.0.0 - (C)2024 GOODDATA LABS SL

Total ROMs:	18
Default ROM index:	17	address: 0x10480000	block size: 64
Rescue ROM index:	0	address: 0x10040000	block size: 64

ROM images:
EmuTOS 1.3.0 English UK 50Hz: 	start address: 0x10040000, blocks: 64 metadata: 0x20040
EmuTOS 1.3.0 - English-UK -50Hz: 	start address: 0x10080000, blocks: 64 metadata: 0x40
EmuTOS 1.3.0 - English-US - 60Hz: 	start address: 0x100c0000, blocks: 64 metadata: 0x40
EmuTOS 1.3.0 - Spanish - 50Hz: 	start address: 0x10100000, blocks: 64 metadata: 0x40
TOS 1.06 - English-UK - 50Hz: 	start address: 0x10140000, blocks: 64 metadata: 0x40
TOS 1.06 - English-US - 60Hz: 	start address: 0x10180000, blocks: 64 metadata: 0x40
TOS 1.06 - German - 50Hz: 	start address: 0x101c0000, blocks: 64 metadata: 0x40
TOS 1.06 - Spanish - 50Hz: 	start address: 0x10200000, blocks: 64 metadata: 0x40
TOS 1.62 - English-UK - 50Hz: 	start address: 0x10240000, blocks: 64 metadata: 0x40
TOS 1.62 - English-US - 60Hz: 	start address: 0x10280000, blocks: 64 metadata: 0x40
TOS 1.62 - Spanish - 50Hz: 	start address: 0x102c0000, blocks: 64 metadata: 0x40
TOS 2.05 - English-US - 60Hz: 	start address: 0x10300000, blocks: 64 metadata: 0x40
TOS 2.05 - German - 50Hz: 	start address: 0x10340000, blocks: 64 metadata: 0x40
TOS 2.05 - Spanish - 50hz: 	start address: 0x10380000, blocks: 64 metadata: 0x40
TOS 2.06 - English-UK - 50Hz: 	start address: 0x103c0000, blocks: 64 metadata: 0x40
TOS 2.06 - English-US - 60Hz: 	start address: 0x10400000, blocks: 64 metadata: 0x40
TOS 2.06 - Spanish - 50Hz: 	start address: 0x10440000, blocks: 64 metadata: 0x40
TOS 2.06 - SuperTOS - 50Hz: 	start address: 0x10480000, blocks: 64 metadata: 0x10040

FLASH fragmentation:
GAP: 0, start address: 104c0000, blocks: 2878

Summary:
Total:			16208896 bytes
Free:			11788288 bytes
Fragmented:		0 bytes
Fragmented space:	0.00%
Max free space:		72.73%

Open the INDEX.HTM file to access instructions online
Edit the DEFAULT.TXT and RESCUE.TXT files to modify the default and rescue TOS images
The default index is now set to 17, which corresponds to the TOS 2.06 - SuperTOS - 50Hz image. The rescue index remains at 0, which is the default EmuTOS image.
The reason you need to eject the SidecarTrdg volume and mount it again is that all operating systems will cache the files, and the changes will not be reflected until the volume is mounted again.
If you are using macOS, you can use the purge command in the Terminal to clear the disk cache and force the system to reload the files, without the need to eject and mount the volume again.
As a rule of thumb, always eject the SidecarTrdg volume after making any changes to the files. This will ensure that the changes are correctly saved and reflected in the emulator.
Advanced Commands
The SidecarTridge TOS emulator supports some advanced commands that can be used to manage the TOS images and flash memory. These commands are executed by creating specific files in the SidecarTrdg volume. Here are some of the advanced commands:
DEFRAG: Forces the emulator to defragment the flash memory. This command is useful after copying multiple files to the emulator to optimize the storage space. When theDEFRAGfile is created, the emulator will unmount the volume, defragment the flash memory, and remount the volume. Wait for the volume to reappear on your computer to ensure the defragmentation process is complete.WIPE_OUT: Erases all files stored on the emulator, including the pre-installed EmuTOS image. This command is useful when you want to start fresh with a clean slate. When theWIPE_OUTfile is created, the emulator will unmount the volume, erase all files, and remount the volume. Wait for the volume to reappear on your computer to ensure the wipe-out process is complete.
Firmware Installation
The SidecarTridge TOS emulator comes with pre-installed firmware and a default EmuTOS image. However, it is recommended to check for the latest firmware version and update if necessary. The firmware update process is straightforward and can be done using a computer with a USB port.
We assume that you have already connected the SidecarTridge TOS emulator to your computer using the USB-C cable and that the SidecarTrdg volume is accessible. If you have not done so, please refer to the Connecting the Device to a Computer section.
Obtaining the Installed Firmware Version
Open the INFO.TXT file to check the installed firmware version. The file should contain information similar to the following:
SidecarTridge ROM chip emulator v1.0.0 - (C)2024 GOODDATA LABS SL

Total ROMs:	1
Default ROM index:	0	address: 0x10040000	block size: 48
Rescue ROM index:	0	address: 0x10040000	block size: 48

ROM images:
EmuTOS 1.3.0 192KB UK.img: 	start address: 0x10040000, blocks: 48 metadata: 0x30030

FLASH fragmentation:
GAP: 0, start address: 10070000, blocks: 3982

Summary:
Total:			16208896 bytes
Free:			16310272 bytes
Fragmented:		0 bytes
Fragmented space:	0.00%
Max free space:		100.63%

Open the INDEX.HTM file to access instructions online
Edit the DEFAULT.TXT and RESCUE.TXT files to modify the default and rescue TOS images
The firmware version is displayed at the top of the file in the format SidecarTridge ROM chip emulator v1.0.0. If there is a newer firmware version available, you can proceed with the firmware update process in the next section. If the firmware version is up-to-date, you can skip the firmware update and proceed to the next section.
Upgrading the Firmware
If there is a newer firmware version available, you can proceed with the firmware update process. Download the latest firmware version from the main page of the SidecarTridge TOS documentation website and store it in a temporary location on your computer.
To update the firmware, follow these steps:
- Hold the
RESETbutton on the SidecarTridge TOS ROM Board. - While holding the
RESETbutton, hold theBOOTbutton. - Release the
RESETbutton. - Release the
BOOTbutton.
The SidecarTridge TOS emulator will enter the firmware update mode and appear as a USB mass storage device on your computer with the name RPI-RP2. Copy the firmware file to the root directory of the mass storage device and wait for the firmware update process to complete. If, after the update, the SidecarTridge TOS emulator does not reboot, press the RESET button for a few seconds to restart the device.
The firmware update process is now complete, and you can proceed to the next section to verify the installation.
The firmware update process is straightforward and will not affect the TOS images stored on the SidecarTridge TOS emulator. However, it is recommended to back up the TOS images before updating the firmware to avoid any data loss.