Hardware Installation
The different Amiga models are encased in a plastic outer shell that must be fully removed to access the internal components. This guide will walk you through the steps necessary to open these cases and install the SidecarTridge Kickstart Emulator safely and effectively.
Table of contents
Opening the Amiga Case
Overview
Once the plastic case is removed, you’ll find a metal shielding that also needs to be taken off to reach the ROMs and other crucial parts of the computer. The user must remove both the plastic and metal casings to access the internal components safely. This process requires a few tools and safety precautions to prevent damage to the Amiga and ensure a successful installation of the SidecarTridge Kickstart Emulator.
Tools Required
- Phillips-head screwdriver
- Flat-head screwdriver (optional, for prying)
- Anti-static wrist strap (recommended)
Safety Precautions
- Power Off and Unplug: Ensure the Amiga is powered off and unplugged from any power source before beginning the disassembly.
- Ground Yourself: Wear an anti-static wrist strap to prevent static electricity from damaging internal components. Alternatively, touch a grounded metal object periodically to discharge static electricity.
- Work on a Clean Surface: Use a clean, static-free workspace to prevent any debris or static discharge from interfering with the components.
Step-by-Step Instructions
- Remove the Screws of the plastic case:
- Turn the Amiga upside down and locate the screws securing the case.
- Using a Phillips-head screwdriver, carefully remove all the screws. Keep the screws in a safe place for reassembly. There are plenty of YouTube videos showing how to open an Amiga case.
- Separate the Case Halves:
- Once the screws are removed, gently separate the top and bottom halves of the case.
- If the case is difficult to open, use a flat-head screwdriver to carefully pry the halves apart, being mindful not to damage the plastic.
- Remove the Metal Shielding:
- After removing the plastic case, you’ll find a metal shielding covering the internal components.
- Locate the screws securing the metal shielding and remove them using a Phillips-head screwdriver.
- Also locate the secure tabs that hold the shielding in place and gently release them.
- Carefully lift the metal shielding off the Amiga to access the internal components.
- Locate the Amiga ROM:
- Once the metal shielding is removed, you’ll find the Amiga ROM chip.
- Depending on the Amiga model, they will be in different locations:
In the Amiga 500, the ROM is located at the left side of the motherboard between the Motorola 68000 CPU and the AGNUS chip. 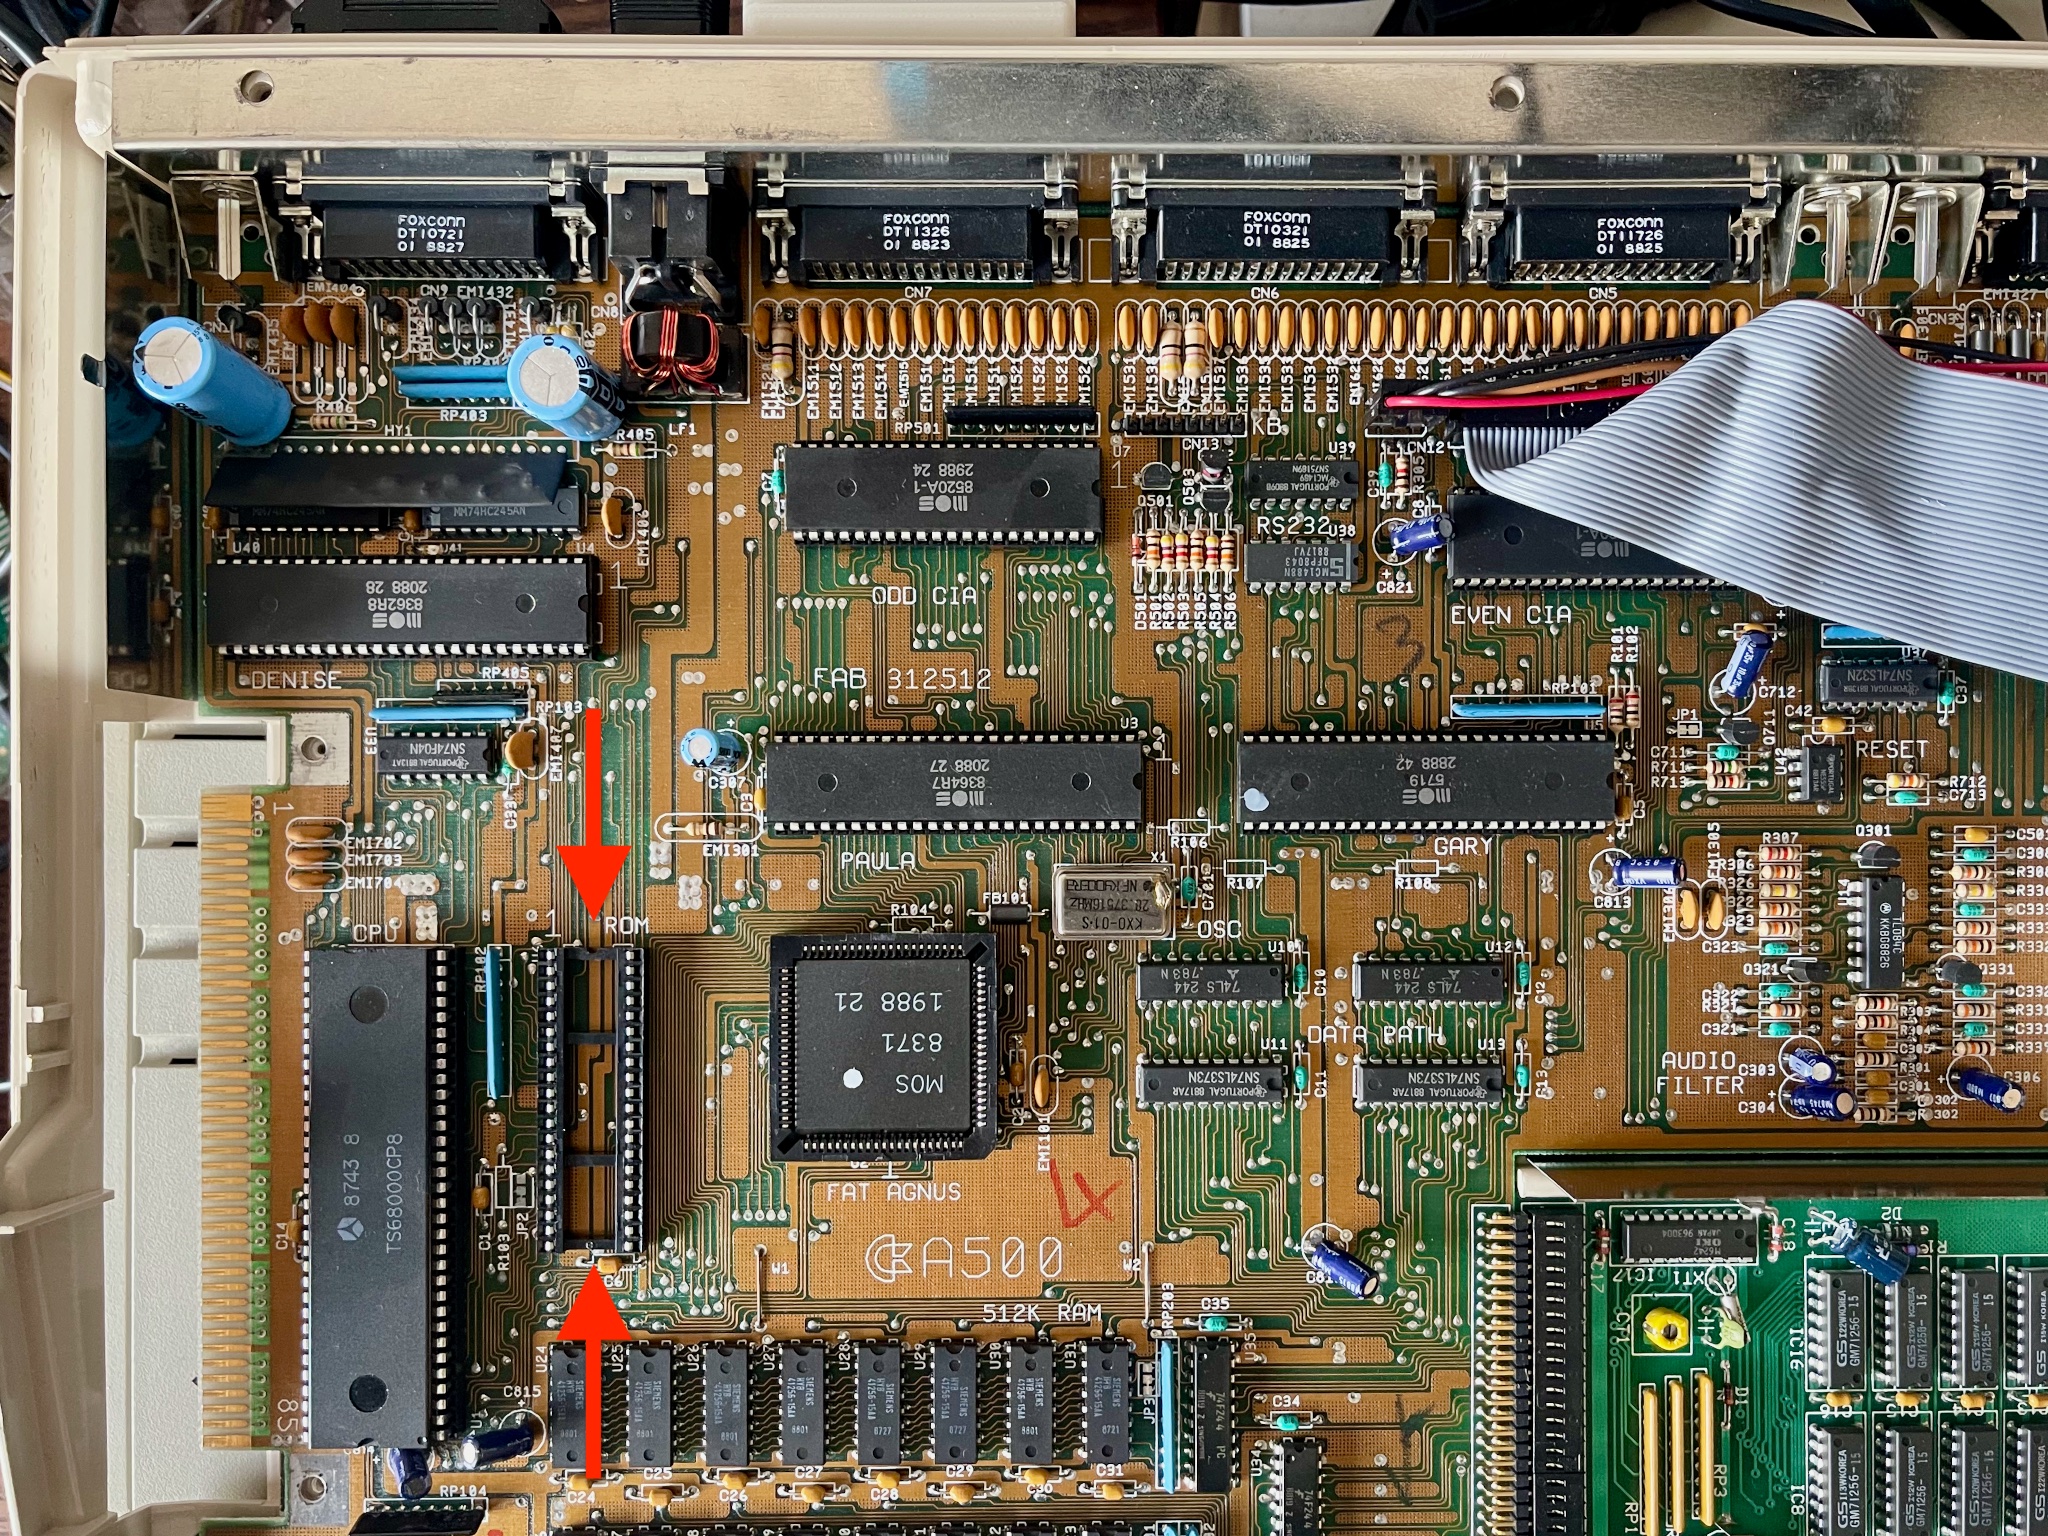
By following these instructions, you can safely open your Amiga case and prepare for the hardware installation of the SidecarTridge Kickstart Emulator.
Unplugging the Amiga ROMs
If the ROM chip is soldered to the motherboard, it is recommended to seek professional assistance to avoid damaging the Amiga. This guide assumes the ROM chip is socketed and can be removed without soldering.
Use a Chip Extractor or Flat-Head Screwdriver
If you have a chip extractor tool, use it to carefully lift the ROM chip out of its socket. If you don’t have a chip extractor, use a flat-head screwdriver. Gently insert the tip under one end of the chip and slowly pry it upward. Repeat on the other end until the chip is free.
Be very careful to lift the chip evenly to avoid bending the pins. Also, avoid using excessive force, as this can damage the chip, the socket, or the motherboard.
Handle ROM Chip with Care
Once removed, place the ROM chip on an anti-static mat or in an anti-static bag to protect it from static damage.
Inspect the Sockets
Inspect the now-empty sockets on the motherboard for any debris or damage. Clean if necessary, using compressed air or a soft brush.
Setting the OOPS Bug jumper (only for the Amiga 2000)
While both Amiga 500 (rev 5 and older) and Amiga 2000 motherboards (notably rev 4.2 and older) are affected by the well-known OOPS bug, a hardware routing error in the Kickstart ROM address lines present in early Commodore schematics.
On the Amiga 500 version of the SidecarTridge Kickstart Emulator this setting is implemented as a soldered junction, since the motherboard revision is usually known in advance.
On the Amiga 2000, however, the motherboard revision is not always obvious, and many users may not know which version they own when purchasing the device.
For this reason, the Amiga 2000 version uses a removable jumper so the OOPS bug compatibility can be easily enabled or disabled if needed.
Because of this bug, some replacement Kickstart ROM devices may fail to boot unless compatibility logic is enabled.
The SidecarTridge Kickstart Emulator for Amiga 2000 includes an OOPS Bug jumper on the carrier board to provide compatibility with these early motherboards.
If the jumper is not set properly on affected machines, the Amiga may show a black screen or fail to start after reset.
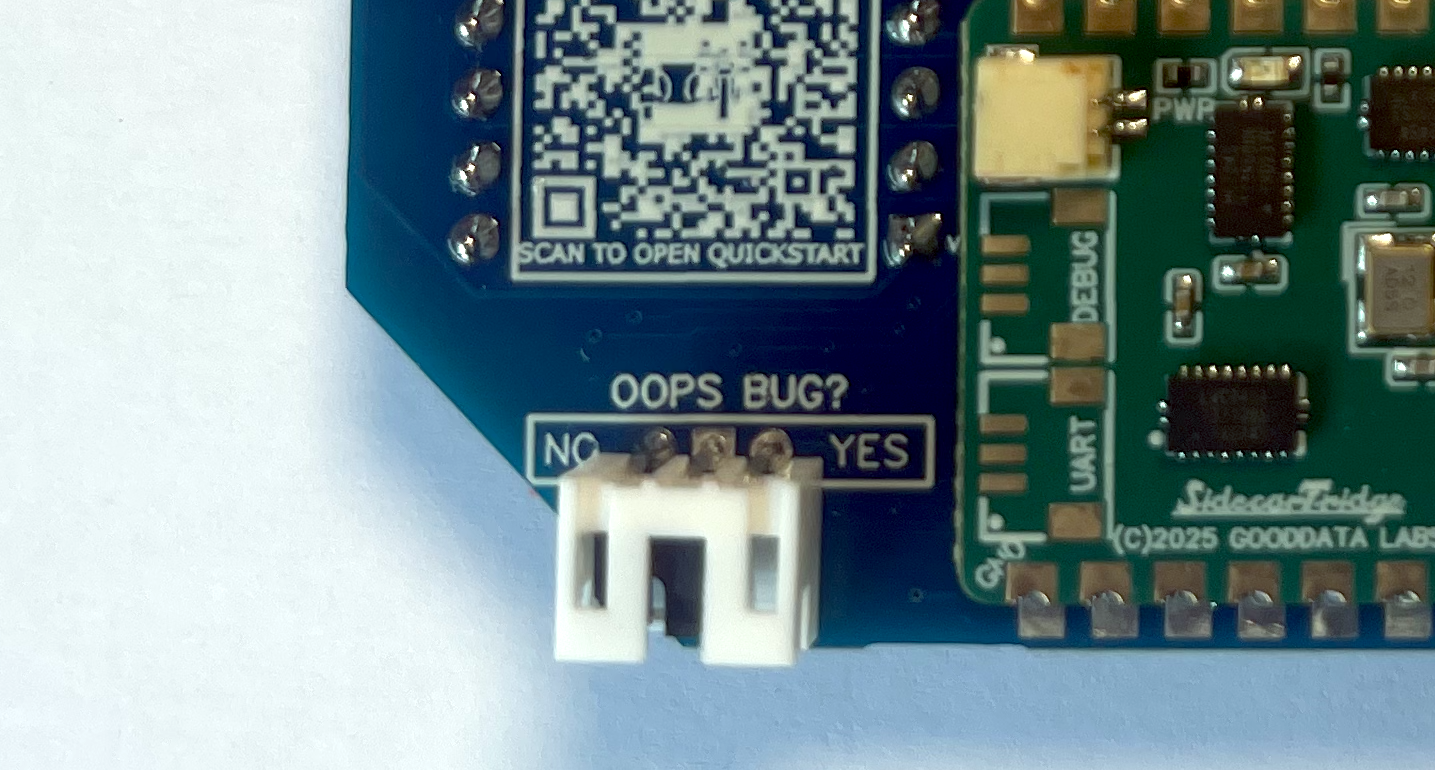
Setting the jumper
- Locate the jumper labeled OOPS BUG on the SidecarTridge Kickstart Emulator board.
- If your Amiga 2000 motherboard is affected by the OOPS bug (rev 4.2 and older), set the jumper to the “YES” position by placing the jumper cap over the designated pins. If the motherboard is not affected, leave the jumper in the “NO” position.
- Ensure the jumper is firmly seated before inserting the board into the ROM socket.
After setting the jumper, continue with the normal installation procedure.
Plugging the SidecarTridge Kickstart Emulator
Depending on the Amiga model, the SidecarTridge Kickstart Emulator carrier board must be connected to the motherboard in the correct orientation. The following steps provide guidance on connecting the emulator to the Amiga motherboard securely.
Find the Correct Orientation
Amiga 500
The SidecarTridge carrier board has to be plugged into the ROM socket as described below:
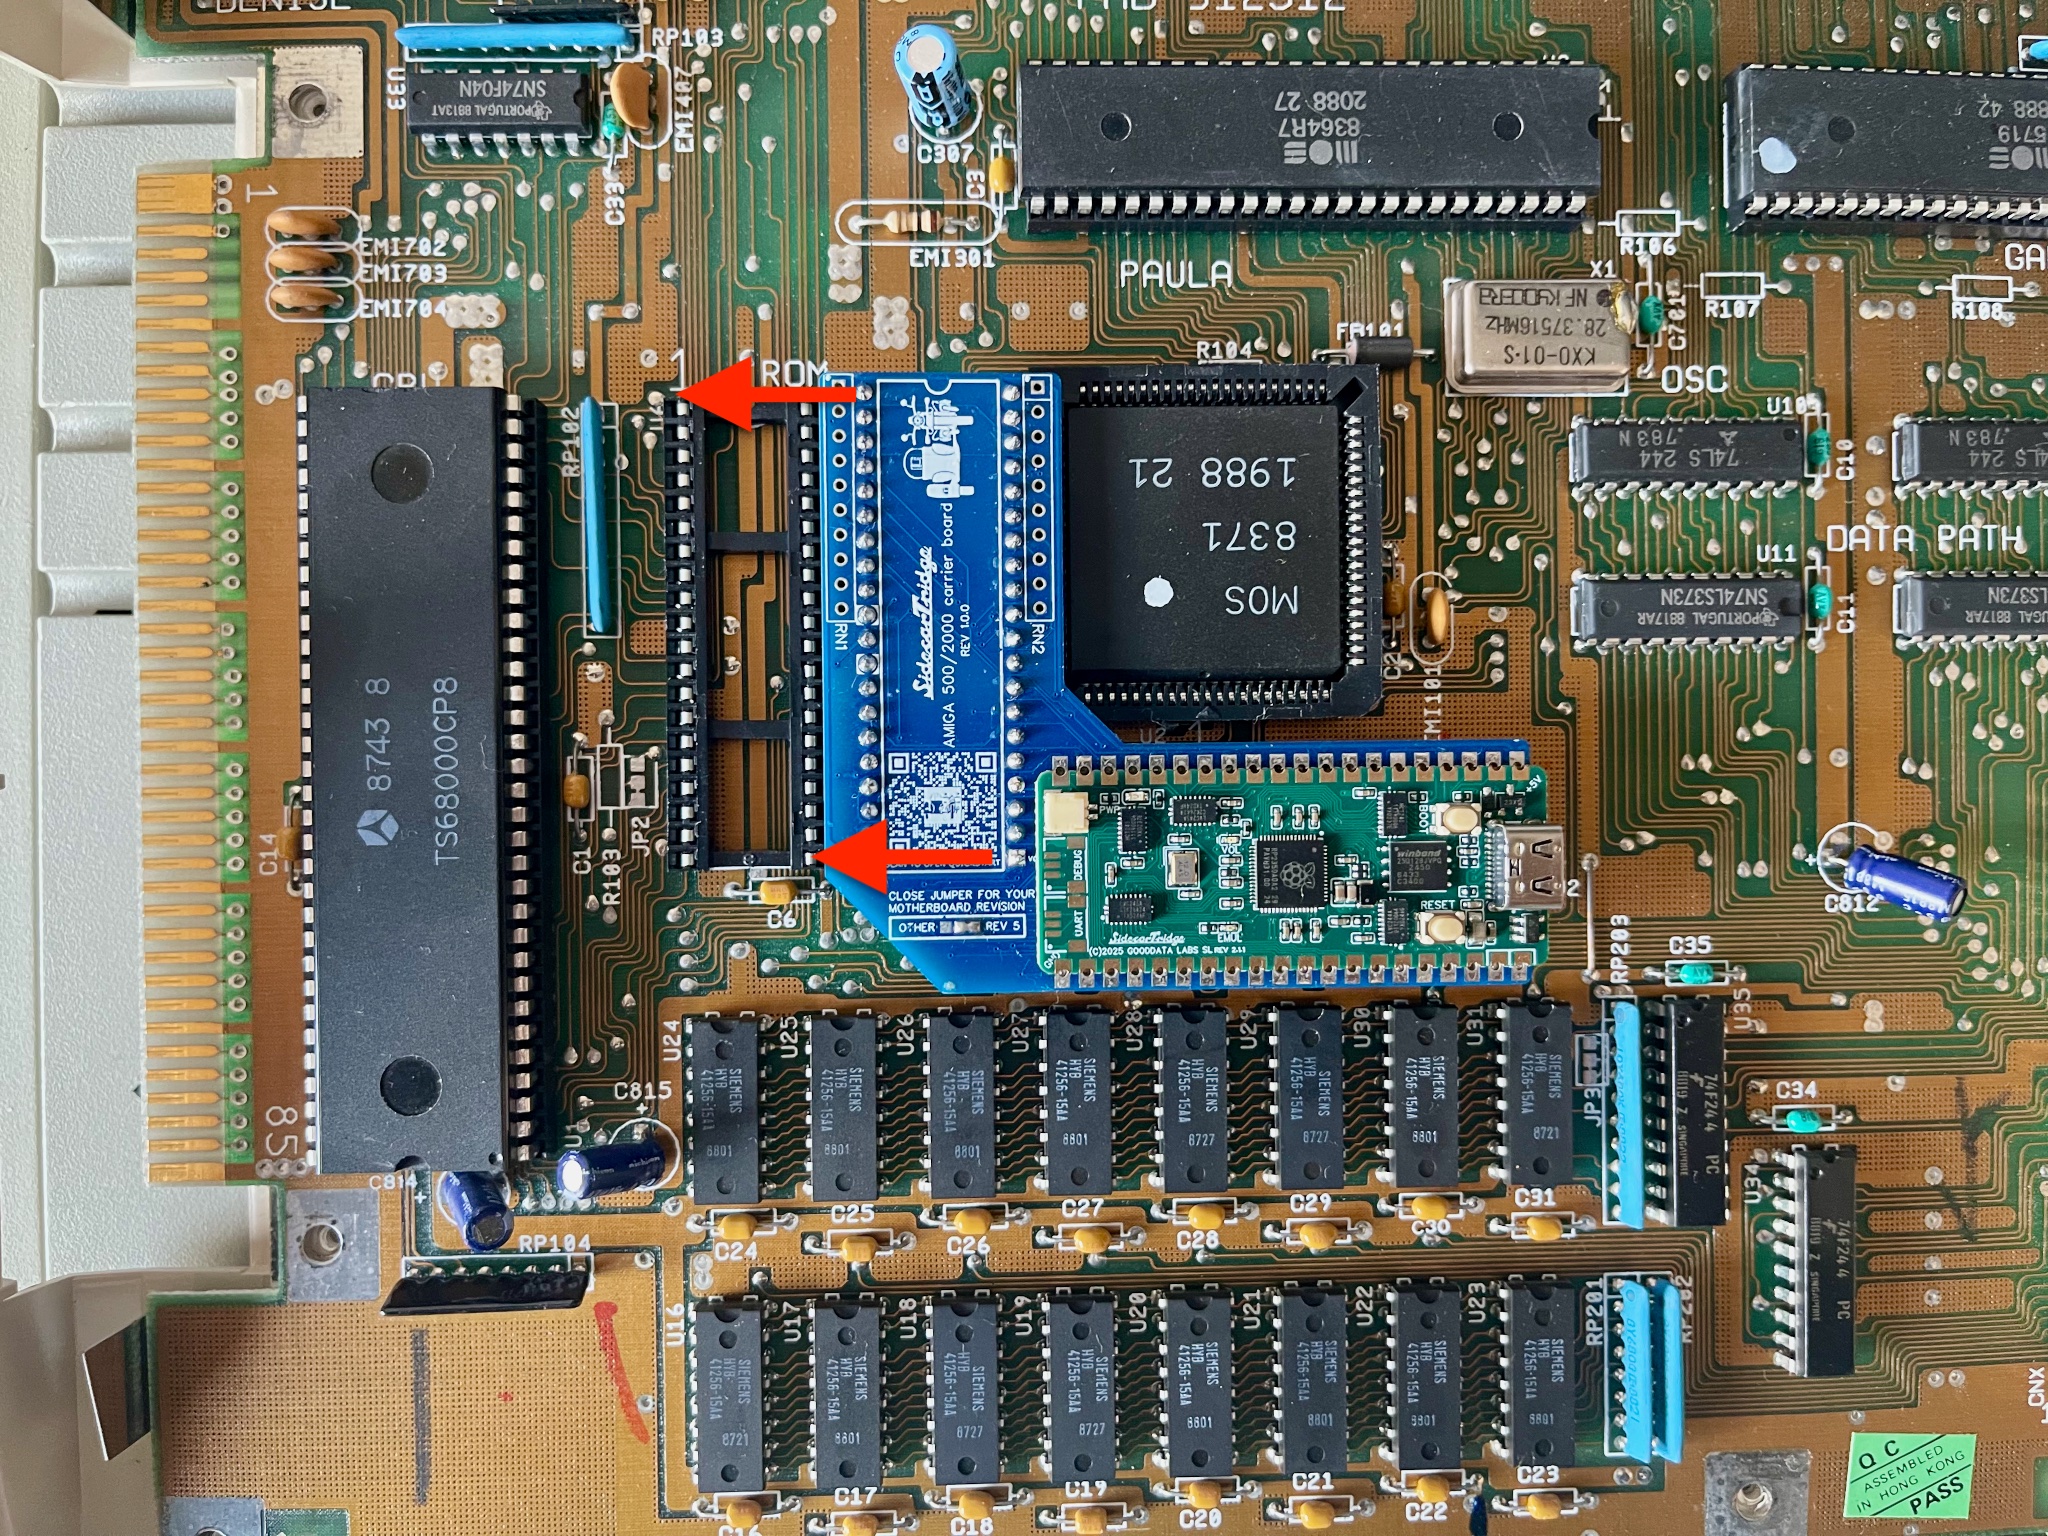
Insert the Emulator
Gently press the SidecarTridge Kickstart Emulator into the ROM socket. Apply even pressure on both sides to avoid bending any pins. Make sure it is fully seated and secure in the socket. Try to insert all the pins at once, and don’t force it if it doesn’t fit.
By following these steps, you will have successfully connected and secured the SidecarTridge Kickstart Emulator to your Amiga 500, ensuring a stable and functional installation.

As a final step, connect the rescue mode cable to the SidecarTridge Kickstart Emulator. This cable is essential for accessing the rescue mode if needed in the future. The cable is long enough to show outside the Amiga case through the expansion port area.
Closing the Amiga 500 Case
Test the unit before closing the case
Before reassembling the Amiga 500, it is recommended to test the unit to ensure the SidecarTridge Kickstart Emulator is functioning correctly. Power on the Amiga 500 and verify that the SidecarTridge Kickstart Emulator is recognized and operational.
If the SidecarTridge Kickstart Emulator is not recognized or functioning correctly, power off the Amiga 500 and recheck the installation steps to identify and resolve any issues. If the problem persists, refer to the Troubleshooting section for further assistance.
Reassemble the Amiga 500
Once the SidecarTridge Kickstart Emulator is confirmed to be working correctly, reassemble the Amiga 500 by reversing the steps taken to open the case.
Before closing the case, ensure there is no contacts of any of the elements of the SidecarTridge Kickstart Emulator with the metal shielding or any other component that could cause a short circuit.