User Guide
This chapter describes the normal day-to-day operation of the SidecarTridge Keyboard Emulator.
Use this page after the hardware has been installed and the initial setup has been completed.
The guide is organized by operating mode and feature area so that new procedures can be added later without restructuring the page.
Table of contents
- Startup behavior and mode selection
- Pass-through mode
- Bluetooth mode
- Overview
- LED behavior in Bluetooth mode
- Configure Bluetooth mode
- Keyboard layout
- Mouse speed
- Gamepad auto-shoot
- Saving Bluetooth configuration
- Pairing procedure
- Powering on with paired Bluetooth devices
- Powering on without paired Bluetooth devices
- Keyboard behavior in Bluetooth mode
- Mouse behavior in Bluetooth mode
- Gamepad behavior in Bluetooth mode
- USB mode
- Overview
- Configure USB mode
- Keyboard layout
- Mouse speed
- Gamepad auto-shoot
- Use original mouse (Experimental)
- USB joystick/gamepad
- Saving USB configuration
- Powering on with connected USB devices
- Powering on without connected USB devices
- Keyboard behavior in USB mode
- Mouse behavior in USB mode
- Gamepad behavior in USB mode
- USB power caveats or limitations
- Advanced network configuration
Startup behavior and mode selection
This section explains what happens when the Atari computer is powered on and how the SidecarTridge Keyboard Emulator selects its operating mode.
Power-on behavior
When the Atari computer is powered on, the SidecarTridge Keyboard Emulator is powered on as well.
The device does not require a separate power source during normal operation.
First boot behavior
On first boot, the device always starts in configuration mode.
The expected LED pattern is:
- Green LED: blinking
- Orange LED: steady on
This pattern indicates:
- firmware is running
- device is in configuration mode
- WiFi station is active
From this initial configuration mode, the user can access the web interface and select the first normal operating mode for the device.
Startup mode after initial configuration
After the first normal operating mode has been selected, the device will start in that mode every time the computer is powered on.
Depending on the hardware model, the available startup modes are:
- Pass-through mode (Croissant only)
- Bluetooth mode
- USB mode (Soufflè only)
The startup mode remains stored until the user changes it.
Entering configuration mode manually
To change the startup operating mode later, the user can return to configuration mode.
Croissant and Soufflè both provide a CONFIG button.
Pressing the CONFIG button forces the device to enter configuration mode immediately.
Configuration mode exposes the web pages described in this document.
Reset code using the Atari reset button
Applicable hardware:
- Croissant only
Croissant also supports changing the operating mode by using the Atari ST reset button during power-on.
Depending on how long the computer reset button is held while powering on the system, the device can switch to a different operating mode.
This reset code allows the user to keep the computer enclosure closed while still changing operational features without pressing any button on the board itself.
See the operating mode sections below for the reset code behavior associated with each feature.
Pass-through mode
Applicable hardware:
- Croissant only
This section covers the operating mode in which the internal keyboard path is preserved and the device operates inline with the original system hardware.
Overview
Pass-through mode allows the SidecarTridge Keyboard Emulator to be used without disabling the original Atari keyboard, mouse, or joystick hardware. In this mode, the HD6301-based IKBD microcontroller used in the 16-bit Atari ST family is not emulated, and the original keyboard path is preserved. The device simply passes through the original keyboard, mouse, and joystick signals.
This mode is intended for users who want to add modern input devices while keeping the original keyboard, joysticks, and mouse fully operational and compatible with software that expects the original hardware behavior.
Enabling or selecting pass-through mode
To enable pass-through mode, the user can either select it from the web interface or use the reset code on Croissant.
Select pass-through mode using the web interface
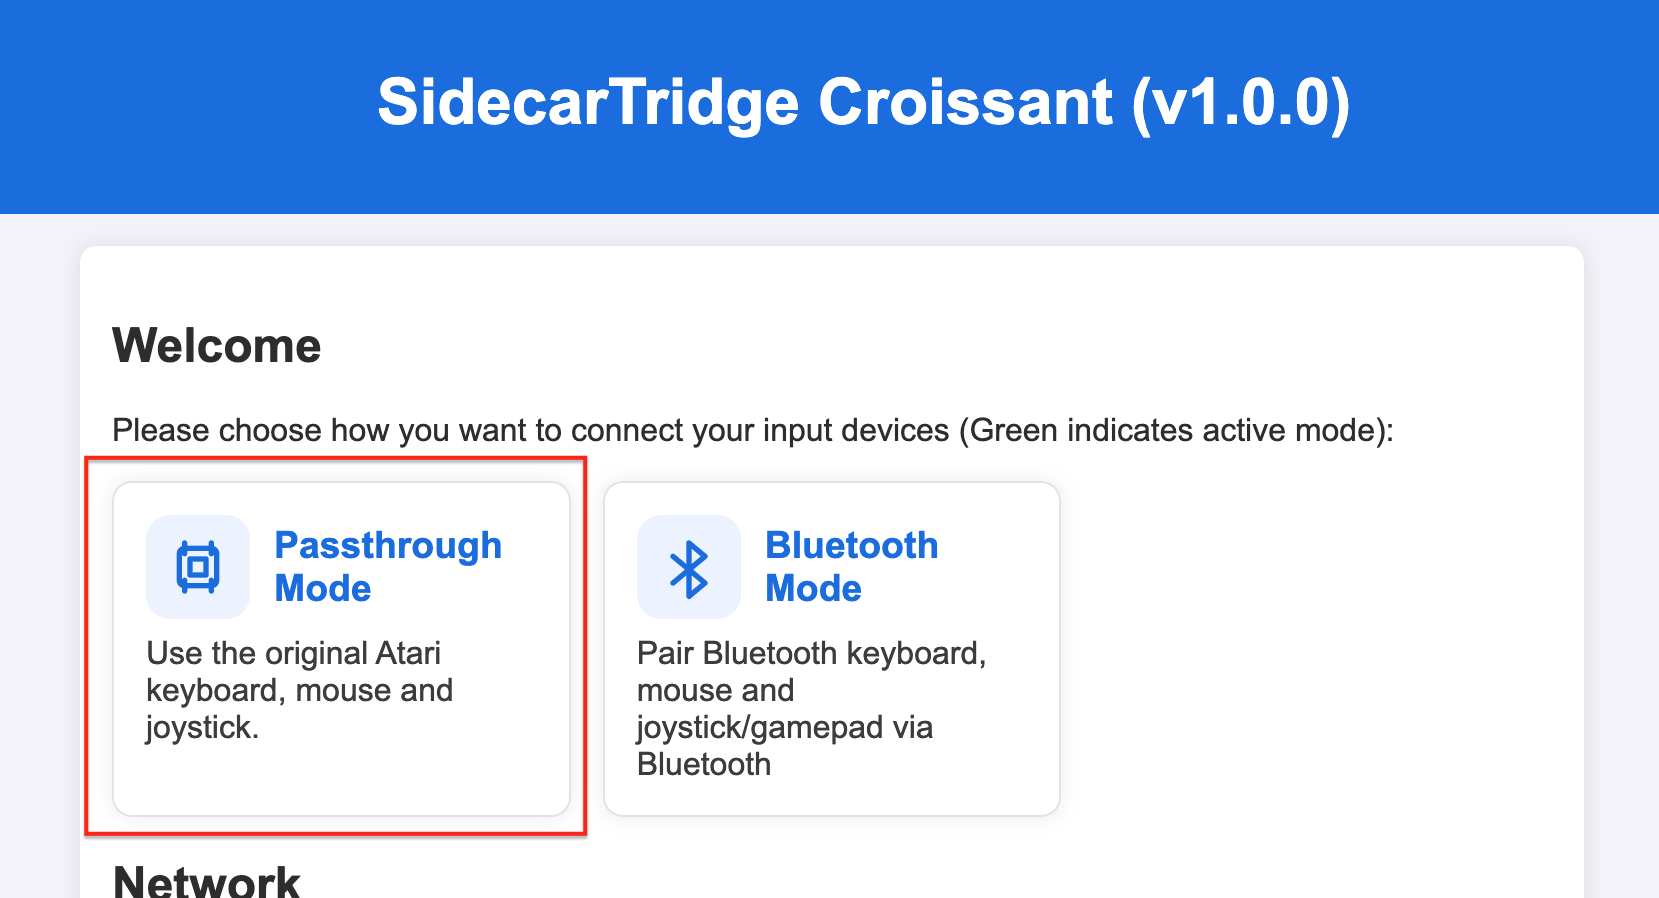
Pass-through mode can be selected from the configuration page shown below:
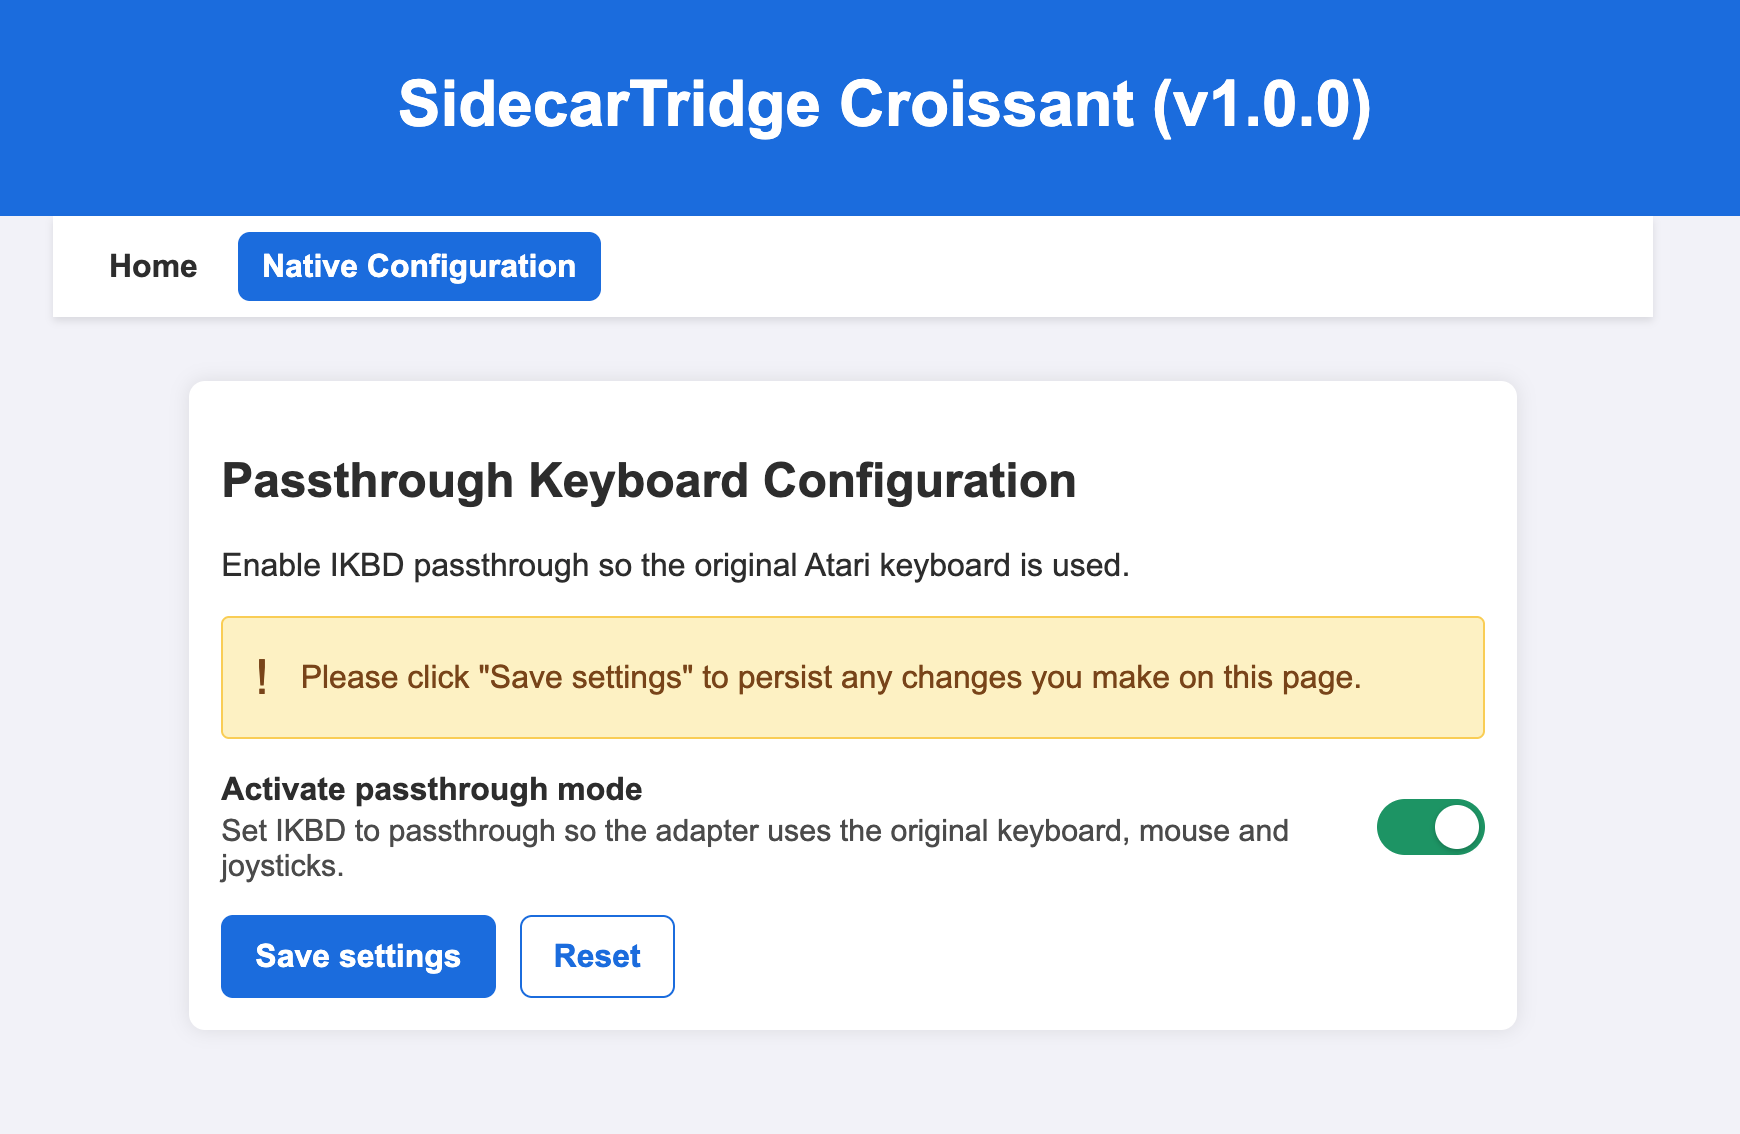
- Choose the pass-through mode option.
- Toggle the
Activate pass-through modebutton in the web interface. - Save the configuration settings.
After that, every time the computer is powered on, the device will start in pass-through mode.
Select pass-through mode using the reset code
Sometimes the user may want to enable pass-through mode even though the default active mode is Bluetooth mode. Instead of entering configuration mode, Croissant provides a timing-based reset feature that bypasses the default Bluetooth mode and starts in pass-through mode.
To enable pass-through mode with the reset code:
- With the computer powered off, hold down the Atari computer reset button and power on the computer.
- Wait between 5 and 9 seconds.
- Release the reset button. The computer will then boot normally with pass-through mode enabled.
If the reset button is held for more than 10 seconds and less than 20 seconds, the device will start in configuration mode.
The reset code only affects that boot cycle. To permanently change the operating mode of the Croissant device, enter configuration mode and store the new setting there.
Expected behavior in pass-through mode
When pass-through mode is active, the orange LED is steady on and the green LED is off.
The keyboard, joystick, and mouse behave as if the device were not connected.
Limitations or mode-specific notes
There are no known restrictions in pass-through mode.
Bluetooth mode
Applicable hardware:
- Croissant
- Soufflè
This section covers Bluetooth operation for keyboards, mice, and other supported wireless input devices.
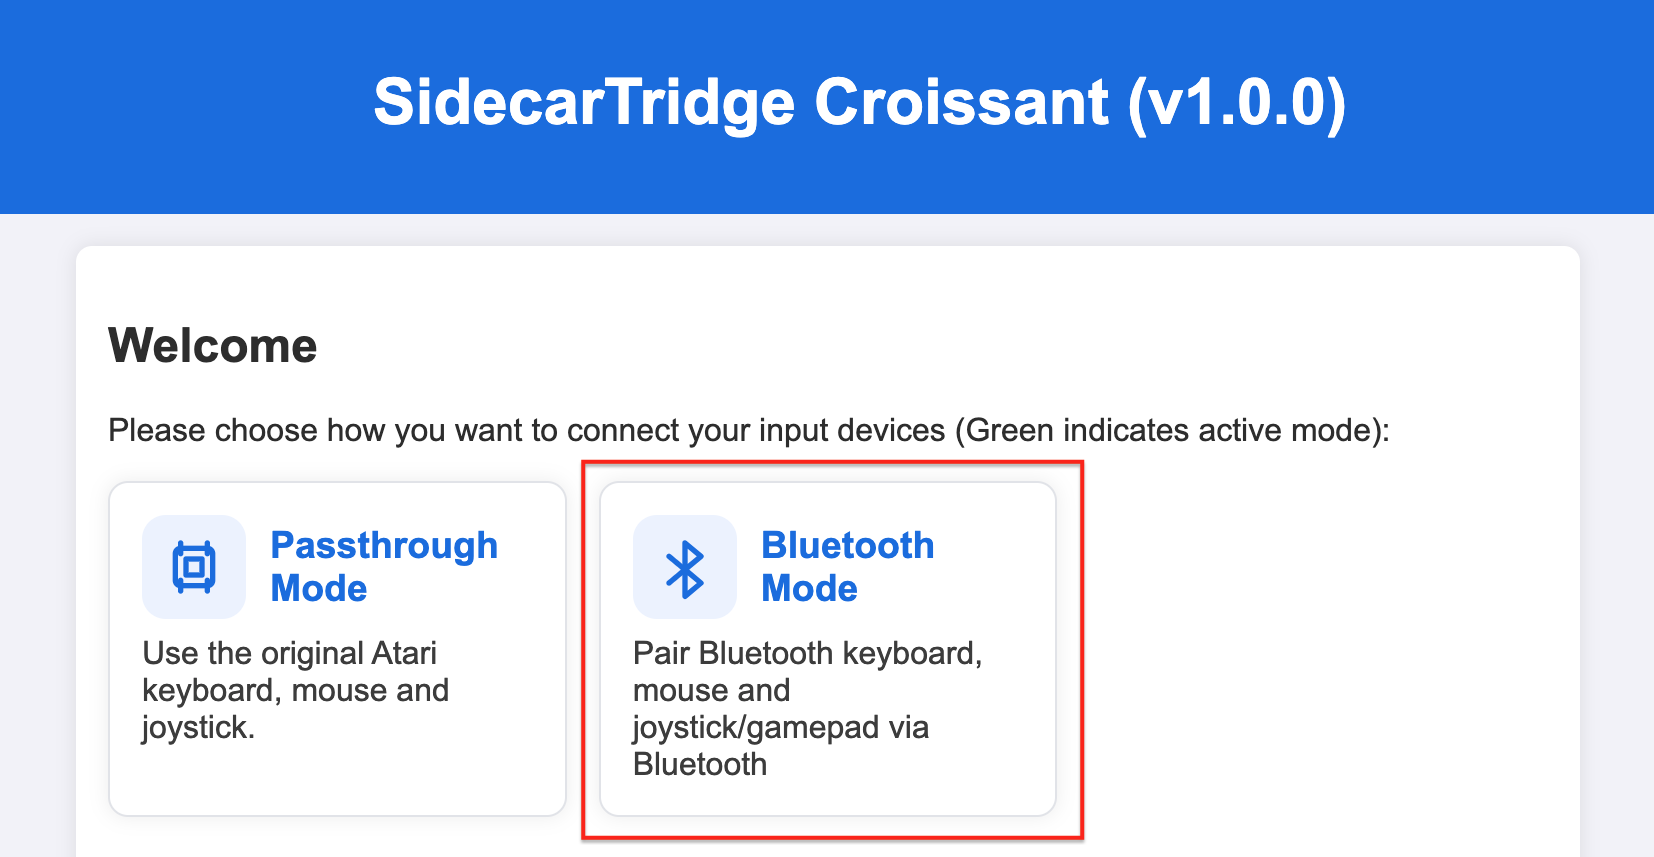
Example select Bluetooth mode page on Croissant (same on Soufflè):
Overview
Bluetooth mode allows the SidecarTridge Keyboard Emulator to connect to modern wireless input devices, such as supported Bluetooth keyboards, mice, and gamepads. In this mode, the device emulates the original Atari keyboard, mouse, or joystick functionality while adding support for Bluetooth input.
This mode is intended for users who want to use modern wireless input devices with their Atari computer while preserving compatibility with software that expects the original hardware behavior.
Bluetooth mode supports both Classic and BLE Bluetooth devices. There is no exhaustive list of supported devices, but the current implementation uses a superset of the devices supported by the Bluepad32 library, which includes a wide range of popular Bluetooth keyboards, mice, and gamepads. The supported device list will continue to expand as more peripherals are tested, and users can also try pairing their own Bluetooth devices to determine compatibility.
The Bluetooth chip in the Raspberry Pi Pico 2W and the Pico-SDK BTstack support a broad feature set, but users should not expect compatibility with every Bluetooth device on the market or feature parity with a full operating system Bluetooth stack.
Croissant is installed between the motherboard and the original keyboard, so Bluetooth range will not be the same as that of an external Bluetooth adapter connected directly to a computer. Typical range is approximately 5 to 10 meters in open space, and walls or other obstacles may reduce it further. Bluetooth performance will depend on the environment and on the specific devices being used. These limitations do not apply in the same way to Soufflè, which has a more open external design.
LED behavior in Bluetooth mode
When Bluetooth mode is active, the orange LED is off and the green LED is steady on.
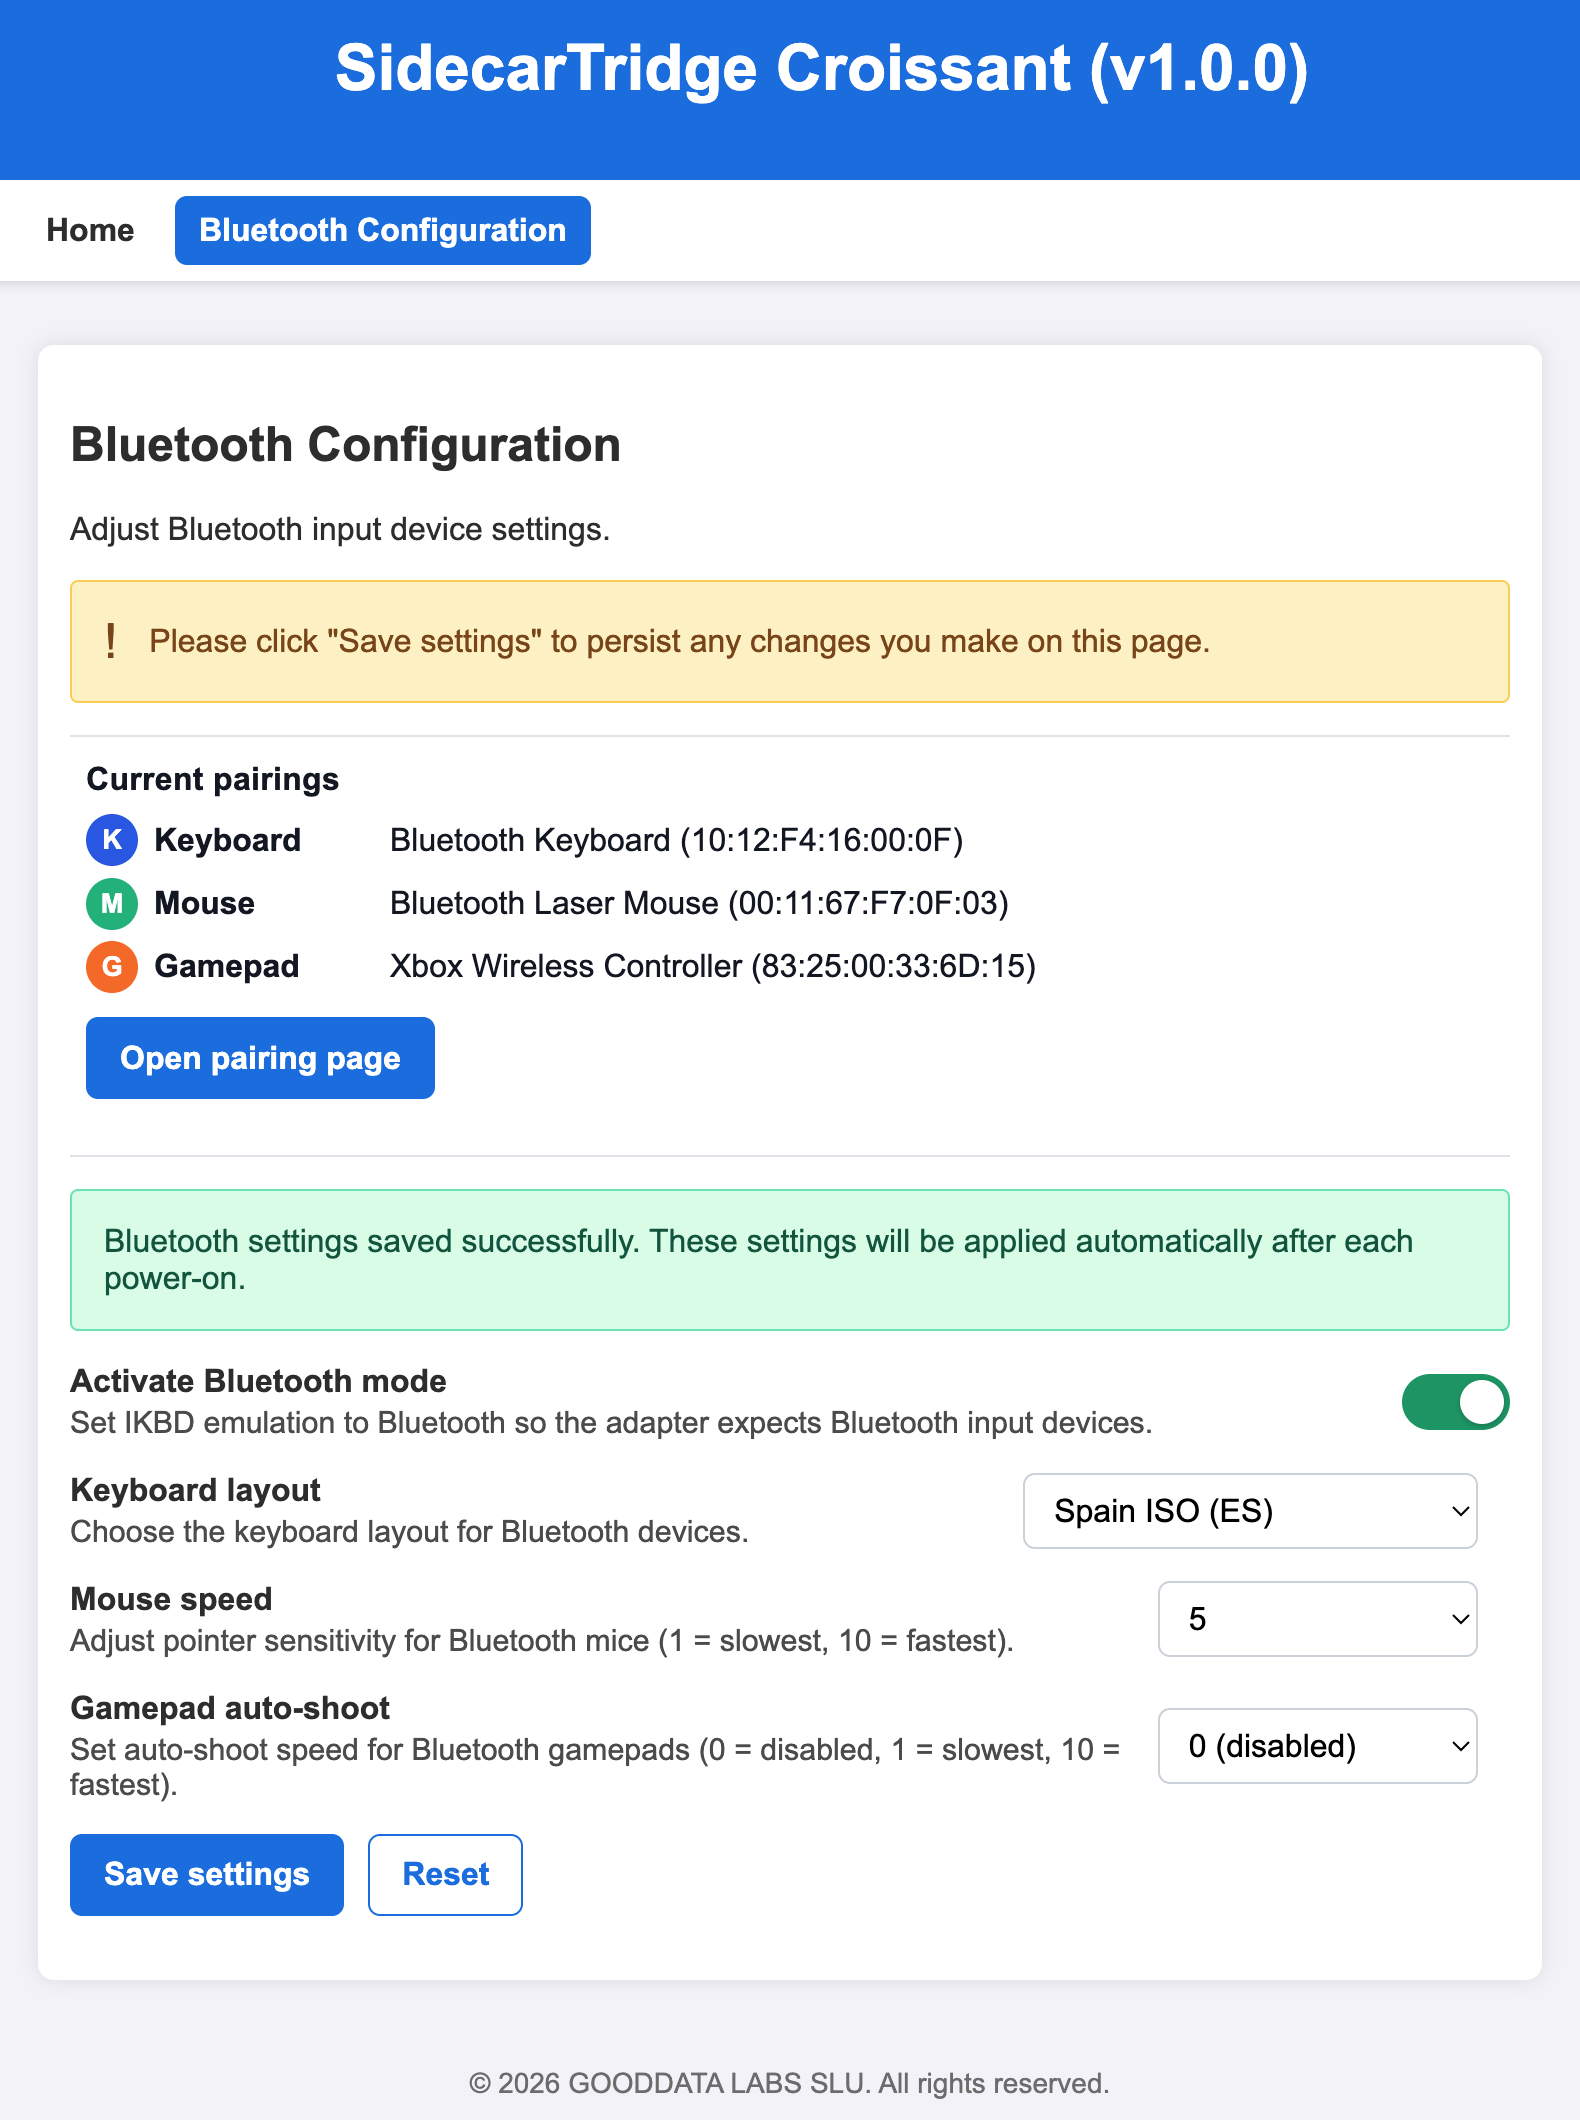
Configure Bluetooth mode
To enable Bluetooth mode, open the Bluetooth configuration page in the web interface. The same configuration workflow is used on both Croissant and Soufflè.
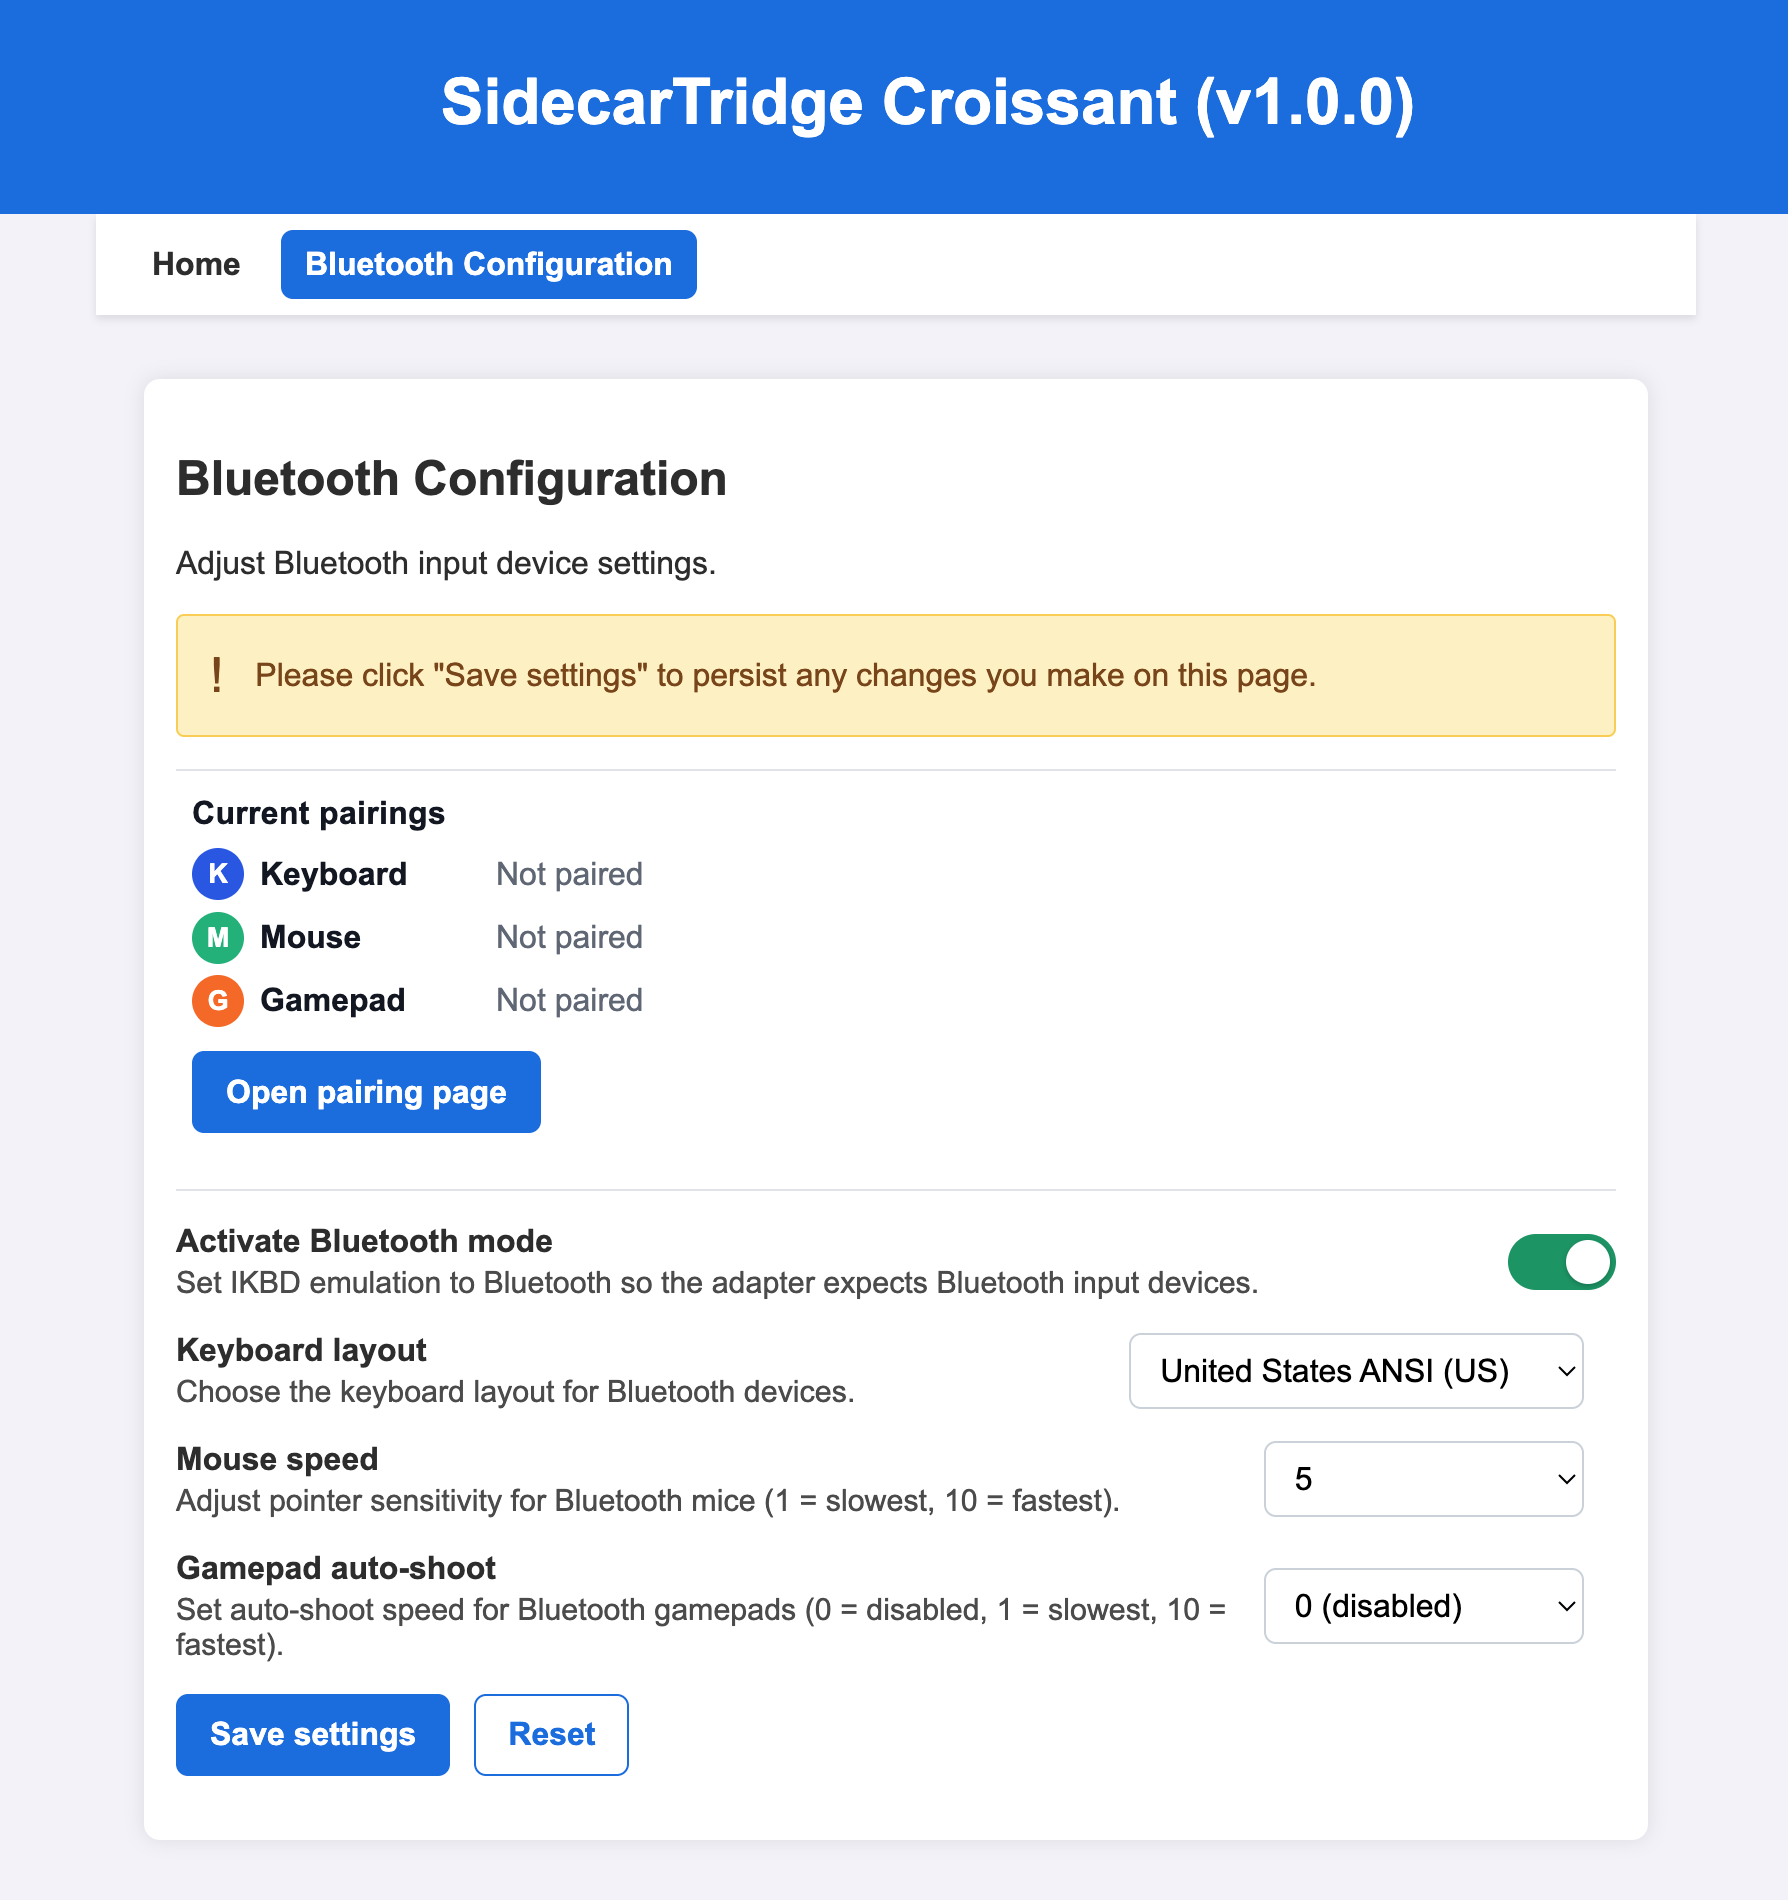
The Bluetooth configuration page provides these controls:
Activate Bluetooth modeenables Bluetooth input mode.Current pairingsshows the pairing status for keyboard, mouse, and gamepad.Open pairing pageopens the pairing workflow for new Bluetooth devices.Keyboard layoutselects the keyboard layout used by Bluetooth keyboards.Mouse speedadjusts pointer sensitivity for Bluetooth mice.Gamepad auto-shootsets the auto-shoot speed used by supported Bluetooth gamepads.
To configure Bluetooth mode:
- Enable
Activate Bluetooth mode. - Review the
Current pairingsstatus shown for keyboard, mouse, and gamepad.Not pairedmeans that no device is currently paired for that category, whilePairedmeans that a device is already paired and connected. To modify the current pairing status, open theOpen pairing page. - Click
Open pairing pageif you want to add or replace a Bluetooth device. - Select the required
Keyboard layout. - Adjust
Mouse speedandGamepad auto-shootas needed. - Click
Save settingsto store the configuration.
If you made changes that you do not want to keep, click Reset before saving.
After that, every time the computer is powered on, the device will start in Bluetooth mode.
Keyboard layout
The Keyboard layout setting allows the user to select the keyboard layout used by Bluetooth keyboards connected to the device. This setting is important to ensure that the keys on the Bluetooth keyboard correspond correctly to the expected key codes sent to the Atari computer.
In the latest firmware version, the following keyboard layouts are supported:
- United States ANSI
- France ISO (FR)
- Germany ISO (DE)
- United Kingdom ISO (GB)
- Spain ISO (ES)
- Italy ISO (IT)
Additional layouts may be added in future firmware versions. If you need a layout that is not currently supported, please open an issue in the GitHub repository so it can be prioritized based on demand.
In normal use, the selected Bluetooth keyboard layout should match the TOS keyboard layout. For example, if the system uses a French TOS, the Bluetooth keyboard should be configured as France ISO (FR). This ensures that the Bluetooth keyboard generates the expected characters and key codes when used with the Atari computer.
Mouse speed
The Mouse speed setting allows the user to adjust the pointer sensitivity for Bluetooth mice connected to the device. This setting controls how fast the mouse pointer moves on the screen in response to physical mouse movement.
1 is the slowest speed, while 10 is the fastest. The default value is 5, which provides balanced sensitivity for most users. Adjusting this setting can improve usability when the default sensitivity feels too slow or too fast.
Gamepad auto-shoot
The Gamepad auto-shoot setting allows the user to adjust the auto-shoot speed for supported Bluetooth gamepads connected to the device. This setting controls how quickly the gamepad repeatedly sends the shoot command while the shoot button is held down.
0 means no auto-shoot, while 10 is the fastest auto-shoot speed. The default value is 0, which means that auto-shoot is disabled by default. Adjusting this setting can improve the gaming experience for titles that benefit from rapid firing. The auto-shoot feature is triggered when the user holds down the shoot button on the gamepad for more than two seconds.
Saving Bluetooth configuration
After adjusting the Bluetooth settings, click the Save settings button to store the configuration. This ensures that the selected Bluetooth mode and settings are applied every time the computer is powered on.
Pairing procedure
Although Bluetooth mode does not strictly require devices to be pre-paired in order to function, it is strongly recommended to pair them in advance to ensure a smoother user experience, since the pairing process can require more than one attempt.
It is important to understand that the Raspberry Pi Pico 2W uses the CYW43439 wireless chipset to serve a web page over 2.4 GHz WiFi while also pairing Bluetooth devices.
How is this possible?

The CYW43439 is a combo chip that supports both WiFi and Bluetooth, but it can only use one of the two wireless technologies at a time. The firmware switches between them as needed during pairing. Because of this, the pairing process can sometimes be less stable than a dedicated Bluetooth stack. Once the devices are paired, however, only the Bluetooth connection is used during normal runtime.
When pressing the Open pairing page button, the device shows a dedicated page with instructions to complete the pairing process.
Example of the Bluetooth pairing page before pairing has started:
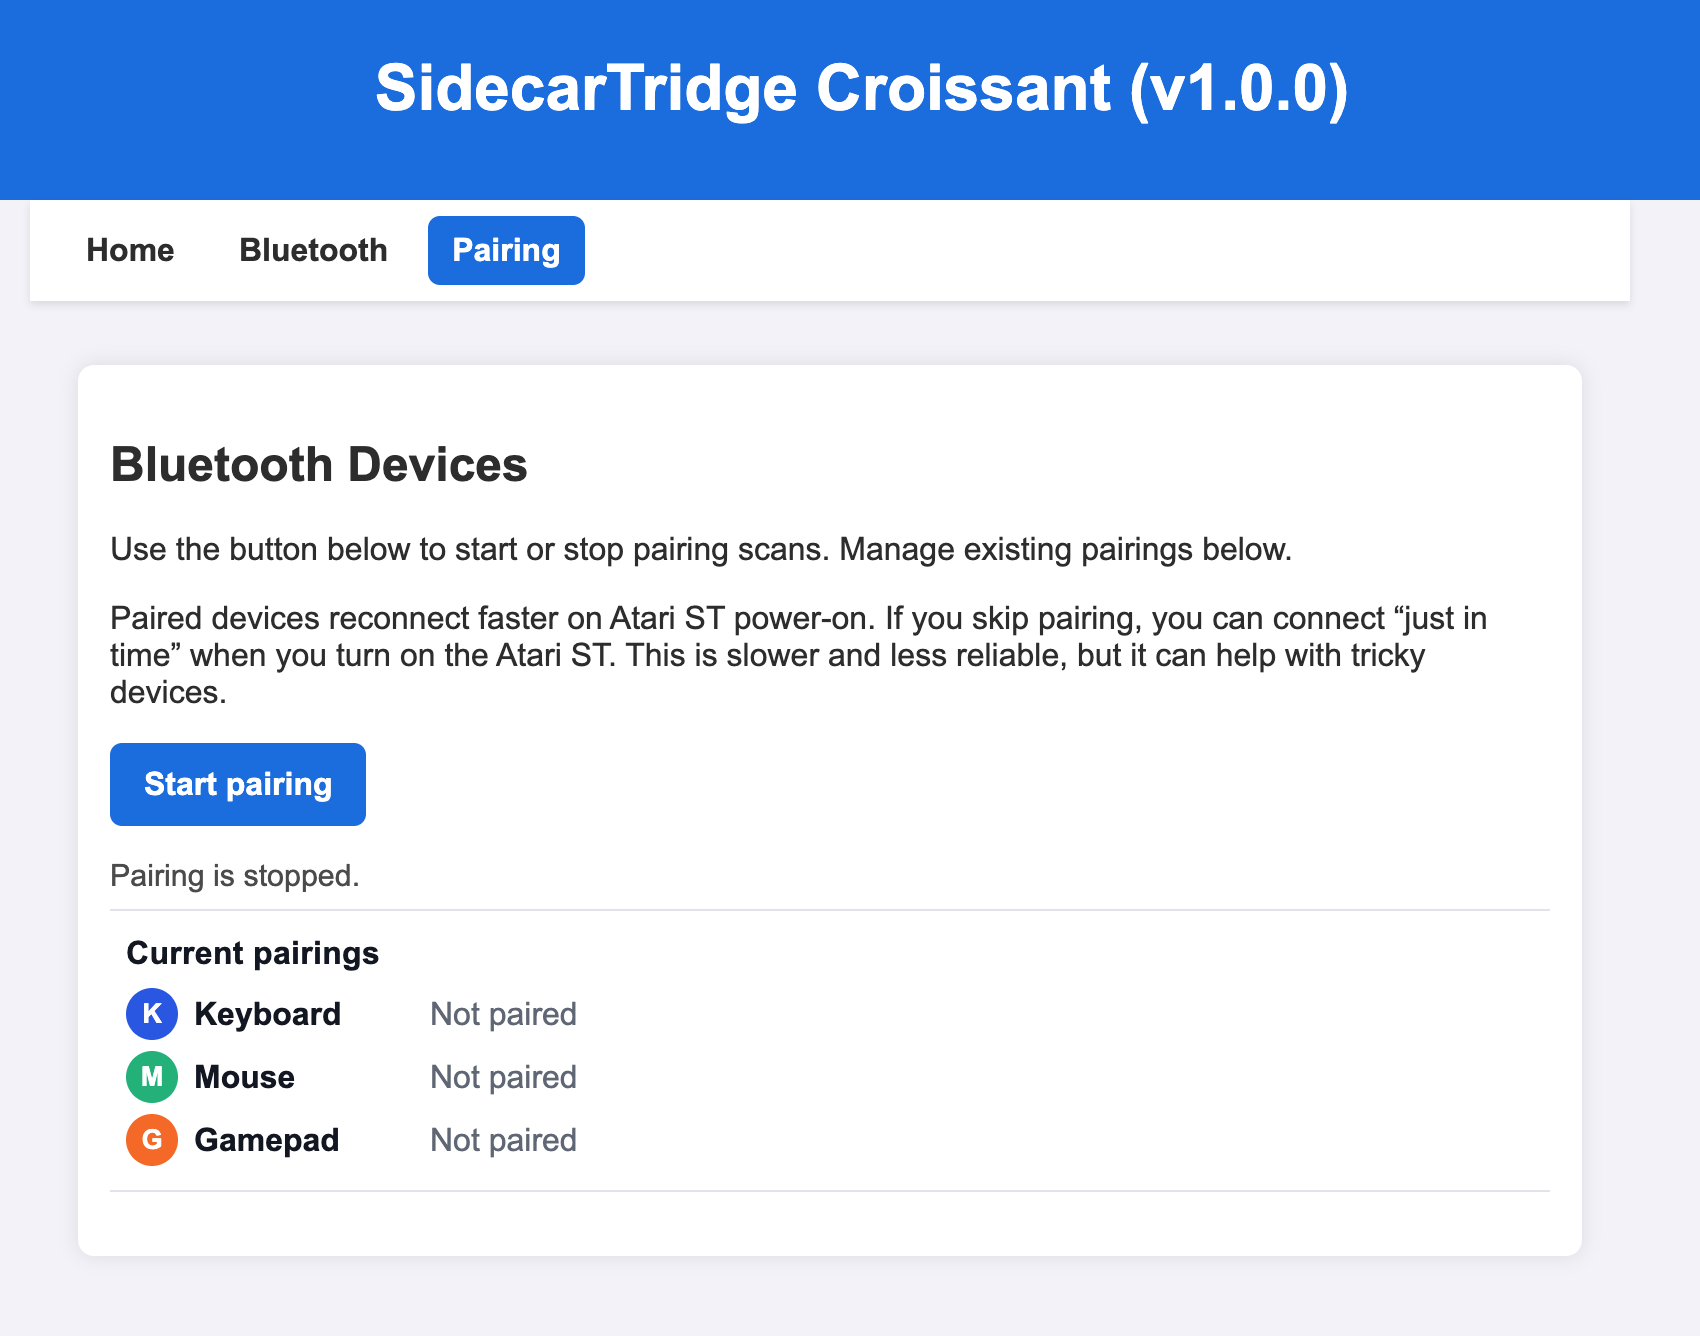
To complete the pairing process:
- Click
Start pairingto begin scanning for nearby Bluetooth devices.
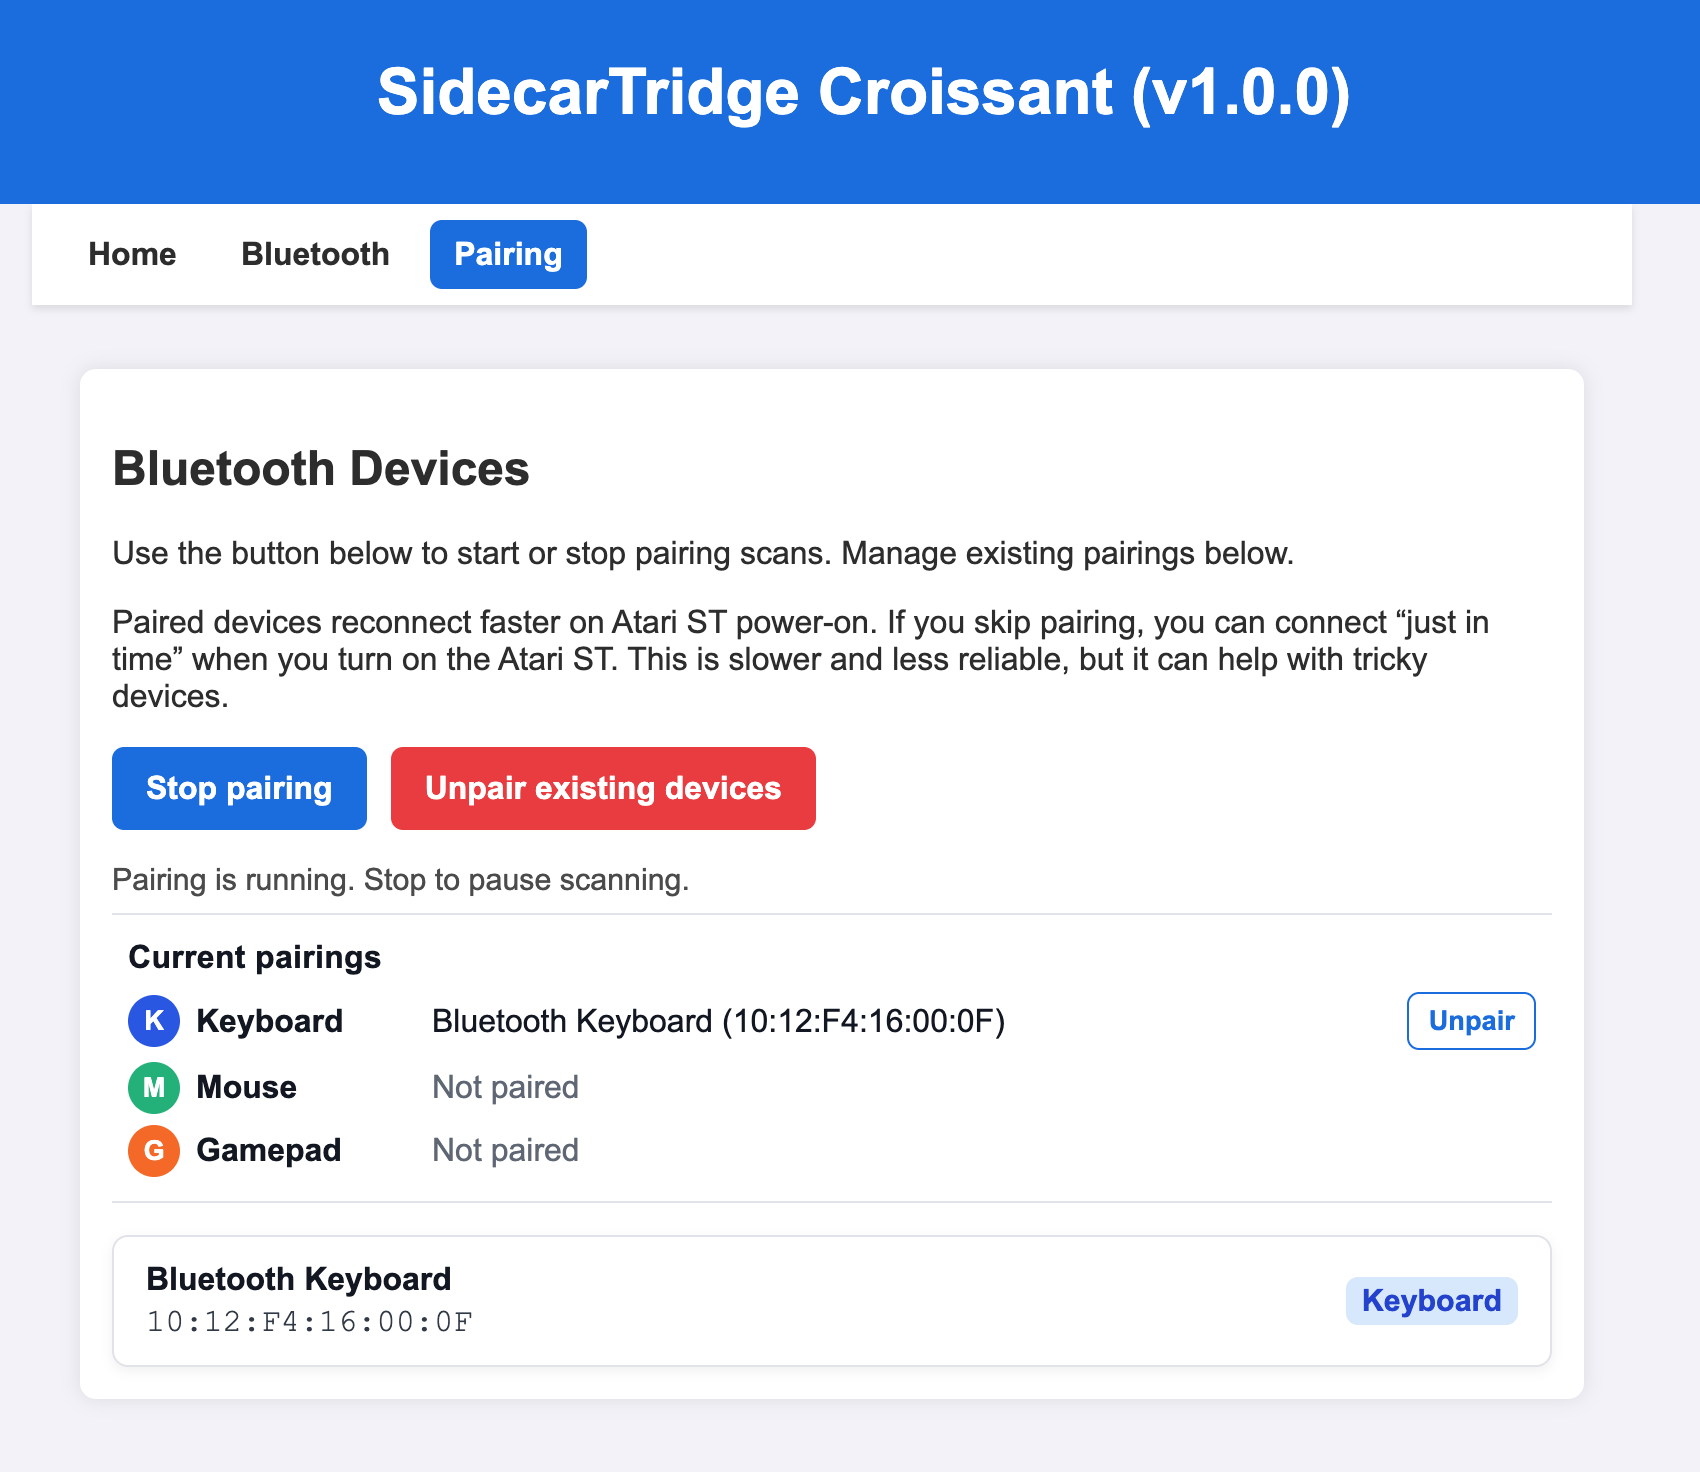
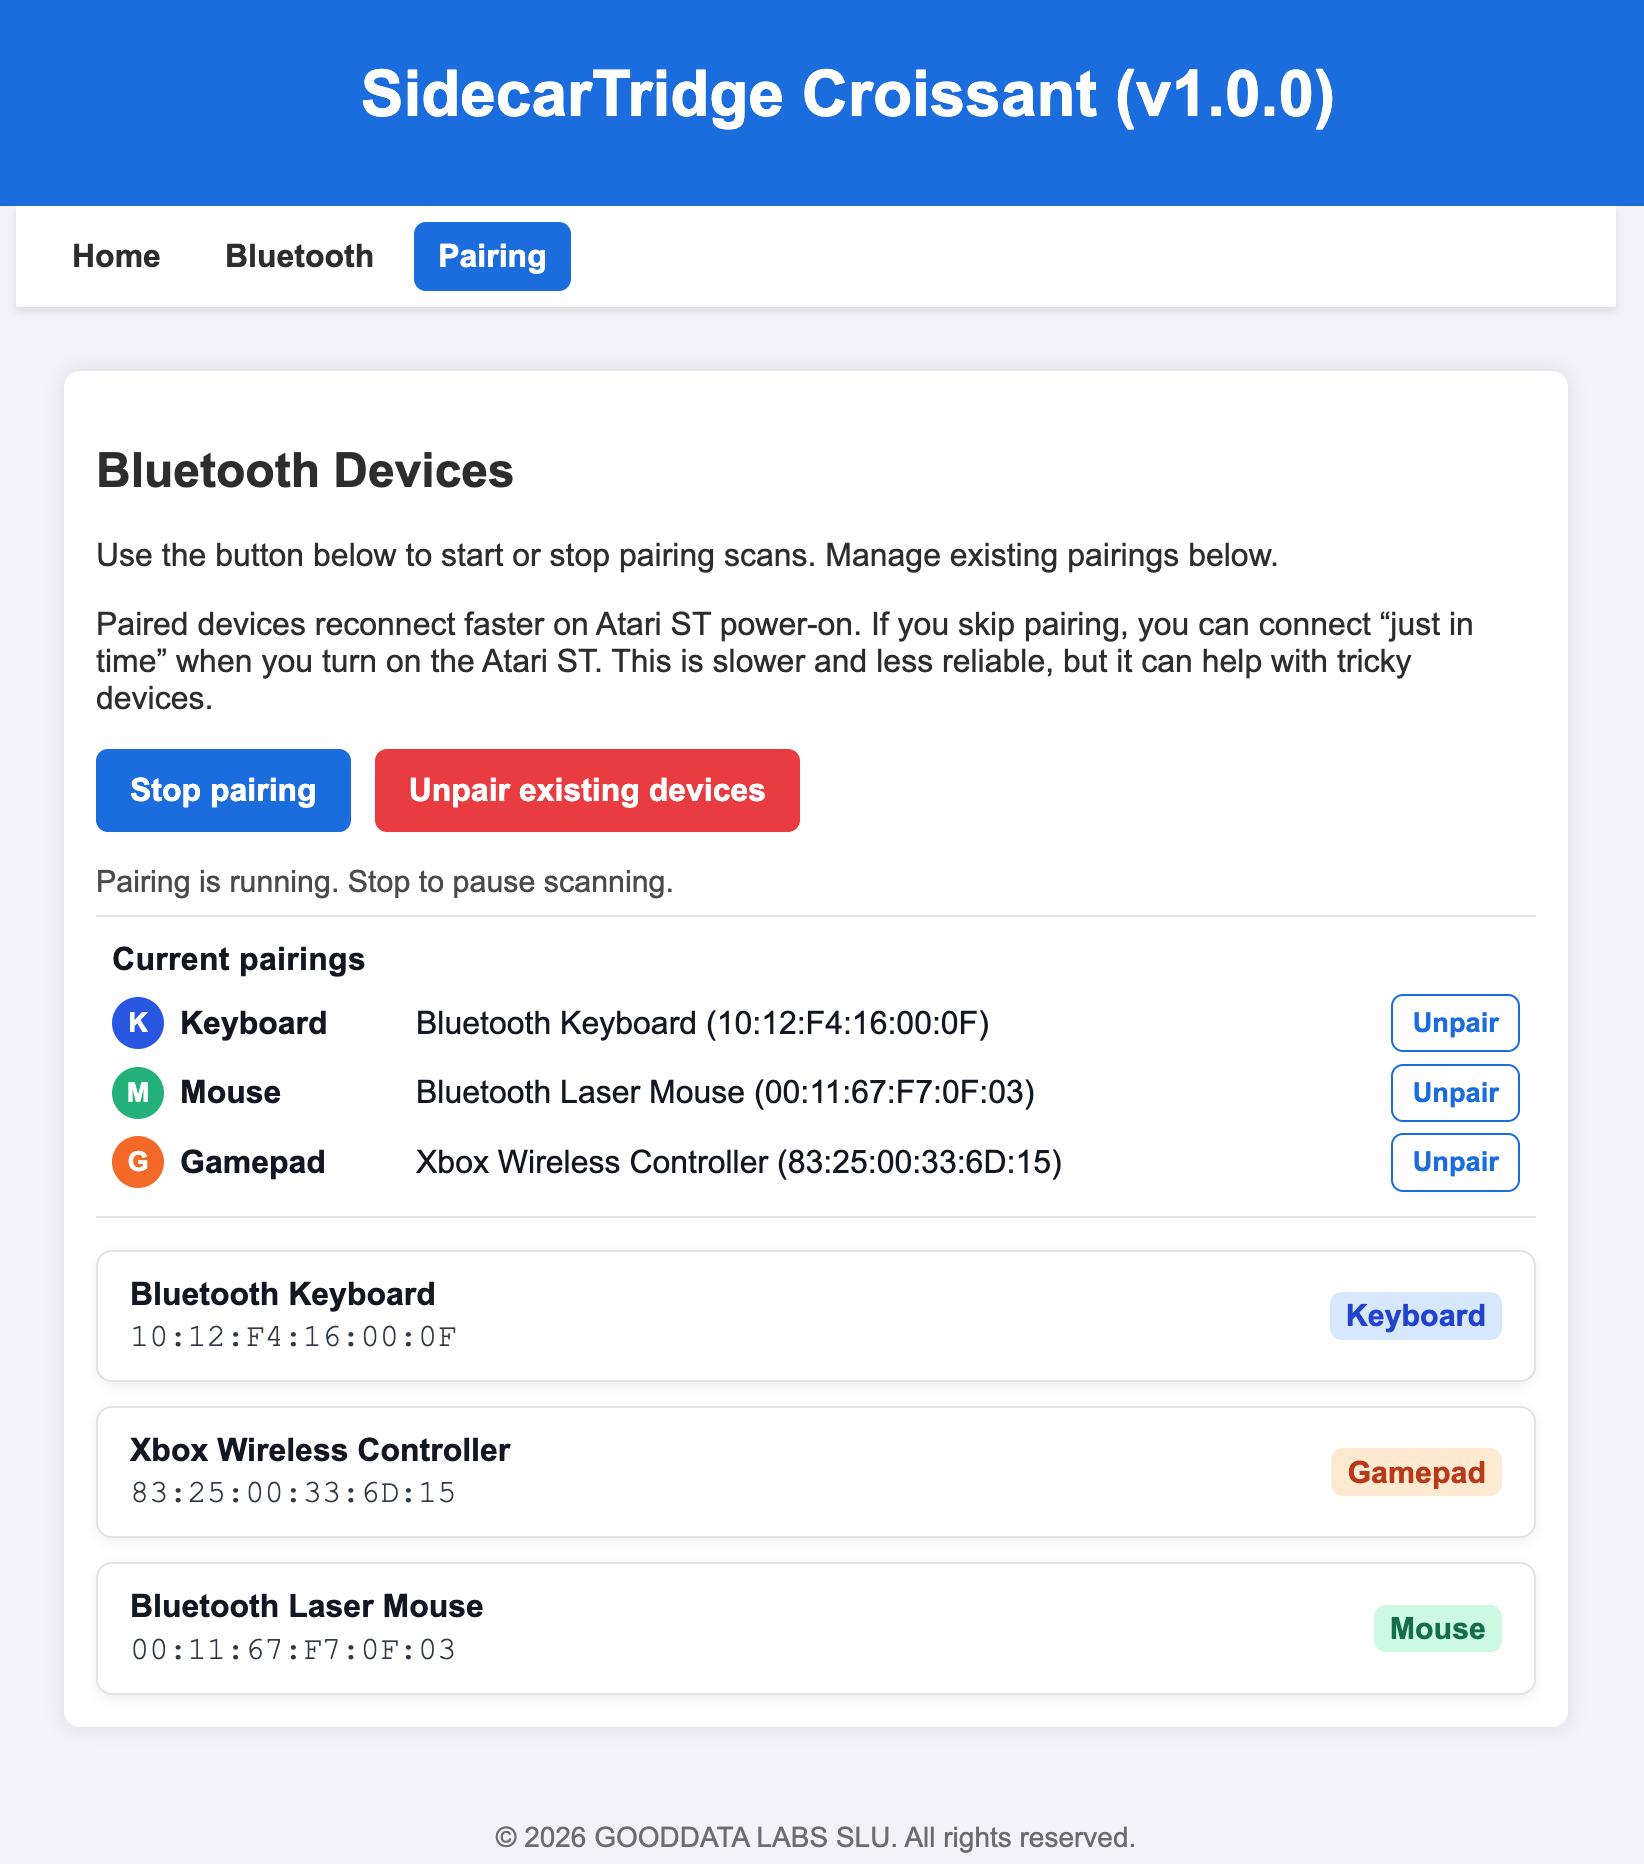
- When a compatible device appears in the lower device list, click that device to pair it.
- If the pairing succeeds, the device is moved into the
Current pairingssection and anUnpairbutton becomes available for that category.
- Once you are done, click
Stop pairingto stop the scan. - Return to the Bluetooth configuration page by clicking
Bluetoothin the navigation bar. - Verify that the paired devices are listed and click
Save settingsso that they are stored for the next power-on.
Powering on with paired Bluetooth devices
When the computer is powered on with Bluetooth mode active and paired devices available, the device will attempt to connect to those paired Bluetooth devices when they are powered on and in range. The expected behavior is:
- Power on the computer. The device starts in Bluetooth mode.
- The device listens for any paired Bluetooth devices that are attempting to connect.
- When a paired Bluetooth device attempts to connect, the device establishes the connection.
- The connected Bluetooth device can then be used as an input device for the Atari computer, emulating the original keyboard, mouse, or joystick functionality.
Bluetooth devices may require a few seconds to connect after power-on. If the devices do not connect, verify that they are powered on, within range, and that Bluetooth mode is active on the device.
Powering on without paired Bluetooth devices
If the computer is powered on with Bluetooth mode active but without paired Bluetooth devices, the device will simply wait for Bluetooth devices to connect. The expected behavior is:
- Power on the computer. The device starts in Bluetooth mode.
- The device listens for any Bluetooth devices that are attempting to connect.
- Since there are no paired devices, no connection is established and the device remains idle until a Bluetooth device attempts to connect.
- If a Bluetooth device is powered on and attempts to connect while the computer is running, the device will establish a connection and allow that Bluetooth device to be used as an input device for the Atari computer.
Connection may take longer after power-on when there are no paired devices. If Bluetooth input will be used regularly, pairing the devices in advance through the web interface is recommended.
Keyboard behavior in Bluetooth mode
When Bluetooth mode is active and a Bluetooth keyboard is connected, the device emulates the original Atari keyboard while allowing the use of a Bluetooth keyboard, with a few differences that should be taken into account. The main differences relate to keyboards that do not include a numeric keypad or function key area. The combination ALTERNATE + INSERT is particularly important because it emulates the left mouse button. If the keyboard layout in use does not provide the expected key, the user can still access this combination by pressing ALTERNATE + BACKSPACE instead.
Mouse behavior in Bluetooth mode
When Bluetooth mode is active and a Bluetooth mouse is connected, the device emulates the original Atari mouse functionality while allowing the use of the Bluetooth mouse.
Some very low-cost mice use simplified Bluetooth implementations that may not be fully compatible with the device. If you have trouble connecting a Bluetooth mouse, report it and try a different model or brand.
Gamepad behavior in Bluetooth mode
When Bluetooth mode is active and a supported Bluetooth gamepad is connected, the device emulates the original Atari joystick functionality while allowing the use of the Bluetooth gamepad. The gamepad is mapped to the joystick port as follows:
- D-pad: mapped to the joystick directional inputs (up, down, left, right)
- A, B, X, Y buttons: mapped to the joystick fire button
USB mode
Applicable hardware:
- Soufflè only
This section covers the use of USB input devices connected to the Soufflè hardware.
Overview
Example USB mode page on Soufflè:
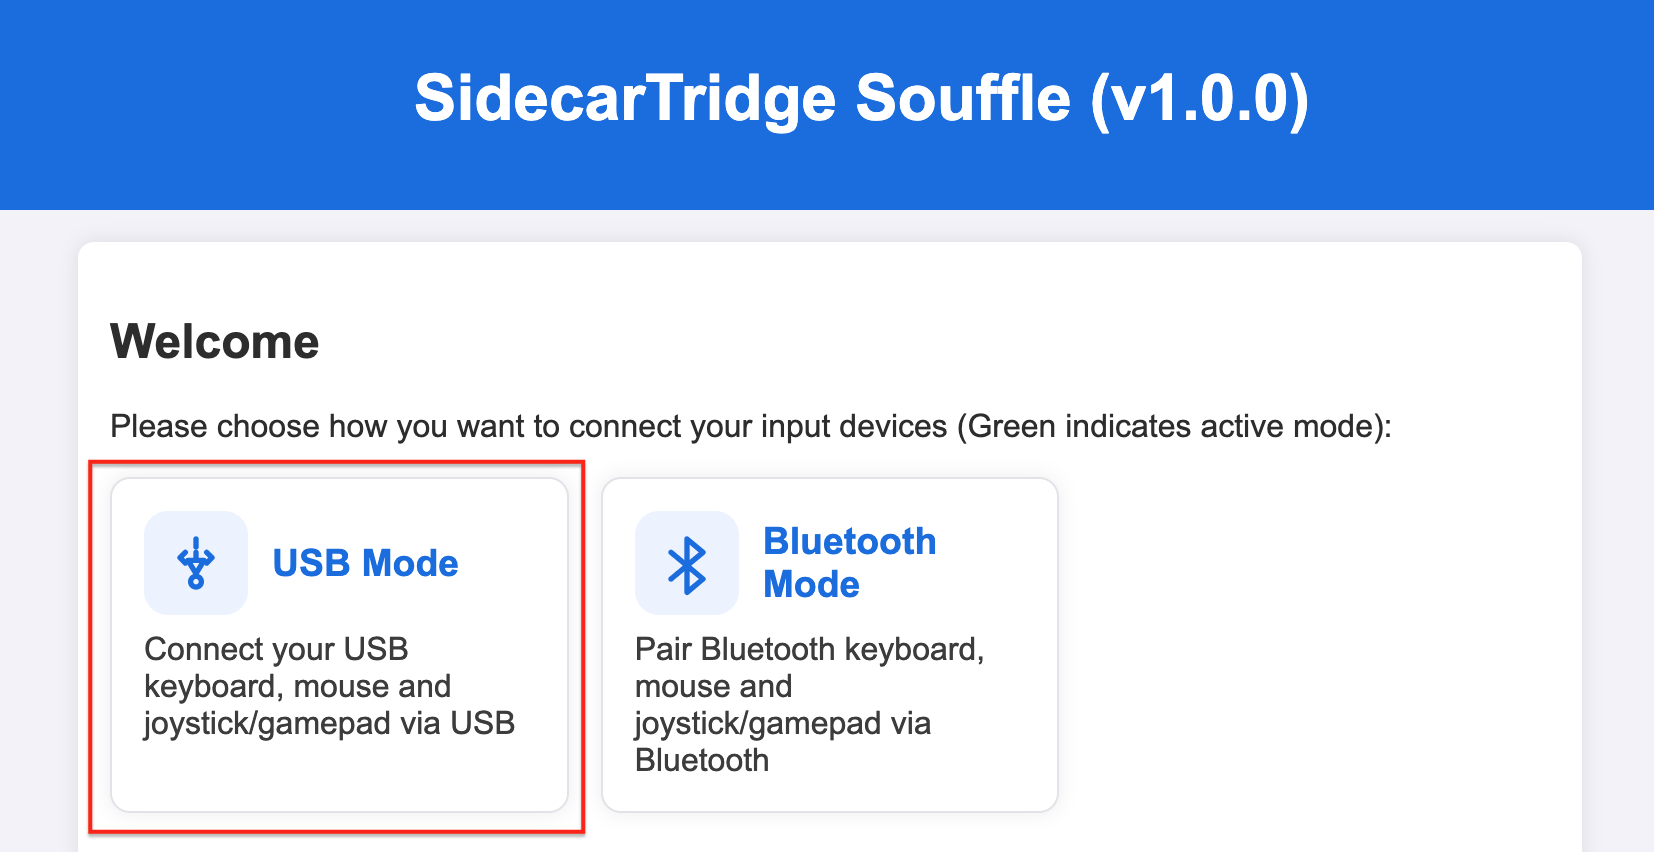
USB mode allows the SidecarTridge Keyboard Emulator to use modern wired USB input devices, such as keyboards, mice, and joystick or gamepad devices connected to Soufflè.
In this mode, the device emulates the original Atari keyboard, mouse, or joystick functionality while taking input from supported USB peripherals.
This mode is intended for users who prefer a wired setup without Bluetooth pairing, wireless range limitations, or radio-frequency interference.
The current implementation is intended for standard USB input peripherals. Compatibility depends on the behavior of the USB device connected to Soufflè, so some devices may work better than others.
A notable feature of USB mode is support for native Atari input devices, such as mice and joysticks that use the original 9-pin connector, together with modern USB input devices. This allows users to combine the original hardware experience with the convenience of modern peripherals.
Configure USB mode
To enable USB mode, open the USB configuration page in the web interface on Soufflè.
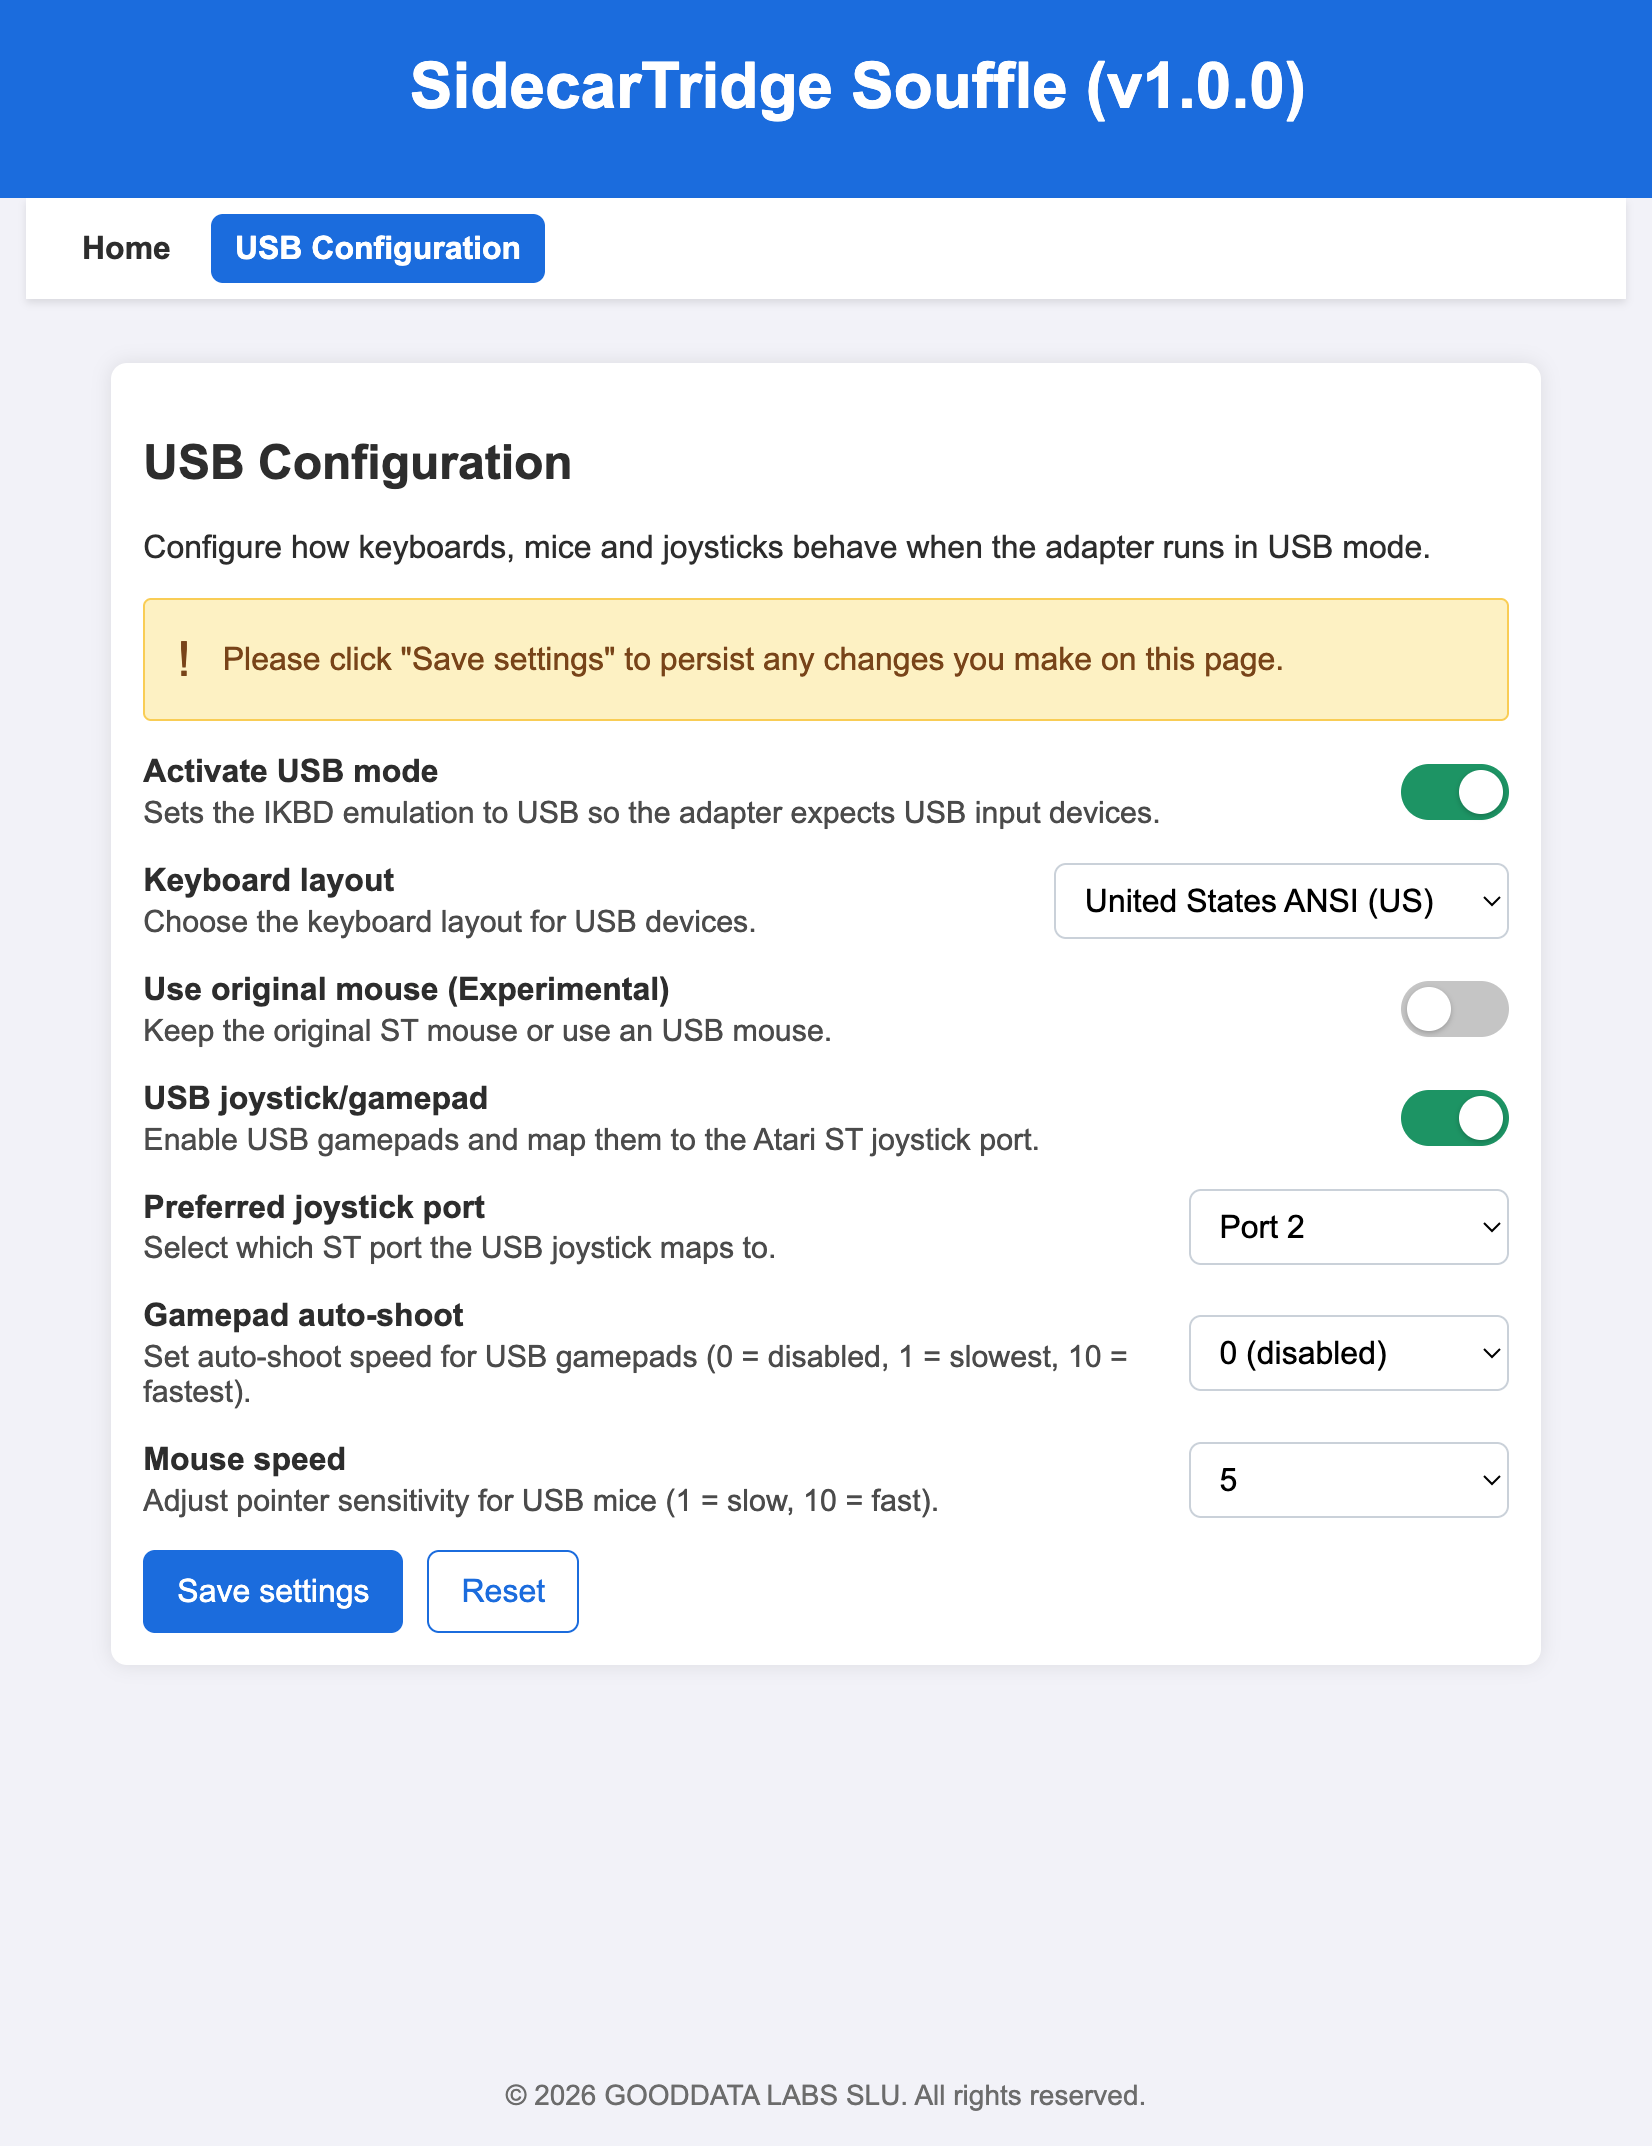
The USB configuration page provides these controls:
Activate USB modeenables USB input mode.Keyboard layoutselects the keyboard layout used by USB keyboards.Use original mouse (Experimental)keeps the original ST mouse active instead of using a USB mouse.USB joystick/gamepadenables USB joystick and gamepad input.Preferred joystick portselects which Atari ST joystick port the USB joystick maps to.Gamepad auto-shootsets the auto-shoot speed used by supported USB gamepads.Mouse speedadjusts pointer sensitivity for USB mice.
To configure USB mode:
- Enable
Activate USB mode. - Select the required
Keyboard layout. - Enable
Use original mouse (Experimental)if you want to keep using the original ST mouse instead of a USB mouse. - Enable
USB joystick/gamepadif you want to use a USB joystick or gamepad. - Select the
Preferred joystick portfor the USB joystick or gamepad. - Adjust
Gamepad auto-shootandMouse speedas needed. - Click
Save settingsto store the configuration.
If you made changes that you do not want to keep, click Reset before saving.
After that, every time the computer is powered on, the device will start in USB mode.
Keyboard layout
The Keyboard layout setting allows the user to select the keyboard layout used by USB keyboards connected to the device. This setting is important to ensure that the keys on the USB keyboard correspond correctly to the expected key codes sent to the Atari computer.
In the latest firmware version, the following keyboard layouts are supported:
- United States ANSI
- France ISO (FR)
- Germany ISO (DE)
- United Kingdom ISO (GB)
- Spain ISO (ES)
- Italy ISO (IT)
Additional layouts may be added in future firmware versions. If you need a layout that is not currently supported, please open an issue in the GitHub repository so it can be prioritized based on demand.
In normal use, the selected USB keyboard layout should match the TOS keyboard layout. For example, if the system uses a French TOS, the USB keyboard should be configured as France ISO (FR). This ensures that the USB keyboard generates the correct characters and key codes when used with the Atari computer.
Mouse speed
The Mouse speed setting allows the user to adjust pointer sensitivity for native and USB mice connected to the device. This setting controls how fast the mouse pointer moves on the screen in response to physical mouse movement.
1 is the slowest speed, while 10 is the fastest. The default value is 5, which provides balanced sensitivity for most users. Adjusting this setting can improve usability when the default sensitivity feels too slow or too fast.
Gamepad auto-shoot
The Gamepad auto-shoot setting allows the user to adjust the auto-shoot speed for supported USB gamepads connected to the device. This setting controls how quickly the gamepad repeatedly sends the shoot command while the shoot button is held down.
0 means no auto-shoot, while 10 is the fastest auto-shoot speed. The default value is 0, which means that auto-shoot is disabled by default. Adjusting this setting can improve the gaming experience for titles that benefit from rapid firing. The auto-shoot feature is triggered when the user holds down the shoot button on the gamepad for more than two seconds.
Use original mouse (Experimental)
The Use original mouse (Experimental) setting allows the user to keep using the original ST mouse instead of a USB mouse. When this option is enabled, the device does not emulate Atari mouse functionality for USB mice and instead passes through the signals from the original ST mouse.
USB joystick/gamepad
The USB joystick/gamepad setting allows the user to enable USB joystick and gamepad input. When this option is enabled, the device emulates original Atari joystick functionality for supported USB gamepads connected to the device. The gamepad is mapped to the joystick port selected in the Preferred joystick port setting.
Saving USB configuration
After adjusting the USB settings, click the Save settings button to store the configuration. This ensures that the selected USB mode and settings are applied every time the computer is powered on.
Powering on with connected USB devices
When the computer is powered on with USB mode active and supported USB devices already connected, the expected behavior is:
- Power on the computer. The device starts in USB mode.
- Soufflè initializes the connected USB devices.
- Once initialization is complete, the USB devices can be used as Atari input devices.
This mode is generally more direct than Bluetooth mode because it does not require wireless reconnection.
Powering on without connected USB devices
If the computer is powered on with USB mode active but no USB devices are connected, the device simply starts in USB mode and waits for compatible USB peripherals to be attached.
Supported USB devices can then be connected later and used once they are detected by the emulator.
Keyboard behavior in USB mode
When USB mode is active and a USB keyboard is connected, the device emulates the original Atari keyboard while taking input from the USB keyboard.
The goal is to preserve normal Atari keyboard behavior while allowing the use of a modern wired keyboard, but a few differences should be taken into account. The main differences relate to keyboards that do not include a numeric keypad or function key area. The combination ALTERNATE + INSERT is particularly important because it emulates the left mouse button. If the keyboard layout in use does not provide the expected key, the user can still access this combination by pressing ALTERNATE + BACKSPACE instead.
Mouse behavior in USB mode
When USB mode is active and a USB mouse is connected, the device emulates the original Atari mouse while taking movement and button input from the USB mouse.
If mouse behavior does not feel correct, try a different USB mouse model to rule out device-specific compatibility issues.
Gamepad behavior in USB mode
When USB mode is active and a supported USB joystick or gamepad is connected, the device emulates the original Atari joystick behavior while allowing the use of the USB gamepad. The gamepad is mapped to the joystick port selected in the Preferred joystick port setting as follows:
- D-pad: mapped to the joystick directional inputs (up, down, left, right)
- A, B, X, Y buttons: mapped to the joystick fire button
Support depends on the USB device and on the way it exposes its input controls to the emulator.
USB power caveats or limitations
USB mode is only available on Soufflè.
USB devices draw power from the Soufflè USB port, so they will not operate if the computer is powered off. This means that USB devices only work when the computer is powered on and when the computer power supply is healthy. A weak or unstable power supply can cause USB devices to disconnect or fail to operate correctly.
As a general rule, avoid power-hungry USB devices such as USB hubs, keyboards with RGB lighting, or gaming mice with additional features. USB mode is intended for simple input devices such as basic keyboards, mice, and gamepads. If you need to use more complex USB devices, consider Bluetooth mode instead.
Advanced network configuration
Applicable hardware:
- Croissant
- Soufflè
This section is reserved for network-related configuration beyond the first-time setup described in Getting Started.
Overview
Example advanced networking page used by Croissant and Soufflè:

The advanced network settings control how the device web interface connects to Wi-Fi.
The two available connection modes are:
Access Point: the device creates its own Wi-Fi network for direct accessStation: the device joins an existing Wi-Fi network
Both modes share these common settings:
Host name: hostname used by mDNS and local network namingPassword: Wi-Fi password used by the selected modeAuth mode: Wi-Fi authentication mode used by the selected mode
Any changes on this page must be stored with Save settings.
Access Point settings
In Access Point mode, the device creates its own Wi-Fi network so that a computer, tablet, or phone can connect directly to it.
Example of the advanced network page in Access Point mode:
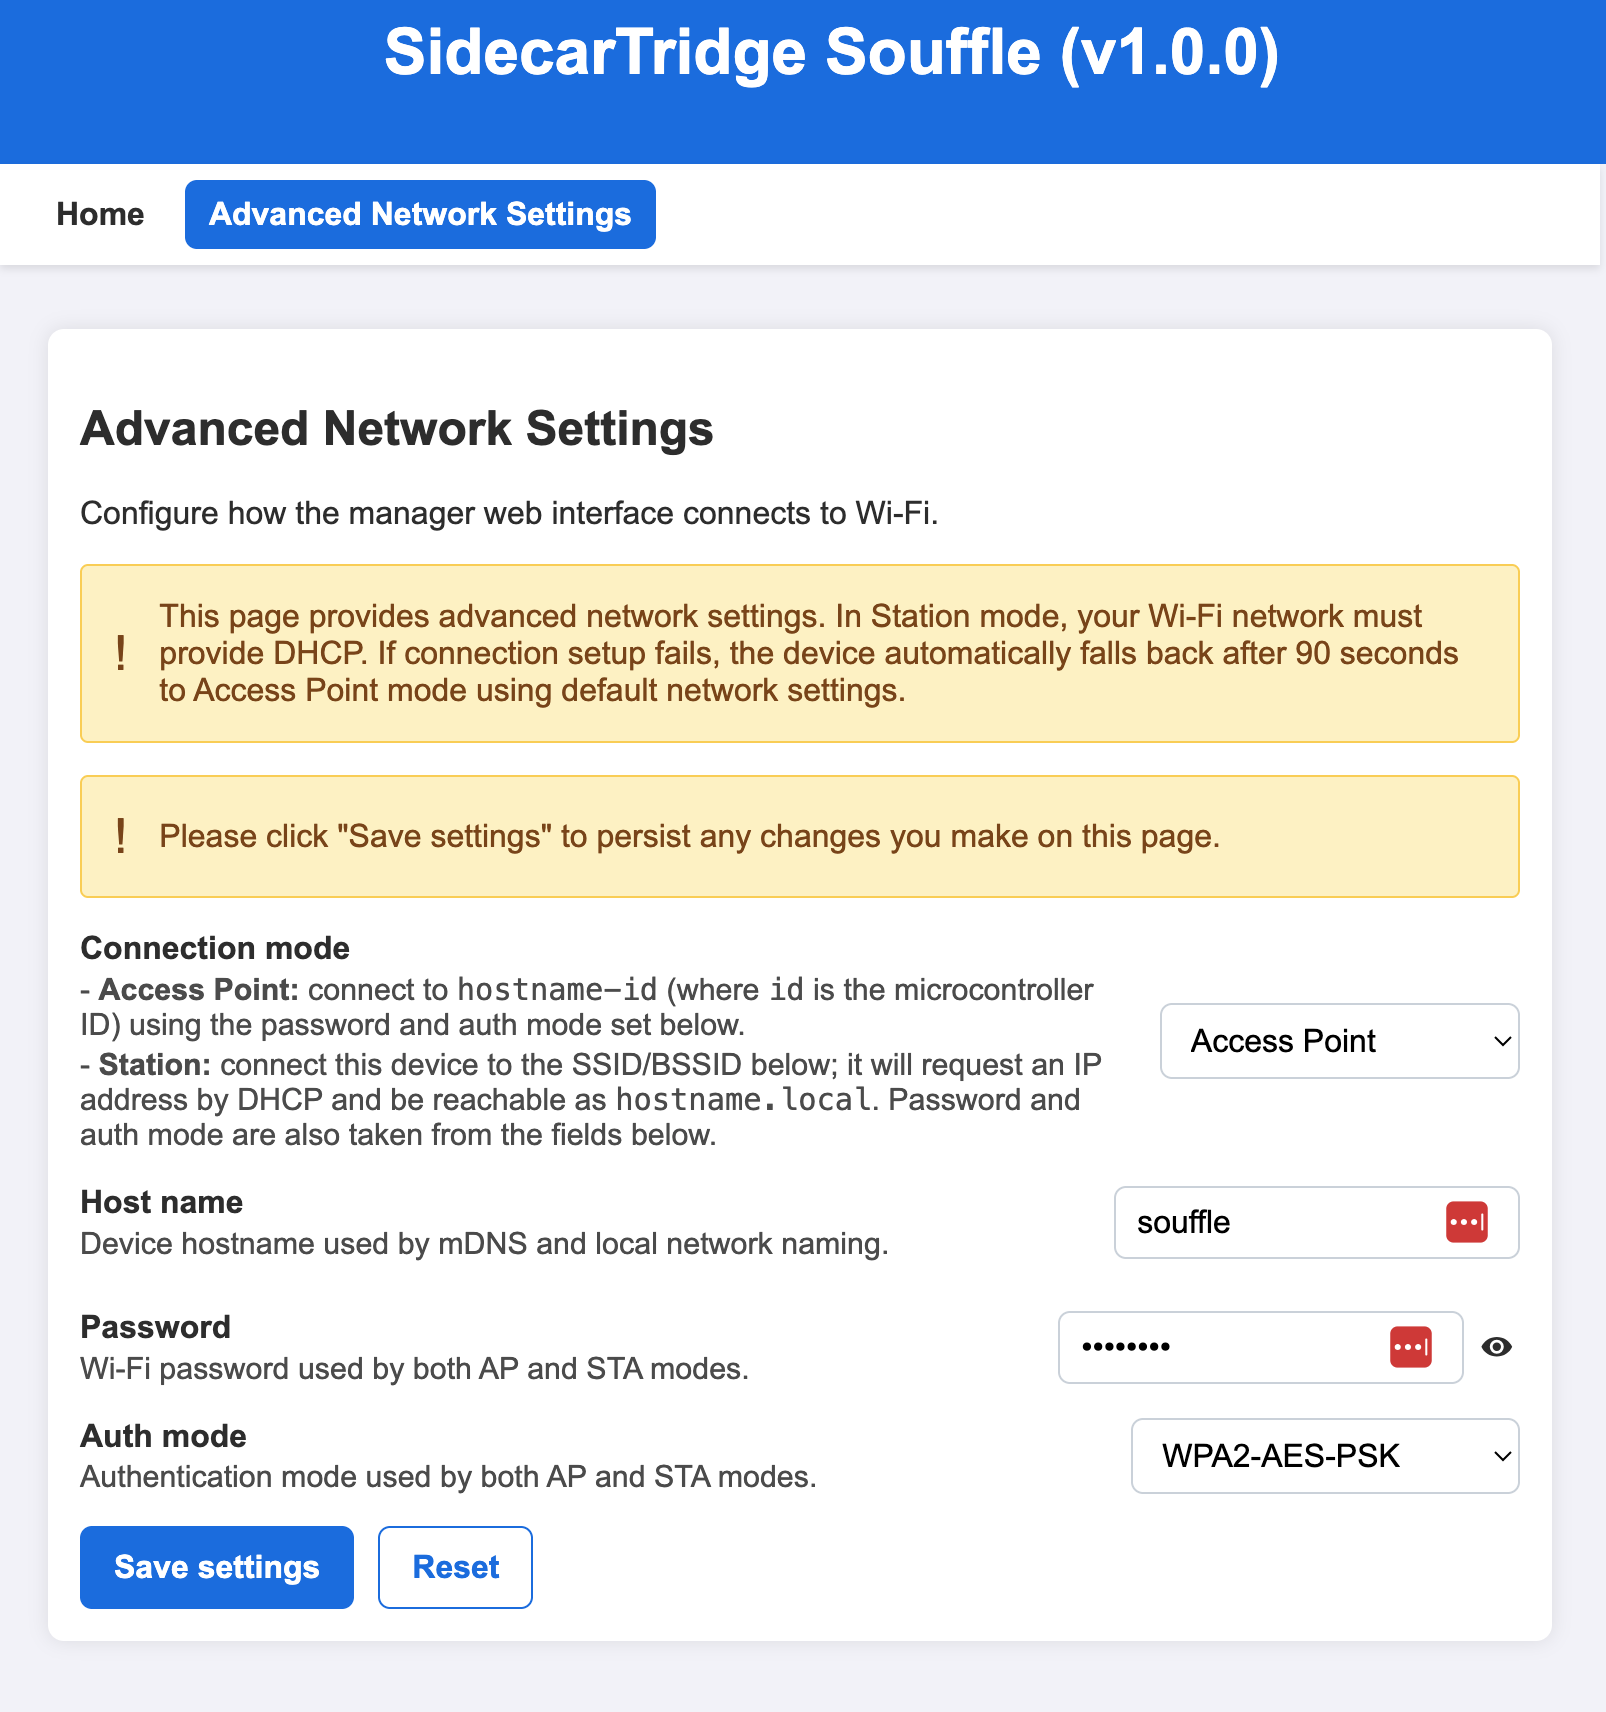
When Connection mode is set to Access Point, the page exposes these settings:
Host name: base name used for the device network identityPassword: password required to join the device networkAuth mode: authentication mode for the device network
In Access Point mode, the device is intended to be reached directly by joining its own Wi-Fi network.
Use Save settings to store the configuration, or Reset to discard unsaved changes.
Station settings
In Station mode, the device connects to an existing Wi-Fi network instead of creating its own.
Example of the advanced network page in Station mode:
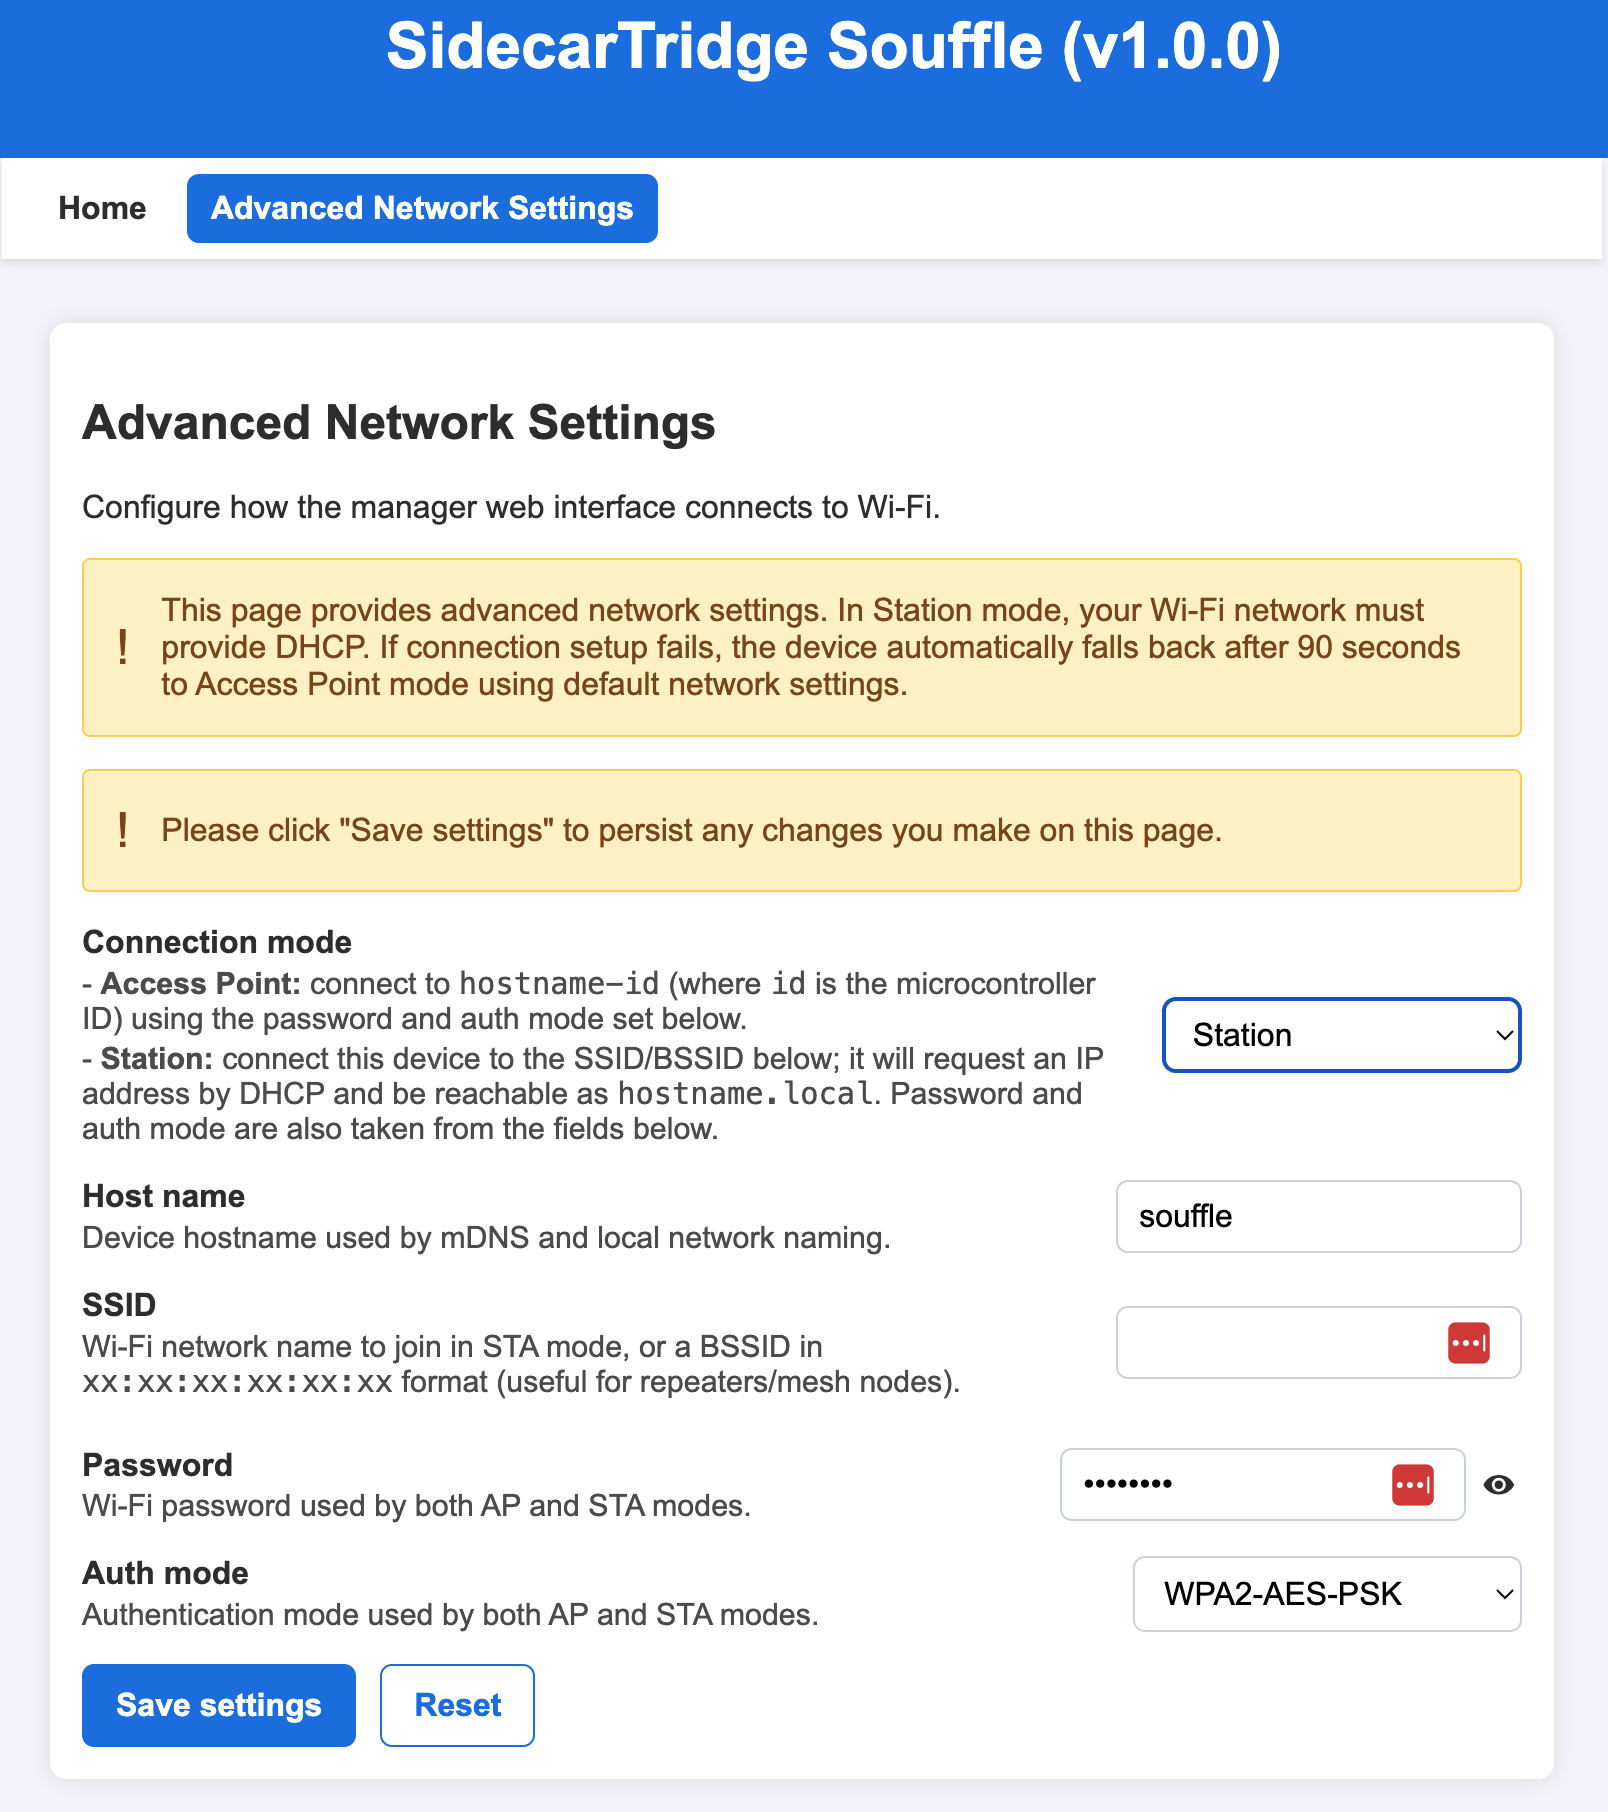
When Connection mode is set to Station, the page provides these settings:
Host name: hostname used by mDNS and local network namingSSID: Wi-Fi network name to join, or a BSSID for more advanced setupsPassword: password of the Wi-Fi network to joinAuth mode: authentication mode used by that Wi-Fi network
In Station mode, the device requests an IP address by DHCP and should be reachable as hostname.local on the local network.
If Station mode setup fails, the device automatically falls back to Access Point mode after 90 seconds using the default network settings.
Use Save settings to store the configuration, or Reset to discard unsaved changes.
Why use each configuration
Use Access Point mode when:
- you want to keep using the default network mode of the device
- you want a direct connection to the device without depending on an existing Wi-Fi network
- you are performing first-time setup or recovery
- you want the simplest possible way to reach the web interface
Use Station mode when:
- you want the device to join your normal Wi-Fi network
- you want to reach the web interface from another device already connected to that network
- you have several devices and want to rename each one with a host name that is easier to remember
- you prefer to access the device through
hostname.localwithout switching to a dedicated device network