SidecarTridge Multi-device Test ROM
Source code CHANGELOG Report BUG v0.0.3
This is a microfirmware application for the SidecarTridge Multi-device, that contains a test program designed to validate the functionality and performance of the Sidecartridge Multidevice.
Table of contents
Introduction
The SidecarTridge Multidevice emulates the behavior of Atari ST cartridges and the ROM memory contained. To ensure its flawless operation and accurate timing, this test suite offers several read tests, presenting the results visually on-screen.
For those new to the Sidecart ROM Emulator, we recommend visiting the official SidecarTridge Multidevice website for a comprehensive overview.
Getting Started
Atari ST / MegaST / STE / MegaSTE / TT / Falcon
To get started with the testing process, you’ll need two main files, both of which can be located in the Release page of this repository:
TESTSCRT.TOS: The primary test program, which should be transferred to your Atari ST machine.TESTROM.BIN: A binary file containing randomized data across two ROM banks. This file needs to be copied to your Atari ST computer and should be placed in the same directory asTESTSCRT.TOS. It is essential for the test program to function correctly.
SidecarTridge Multidevice Setup with a functional computer
This version of the test suite is designed to run on the SidecarTridge Multidevice with the new firmware v2.0 or later. Once you are in the management web interface of the SidecarTridge Multidevice also called the Booster Configurator, you have to find the Multidevice Test microfirmware, download it, and launch it. This microfirmware is designed to work with the programs located in the Atari computer.
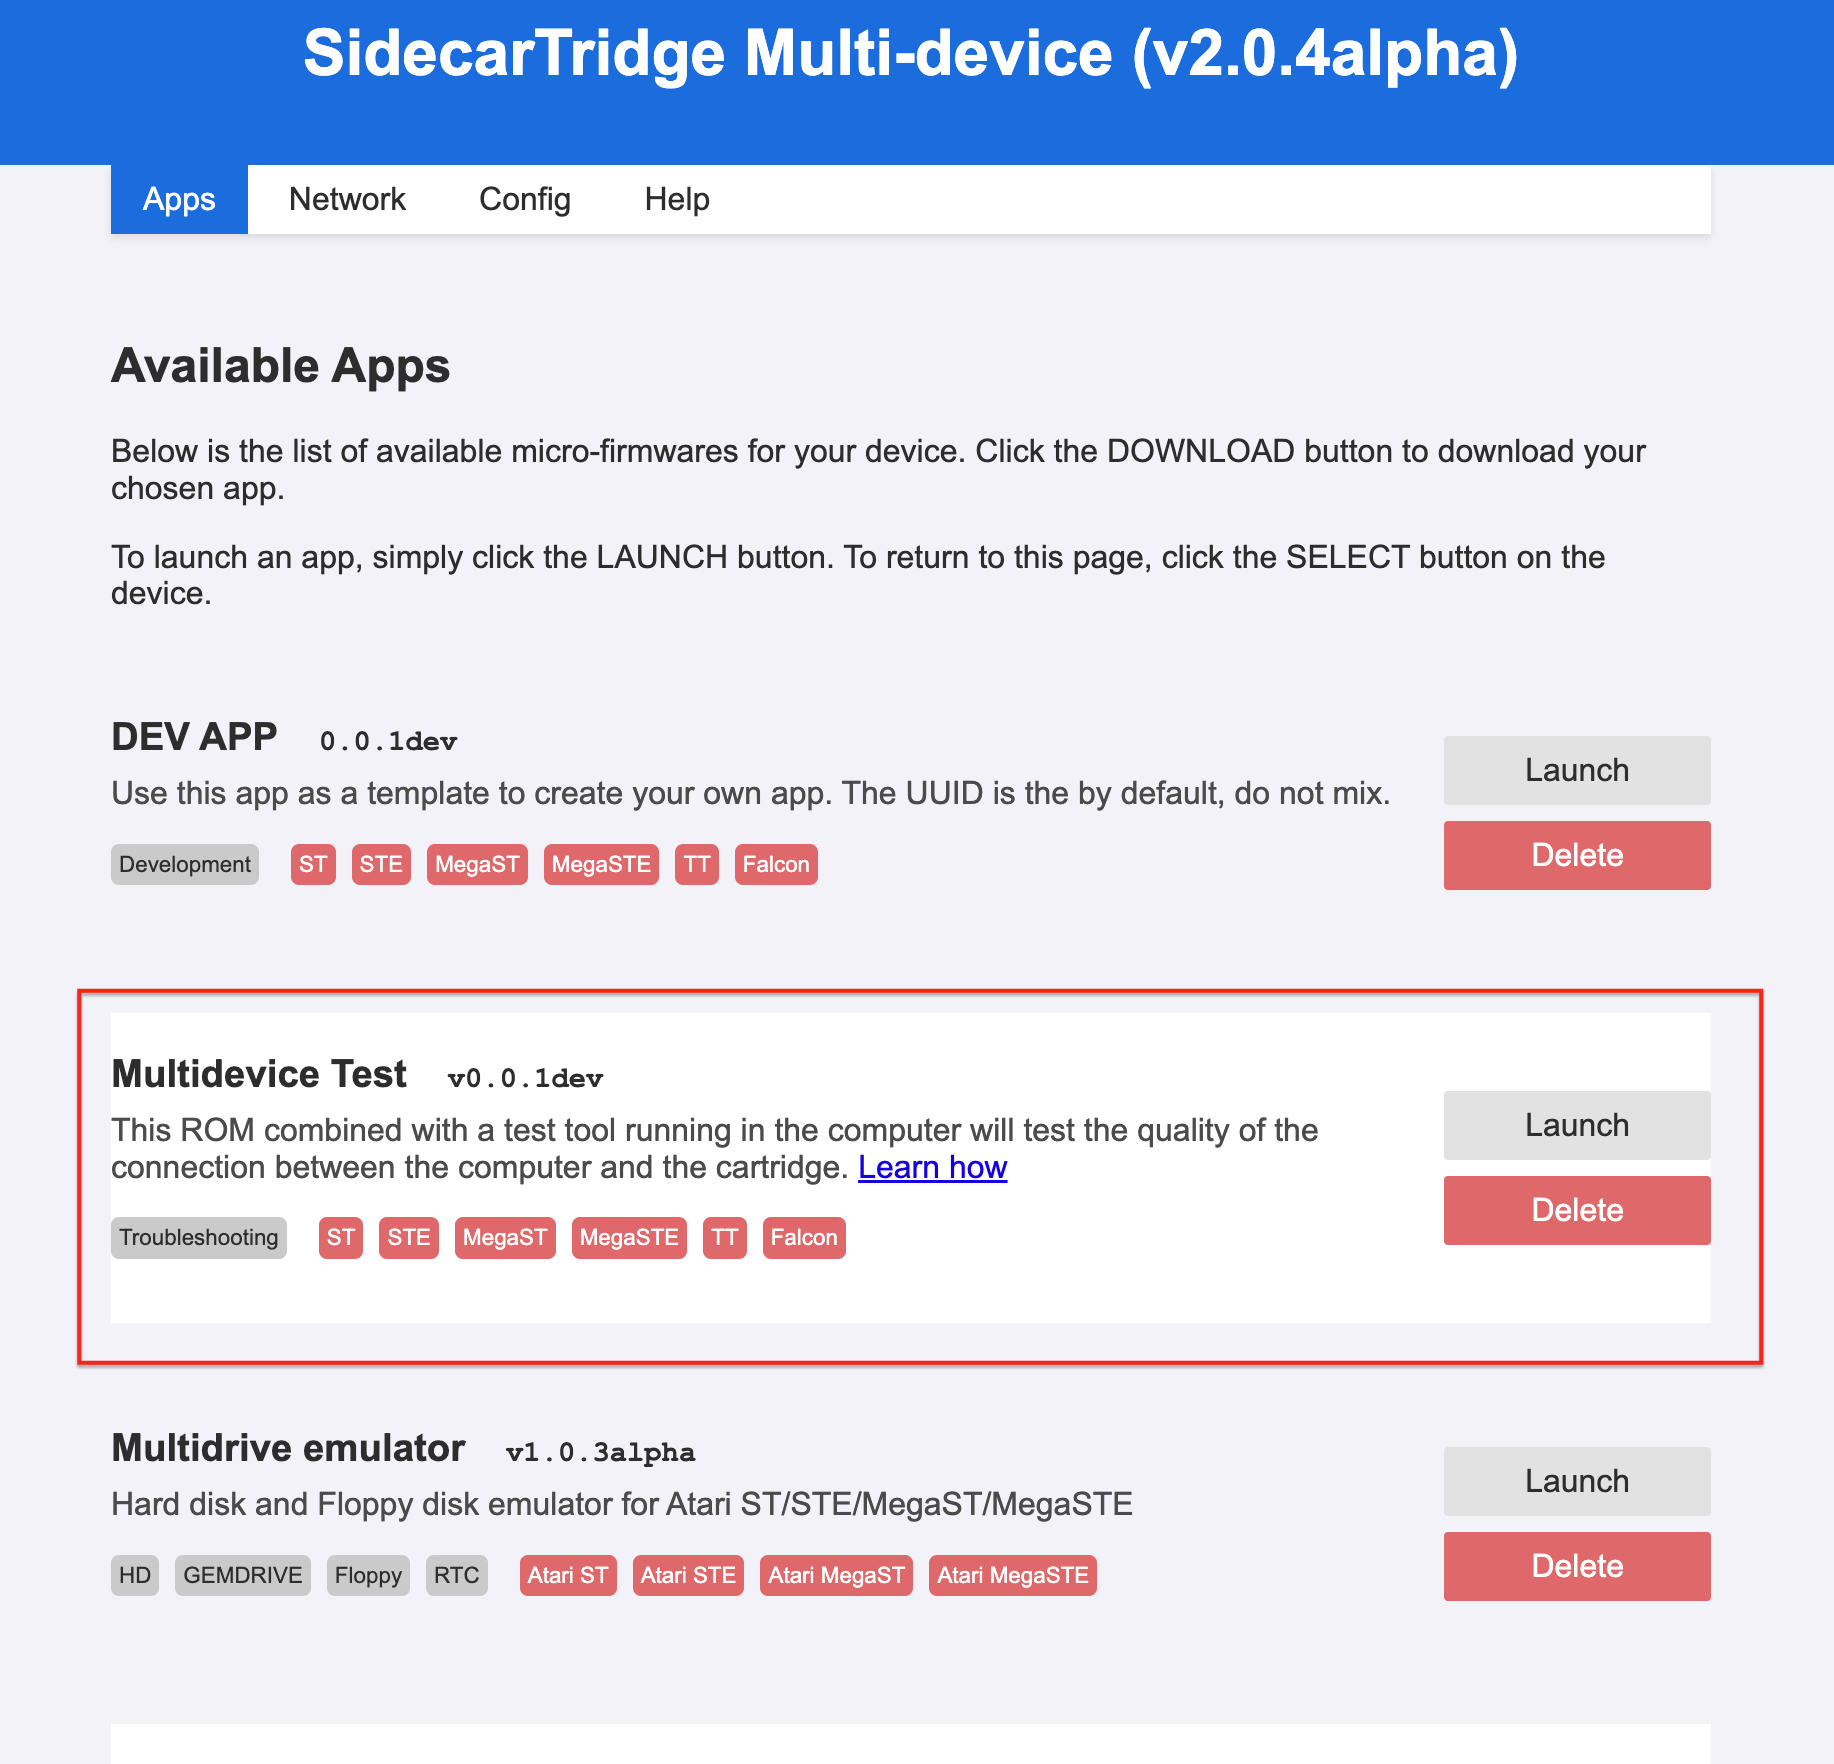
After launching the Multidevice Test, your computer should start as if nothing happened. You can now run the TESTSCRT.TOS program from your Atari ST computer.
SidecarTridge Multidevice Setup with a failed computer <-> device connection
One of the reasons for running this test suite is to verify the connection between the SidecarTridge Multidevice and your Atari ST computer. So, if your computer is not running correctly with the device connected, you can still run the test suite.
The SidecarTridge Multidevice with the new firmware v2.0 can start and can be configured without the Atari ST computer. Please follow first the steps to connect the SidecarTridge Multidevice to your WiFi network using the factory configuration mode as explained in the Initial Factory Configuration section. Once you have access to the management web interface of the SidecarTridge Multidevice, please follow these steps:
- The device will now be accessible via the WiFi network you selected as
http://sidecart.localorhttp://<IP_ADDRESS_OF_THE_DEVICE>. If the DNS or mDNS of your network cannot be configured to resolvesidecart.local, you should find the IP address of the device in your router’s DHCP client list. - Once you have access to the management web interface, you have to download the
Multidevice Testmicrofirmware and launch it. This microfirmware is designed to work with the programs located in the Atari computer. - Power off the SidecarTridge Multidevice and connect it to your Atari ST computer. Remove the micro-USB cable to guarantee that the device is powered by the Atari ST computer.
- Power on the Atari ST computer. The SidecarTridge Multidevice should start automatically, and you can run the
TESTSCRT.TOSprogram from your Atari ST computer.
Output of the test program
The test program will output the results of the various tests it performs on the SidecarTridge Multidevice.
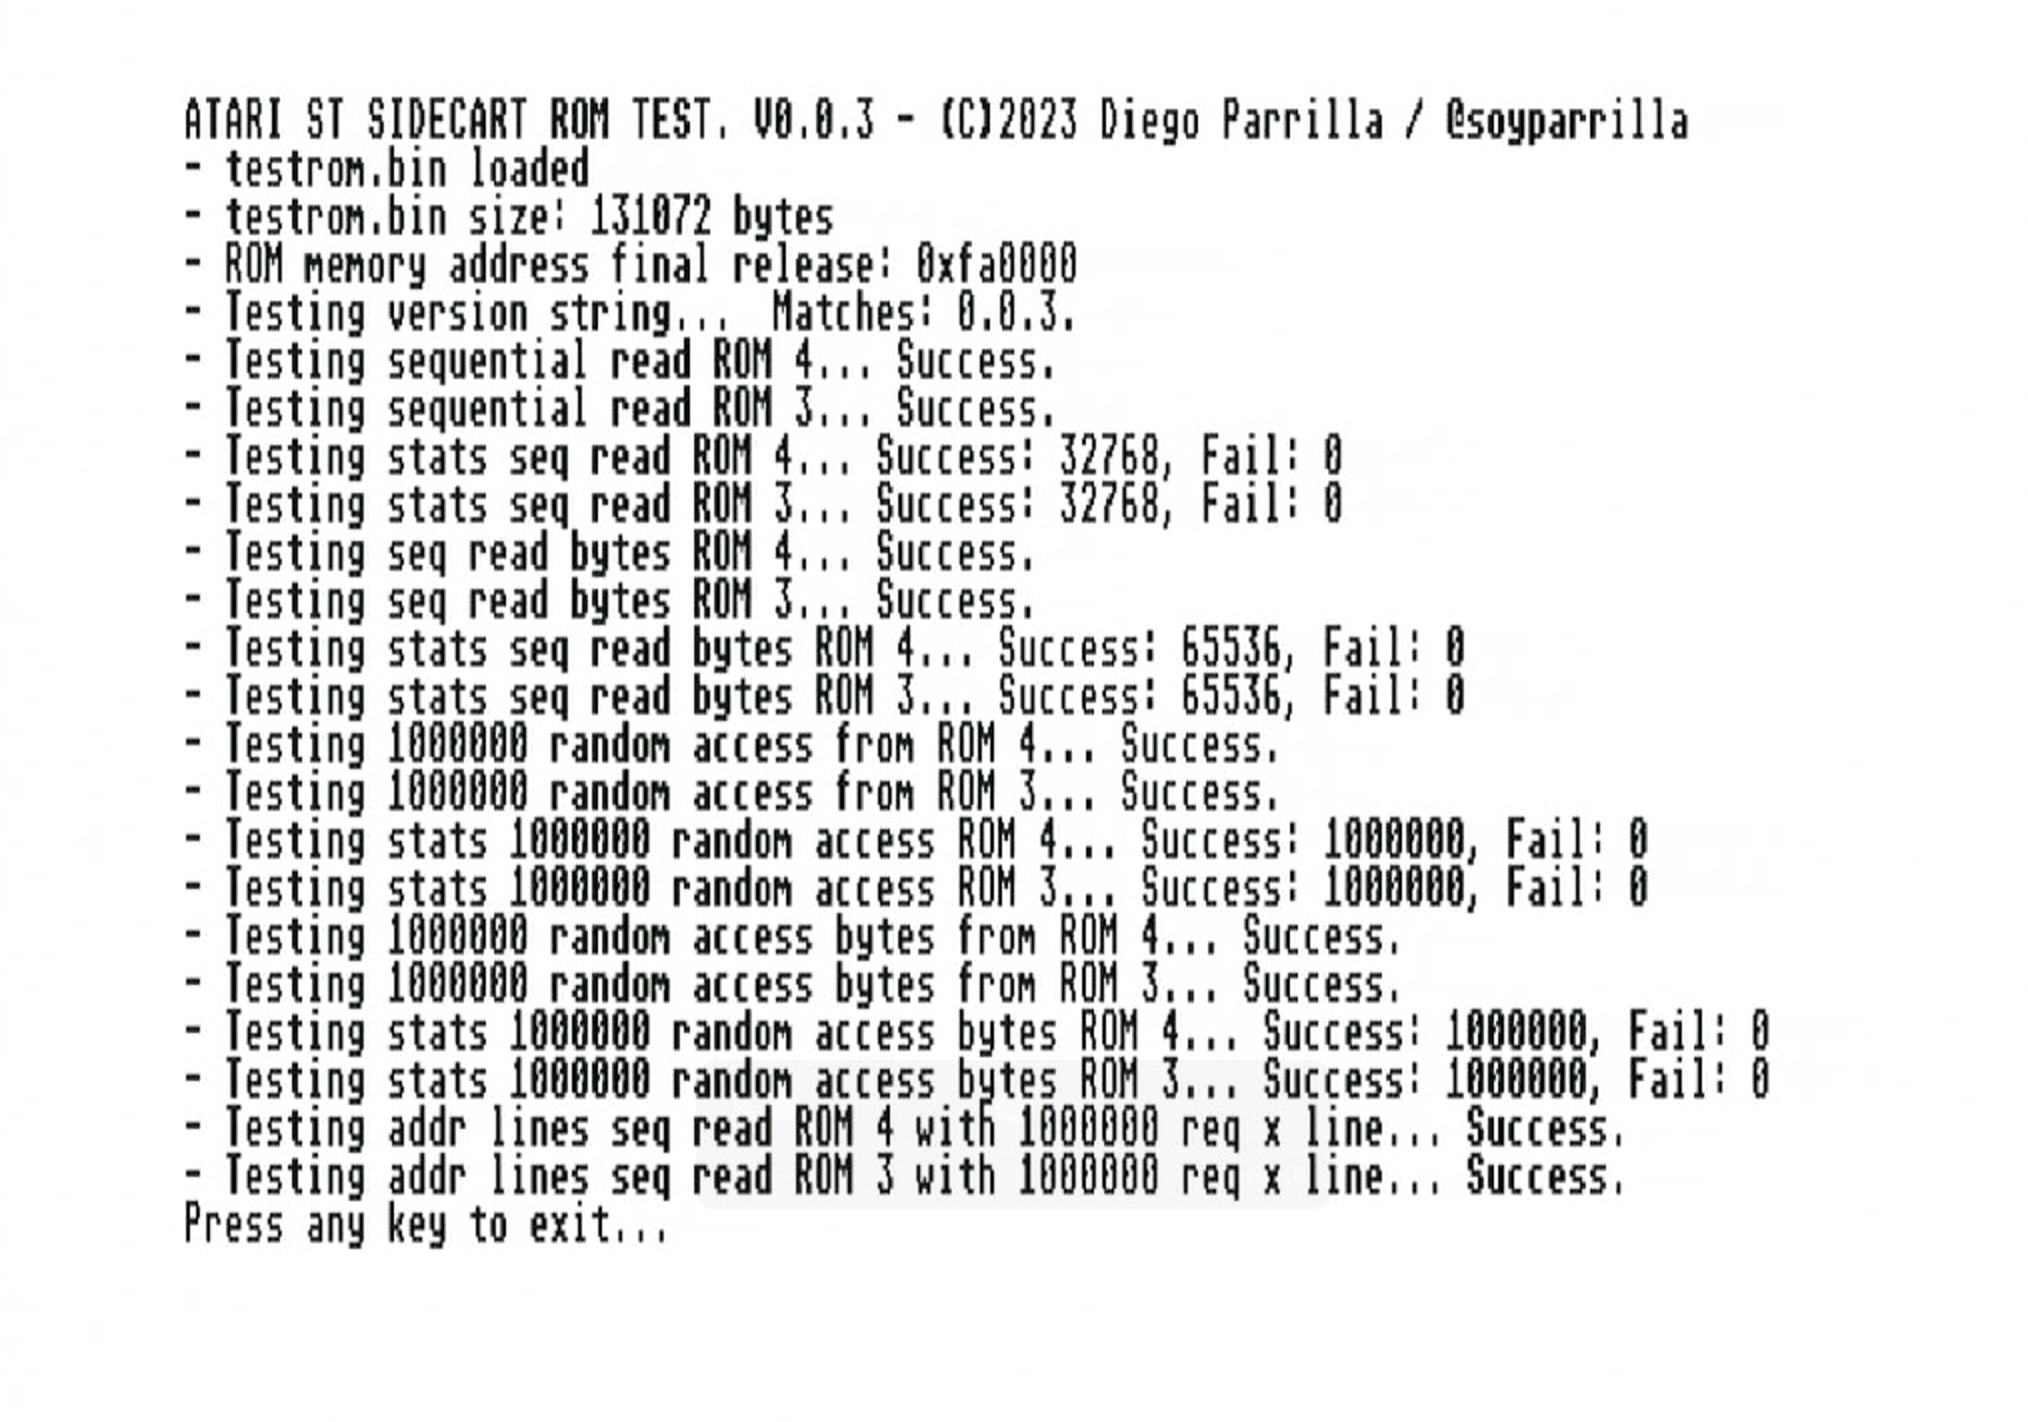
The program will perform the following tests. It will take several minutes:
- Test version string: Displays the version of the test program and in the ROM image. It must match the version of the test program.
- Test sequential read in ROM 3 and ROM 4: Reads the ROM 3 and ROM 4 banks sequentially and displays the results. The expected result is that all bytes read match the expected value.
- Test sequential read of bytes in ROM 3 and ROM 4: Reads the ROM 3 and ROM 4 banks sequentially, byte by byte, and displays the results. The expected result is that all bytes read match the expected value.
- Test random read in ROM 3 and ROM 4: Reads the one million times random words from the ROM 3 and ROM 4 banks and displays the results. The expected result is that all bytes read match the expected value.
- Test random read of bytes in ROM 3 and ROM 4: Reads the one million times random bytes from the ROM 3 and ROM 4 banks and displays the results. The expected result is that all bytes read match the expected value.
- Test sequential read in ROM 3 and ROM 4 incrementing the address by address lines: Reads the ROM 3 and ROM 4 banks sequentially, incrementing the address by address lines, and displays the results. The expected result is that all bytes read match the expected value. This test is designed to figure out if some of the address lines are not working correctly and expose the problem.
A healthy SidecarTridge Multidevice should pass all tests without any errors. If any test fails, it indicates a potential issue with the device, its connection, or the computer itself.
## Return to the Booster Configurator
To return to the Booster Configurator, press the SELECT button on your SidecarTridge Multi-device. This will exit the test program and bring you back to the main menu of the Booster Configurator.
📄 License
This project is licensed under the GNU General Public License v3.0.
See the LICENSE file for full terms.
🤝 Contributing
Made with ❤️ by SidecarTridge
Previous: Drives Emulator Main Next: File & Download Manager